![]() This week, we provide you with a short tutorial explaining the basis of the use of Yoctopuce modules into LabVIEW. We limit ourselves to a very simple application: turning on and off a light depending on the ambient light level.
This week, we provide you with a short tutorial explaining the basis of the use of Yoctopuce modules into LabVIEW. We limit ourselves to a very simple application: turning on and off a light depending on the ambient light level.
Principle
We are going to use a Yocto-Light-V3 and a lamp controlled by a Yocto-PowerRelay-V3 which is itself driven through Wifi thanks to a YoctoHub-Wireless-SR. Remember, a few months ago, we built small boxes which do exactly that. The light sensor is directly connected by USB to the computer running the application.
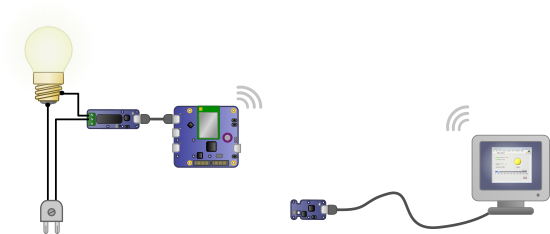
Basic outline
For the code to be easier to understand, we gave the logical name AmbientLight to the light sensor, and LampControl to the relay. You can use the VirtualHub application to assign a logical name to any Yoctopuce function.
Groundwork
You'll need the Yoctopuce library for LabVIEW, which you can download from our library page. It's a large ZIP file that you can unzip wherever you want. The archive contains a directory for each LabVIEW version. In each of these directories, there is a VI called install.vi. Open it with LabVIEW to install the library. If you want to know what this installer does exactly, you can find the details in this post. When the installation is done, you can find the Yoctopuce library in the "function/addons/Yoctopuce" menu.
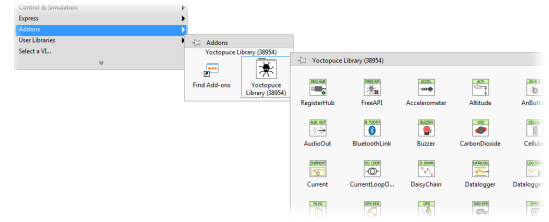
The Yoctopuce library for LabVIEW
The software
User interface
The most important part of the interface is a slider which allows the user to define the threshold below which the lamp must be turned on. We added a few indicators to signal:
- if the light sensor is present (online)
- if the relay is present (online)
- the value of the sensor
- the state of the relay, that is whether the lamp is on or off
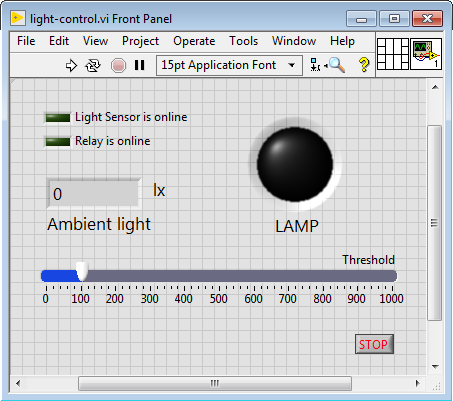
The user interface
Initialization
The first step is to initialize the Yoctopuce API by signaling that we want to use a local USB connection and a network connection. To do so, we use the YRegisterHub twice: once with the "usb" parameter and the second time with the IP address of our YoctoHub-Wireless-SR, that is 192.168.1.95.
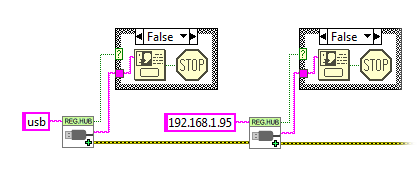
Initialization of the code
Note that if the call to YRegisterHub fails, the success output is set to false and the reason of the problem is contained in the error msg output. The most common error message is "Another process is already using yAPI". Indeed, there can be only one application at a time which uses the Yoctopuce modules directly by USB. You can find more information on the ins and outs of this technical limitation in this post.
Reading the sensor
Reading the light sensor is performed simply with the YLightSensor VI to which we give as parameter the logical name of the sensor, that is "AmbientLight". We obtain as output the state of the sensor and its value.
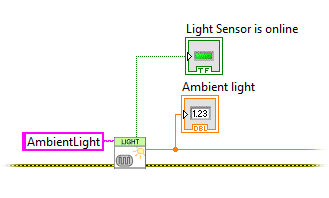
Querying the light sensor
Computing the state of the relay
Rather that changing the state of the lamp as soon as the value of the light sensor crosses the threshold, we use a Schmitt trigger. This prevents the lamp control from oscillating when the ambient light oscillates around the threshold. We selected a +/- 5% margin for the Schmitt trigger.
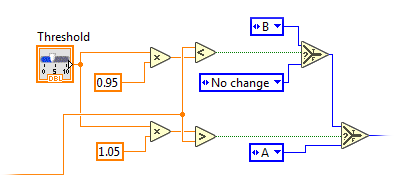
Computing the state of the relay with a Schmitt trigger
Driving the relay
To drive the relay, we use the "YRelay" VI to which we give as parameter the logical name of the relay and the relay state that we just computed.
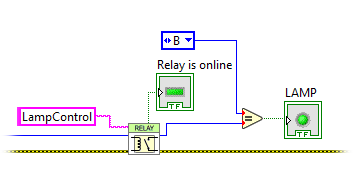
Driving the relay
We retrieve the output of the relay and we use it to display the state of the lamp in the interface. We then only need to put the code in a loop and to add a small detail...
Freeing the API
When an application ends, it is indispensable to free the Yoctopuce API with the YFreeAPI VI. If you forget to do so, you risk to find yourselves with a blocked Yoctopuce API as long as you haven't quit LabVIEW.
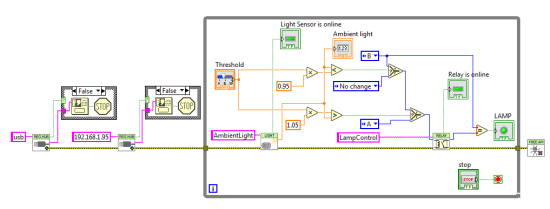
The complete code
Small comment
You may have noticed that the control loop is not temporized. This is not recommended from the LabVIEW standpoint, because this monopolizes more CPU resources than required. But this ins't an issue for the Yoctopuce API as it was optimized to communicate with the Yoctopuce modules only when necessary.
Conclusion
This small program uses only a few VIs, but the other VIs of the Yoctopuce library for LabVIEW work in the same way. If you have understood how this program works, you shouldn't have any trouble writing your own.


