 Three weeks ago, we showed you how to integrate your own web page into Yocto-Visualization (for web). This week we explain how to do the opposite, i.e. integrate Yocto-Visualization (for web) into web pages served by an arbitrary web server.
The problem
Yocto-Visualization (for web) was mainly designed to be hosted by a YoctoHub, a VirtualHub or an instance of VirtualHub for web by taking advantage of the small web server integrated in these products. But it is also possible to integrate it on your own web server, for example in a simple PHP page.
The Yocto-Visualization (for web) application is provided as a JavaScript file, so launching it from any HTML page is quite trivial. What is less trivial is to save the configuration somewhere and then retrieve it. That's what this post is about.
Preparations
Start by downloading the zip file of Yocto-Visualization (for web). In the dist/es2017 directory, you can find four flavors of Yocto-Visualization (for web).
| yv4web-full.js | Unminimized version, read/write |
| yv4web-full.min.js | Minimized version, read/write |
| yv4web-readonly.js | Non-minimized version, read-only |
| yv4web-readonly.min.js | Minimized version, read-only |
The read-only versions do not allow configuration or widget editing, in fact, all the code that is used for editing is missing from the read-only versions. Minimized versions take up a little less space than non-minimized versions, but are more difficult to debug. For the purpose of this post, it is best to choose the yv4web-full.js version that you need to copy to your web server.
Instantiation
Let's imagine a simple web page
<BODY>
Hello world...
</BODY>
</HTML>
To launch Yocto-Visualization (for web) in this page, you only have to insert some JavaScript code. Note that it is imperative to use a module script. Even if, in principle, all web browsers support modules since about 2018, it is good practice to detect the opposite case.
<BODY>
Hello world...
</BODY>
<script type="module">
import { YWebPage} from "./yv4web-full.js";
YWebPage.run("", null,null);
</script>
<script nomodule="">
document.write("<p>Yocto-Visualization (for web)"
+"cannot run on this browser. Sorry.<br>"
+"Consider using a more recent browser.</p>")
</script>
</HTML>
That's a start, but if you try to load this page in your browser, Yocto-Visualization (for web) complains because the configuration is empty and you can't create a new one. In other words, it's unusable as it is.
Loading the configuration
Yocto-Visualization (for web) saves its configuration in a string in XML format, this is the first parameter of the YWebPage.run function. For the purpose of the demonstration, you can get an example by exporting the configuration of another instance of Yocto-Visualization (for web), or even by retrieving one from the native version. Let's imagine that this XML code is stored in a config.xml file saved in the same place as your web page. The PHP code to load this file and provide it to the web page is quite simple:
<BODY>
Hello world...
</BODY>
<script type="module">
import { YWebPage} from "./yv4web-full.js";
<?php
define("CONFIGFILENAME" , "config.xml");
$config="";
if (file_exists(CONFIGFILENAME))
$config = file_get_contents(CONFIGFILENAME);
Printf("YWebPage.run(%s, null,null)",json_encode($config ));
?>
</script>
.....
</HTML>
Now that we are able to load a configuration, it is a question of saving it and this is where things get a little more complicated.
Saving the configuration
The third parameter of the YWebPage.run function is a callback function that you have to provide. This function is automatically called by Yocto-Visualization (for web) whenever the user saves. It takes two parameters:
- The first one is the XML string that contains the configuration
- The second one is a callback to be called once the save operation has been performed. This callback takes two parameters:
- A boolean that indicates if the operation went well.
- A string detailing what happened.
If the save callback is not provided, i.e. if the third parameter of YWebPage.run is set to null, then Yocto-Visualization (for web) works in read-only mode: the user cannot modify anything.
In the case we are interested in, we write a JavaScript function saveNow() which sends the configuration to the PHP server in the form of an HTTP POST, and we pass this saveNow() function as a parameter to YWebPage.run.
import { YWebPage} from "./yv4web-full.js";
function saveNow(xmldata, completedCallback )
{ let currentpage = "<?php print($_SERVER['REQUEST_URI']);?>"
const xhr = new XMLHttpRequest();
xhr.open("POST", currentpage);
xhr.setRequestHeader("Content-Type", "application/x-www-form-urlencoded");
const data = "xml="+encodeURIComponent(xmldata);
xhr.onload = () => {
if (xhr.readyState == 4 && xhr.status == 200 )
completedCallback(true, "saved");
else
completedCallback(false,"Save failed: error" + xhr.status);
};
xhr.send(data);
}
<?php
$config="";
if (file_exists(CONFIGFILENAME))
$config = file_get_contents(CONFIGFILENAME);
Printf("YWebPage.run(%s, null,saveNow)",json_encode($config ));
?>
</script>
Now we only have to write the server part that retrieves the data from the HTML POST and save it. Note that in terms of security, the bare minimum is to check that the POST contains XML data. You don't necessarily want someone to use this mechanism to put an arbitrary file on your server. To keep the example concise, we have chosen to put this code in the web page itself at the very beginning, but it is not an obligation, you can perfectly well put this code in a separate file.
define("CONFIGFILENAME" , "config.xml");
if( isset($_POST['xml']) )
{ $status = array("ok"=>false, "msg"=>"");
$XMLdata = $_POST['xml'];
//makes sure it looks like an XML file
$ok = @simplexml_load_string($XMLdata);
if ($ok)
{ if (@file_put_contents(CONFIGFILENAME, $XMLdata)===false)
$status["msg"] = "cannot write config file";
else
$status["ok"] = true;
}
else $status["msg"]="invalid xml config data";
print(json_encode($status));
die();
}
?><HTML>
Hello world...
Note that to make the mechanism a little more user-friendly, we return the result of the save operation as a JSON structure that the web page can parse, and then pass the result to the callback function provided by Yocto-Visualization (for web)
{ let res = JSON.parse(xhr.response);
let desc = res.ok?"Saved":"Save failed: "+res.msg;
completedCallback(res.ok, desc);
}
That's it, we told you everything. You now know how to integrate Yocto-Visualization (for web) in your own PHP page. You can find all the code snippets described above gathered in a complete example that you can download here. Of course you can improve the concept by using the positioning DIV mechanism.

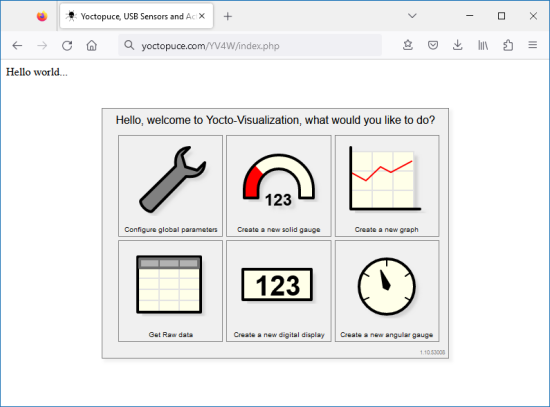
Tadaaa! it works
And the second parameter?
The most attentive among you will have noticed that YWebPage.run takes three parameters. The middle one is also a callback that is called every time the configuration of a Yoctopuce module changes. It is used to dynamically detect changes in the configuration file when it is stored on the filesystem of a YoctoHub. But this technique is not applicable in our case.
One last detail
Finally, remember that, even if the JavaScript file and the Yocto-Visualization (for web) configuration file are managed by your PHP server, the application itself is still running in your web browser, so it must have access to the Yoctopuce modules you want to use, even if it means using a VirtualHub for web.
Finally, you can find below a list of other posts referring to Yocto-Visualization (for web).
- The presentation of Yocto-Visualization (for web).
- How to use the native version.
- Comparison between the web version and the native version.
- Integrating your own web page in Yocto-Visualization (for web).
- Adding series in Yocto-Visualization (for web).
- Web page, Yocto-Visualization, and actuators.


