 You probably heard of water rockets and might know that it's quite easy to build them yourself with soda bottles and hose nozzles. This type of "toy" can be propelled to quite breathtaking heights, which makes it a rather fun hobby. Well, Yoctopuce looked into it...
The principle
Like classical rockets, water rockets are propelled by reaction: the motor is nothing else that a bottle partly filled with water and then put under pressure. When launched, compressed air violently flushes the water in the bottle and, by reaction, the rocket moves (fast) in the direction opposite to the water.

The working principle of a water rocket
Hand-made water rockets are often based on hose nozzles that automatically lock themselves. The male component is glued to the bottle neck and the female component, containing the locking system, is connected to a hose planted in the ground and itself connected to a bicycle pump. It's the launcher.

Automatically locking hose nozzles: the secret of water rocket technology
To launch a rocket, you partially fill a bottle, you fix it upside down on the launcher, you pump like a madman, then you trigger nozzle unlocking, and the rocket shoots forward. Dead easy.
Yoctopuce version
At Yoctopuce, we like to automate things. So we decided to take the concept of water rockets further by creating an autonomous rocket launcher. This launcher must take care of filling the rocket, putting it under pressure, and launching it, while we watch the show from a safe distance.
To do so, we are going to use, on top of the essential hose nozzles:
- 24V electrovalves
- a mini-compressor designed to inflate tires
- a pressure sensor with a 4-20mA interface
- a pneumatic piston
- a YoctoHub-Wireless
- a Yocto-MaxiCoupler
- a Yocto-4-20mA-Rx
The first idea is to separate the water filling circuit from the pressurizing circuit, to prevent water flowing back into the compressor when pressurizing. Compressors, like bicycle pumps, don't appreciate being filled with water.

The water and air circuit of the launcher
The water/air separation in the bottle is ensured by a small tube which goes very high in the bottle. Compressed air goes in through this tube, and we know that water cannot go out from there.
Filling stage
We have a water reservoir in a drum. To fill the rocket, we open valves 1 and 4 and we inject air in the drum with the compressor. This pushes the water into the rocket. The more the water level rises in the bottle, the higher the pressure of the air captured in the bottle above the water increases. If we measure this pressure, we can deduct the water level and automatically stop filling.

The filling stage
We used a simple plastic drum as a water reservoir, but we had to reinforce it as it started to bulge alarmingly in the filling stages.
Pressurizing stage
When filling is done, we isolate the water circuit by closing valves 1 and 4. Then we open valve 3 and we go on pumping until we judge that there is enough pressure in the bottle. We then stop pumping and we close valve 3. The rocket is ready for launching.

The pressurizing stage
Launching stage
We could have used a RC model servomotor to trigger the hose nozzle, but it would have been drenched with water during each launch. So we preferred to use a small pneumatic piston connected to the nozzle. To launch the rocket, we open valve 2 which triggers the piston and frees the rocket.

The launching stage
The air moving the piston is taken from the bottle, but it's a negligible quantity so not a real issue.
Implementing
The idea was to build a compact launcher that we could easily carry around and that we could control from a smartphone.
We therefore designed an X shaped structure on top of which all the elements are screwed. Thus, all parts of the launcher are easily accessible.

The launcher skeleton
The hydro-pneumatic component is made of 4mm polyurethane pipe for compressed air, and we used push-in fittings whenever possible.

Polyurethane pipes and push-in fittings
The launching tube
The launching tube is the most delicate component to build. You must start by finding a suitable tube. It is in fact a fitting on which we must adapt the hose nozzle as well as the push-in fittings, even if we need an army of adapters. Inside the large tube, there are several small pipes connecting the distinct outputs, everything is drowned in epoxy resin. The capillary and the push-in fittings are screwed on threaded inserts also drowned in the resin.

The launching tube and its internal structure
Whenever possible, pipe components were glued together with epoxy. Thus, no need for joints and no leaks. :-)
The compressor
We used a 12V compressor powered from a cigarette lighter, bought for ~$20 in a local store. We stripped it of its plastic case and we screwed it on a support.


The compressor
It is controlled by a large 24V relay which is itself driven by one of the Yocto-MaxiCoupler outputs. The compressor requires too much power to be driven directly by a Yocto-MaxiCoupler. We put a big TVS diode on each side of the 24V relay: one to protect the relay from voltage spikes induced by the compressor coil, the second one to protect the Yocto-MaxiCoupler from voltage spikes induced by the relay coil.
The valves
They are 24V electrovalves. Their current consumption is only of 100mA. This enabled us to drive them directly with the Yocto-MaxiCoupler.

The electrovalves
The pressure measure
The pressure of the air circuit is measured with a 4-20mA pressure sensor connected to a Yocto-4-20mA-Rx.

The 4-20mA pressure sensor
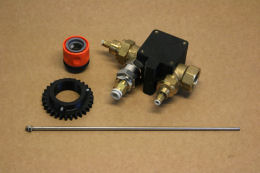
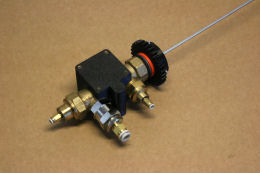
The trigger
Triggering is based on a small pneumatic piston which actuates a gear rack, itself actuating a gear wheel fixed to the hose nozzle. The rack and the wheel were made with a 3D printer.

The trigger
The control
The Yocto-4-20mA-Rx and the Yocto-MaxiCoupler are driven by a YoctoHub-Wireless. The idea is to configure the YoctoHub-Wireless in ad hoc mode. Thus, the launcher generates its own Wifi network and can be used without hassle in the middle of nowhere.

Wiring of the Yoctopuce modules in the launcher
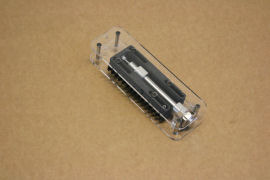
The early tests showed that we needed to move the YoctoHub-Wireless antenna away from the compressor. When working, there is enough inerferences close to the compressor motor to prevent any radio communication. So we put the antenna on a small pole on the side of the launcher.

The electronic component. The YoctoHub-Wireless is a pre-series model, hence its green color.
Power source
The power source is a tricky issue. In the setup, we have:
- Yoctopuce modules needing 5 volts
- Valves needing 24 volts
- A compressor needing 12 volts
To power everything, we decided to use one of these portable batteries which are used to start your car when its own battery is dead. This device, designed to be easily carried, provides 12V and even has a cigarette lighter socket.

A powerful and easily movable 12V power supply.
We had to use two converters, one from 12V to 5V for the Yoctopuce modules, and one from 12V to 24V for the valves and the relay driving the compressor.

The power supply component
The bonus
As there were empty outputs on the Yocto-MaxiCoupler, we used two of them to control cameras and to take pictures of the launches. We used this method before, it is described in a previous post.
Results
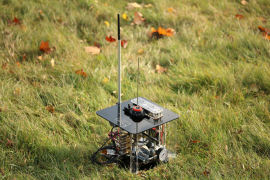
We are not going to turn a blind eye: although compact, the launcher looks like gasworks. But it's got style anyway. Dads are always proud of their offsprings :-)

The whole launcher
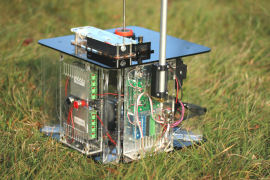
Early tests with a simple soda bottle were quite promising.

Rather effective...
Launcher: done. Next week, we'll take care of the rocket...

