![]() The Yocto-Serial is the little brother of the Yocto-RS232. While the Yocto-RS232 follows the RS232 standard, the Yocto-Serial works with TTL logical levels. If you don't know the difference between the two, you'd better pay close attention to what comes next...
The Yocto-Serial is the little brother of the Yocto-RS232. While the Yocto-RS232 follows the RS232 standard, the Yocto-Serial works with TTL logical levels. If you don't know the difference between the two, you'd better pay close attention to what comes next...
RS232 vs. TTL
An RS232 port communicates by diffusing 0s and 1s as positive and negative voltages, usually +/-12V, but lower voltages can also be used. The main point is that there are positive and negative voltages. In the opposite, a serial port in TTL levels communicates with a strictly positive signal between 0 and +xV, generally 0/3.3V or 0/5V. These serial communication types are therefore not compatible. At best it won't work. But in most cases, you are going to fry something. Unless explicitly designed for it, most digital electronic components don't like to receive -12V on their input.
You often find RS232 ports on complete devices, ready for use in a nice enclosure. TTL level serial ports are most often used in isolated components designed to be embedded in larger projects. You can also find them on service port in robots like iRobot Rumba vacuum cleaners, Huskvarna Automower robotic lawn mower, etc.
The Yocto-Serial
The Yocto-Serial therefore offers you to interface components with a TTL serial output. You can even select the voltage to use for the serial communication: 3.3 or 5V. On top of the serial port, the Yocto-Serial provides a small power supply that you can configure to 3.3V or 5V. This should enable you to power the component with which you want to communicate.
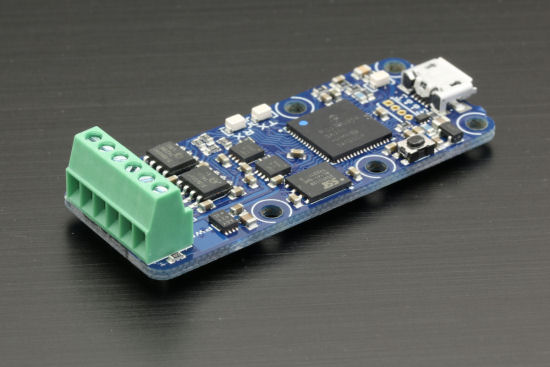
The Yocto-Serial
In the opposite to the Yocto-RS232, the Yocto-Serial is not isolated. As it is designed to interface components that it can power, it didn't seem necessary.
At the logical level, you have exactly the same features as in the Yocto-RS232. This allows you to transform any sensor with a serial output into a Yoctopuce sensor. You can thus benefit from all the advantages linked to them: logical names, polling, callbacks, data logger, and so on...
Application example: measuring oxygen
The SST (LOX-02) LuminOx sensor is an excellent usage example for the Yocto-Serial. Coupled with a Yocto-Serial, the LuminOx becomes a USB oxygen, temperature, and pressure sensor that you can query remotely in all the programming languages supported by Yoctopuce. The LuminOx is a small cylinder, with a 20mm diameter and a 12mm height. It has four pins: GND, 5V, receive, and transmit.
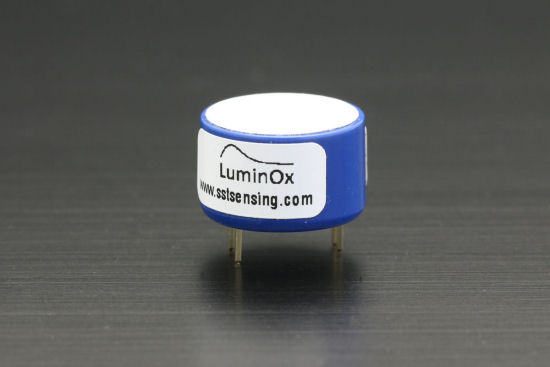
The LuminOx oxygen sensor
Step 1: Connection
First, you must check that the serial port and the power supply of the Yocto-Serial are off to make sure you are not going to send an inappropriate voltage into the sensor. Then, interconnect the two together: you need only four wires.
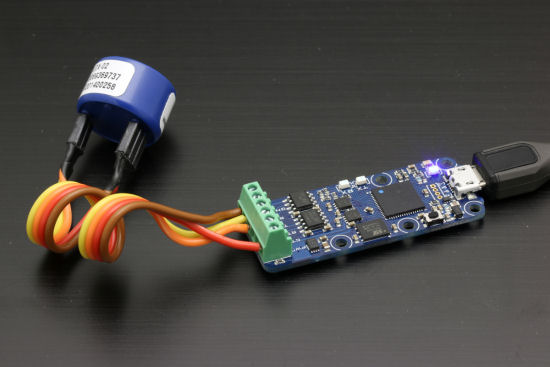
Interconnecting the Yocto-Serial and the oxygen sensor
Step 2: Hardware configuration
With the VirtualHub, set the power supply voltage to 5V, configure the serial port to 9600,8N1 3.3V. Make sure to set the power supply before you set the serial port. Most electronic components don't like to see on their input/output a voltage that is superior to that of their power pin.
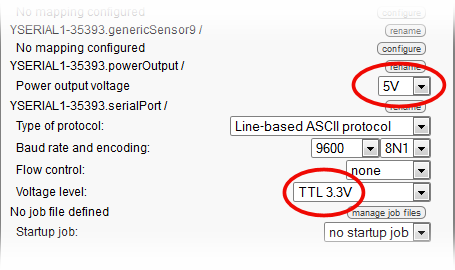
Configuring voltages and the serial port
From then on, you can see the data sent by the LuminOx. They appear in the details window of the Yocto-Serial. You can decide to stop there and to start programming an application that decodes these data. But you would be depriving yourself of an important feature of the Yocto-Serial: it can do it for you.
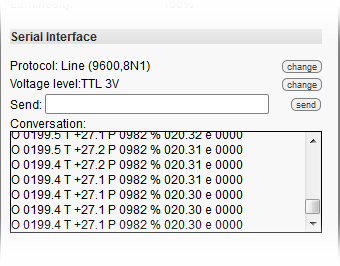
You can see the data sent by the sensor
Step 3: Sensor configuration
You can configure the Yocto-Serial so that it interprets the data sent by the LuminOx and presents them in the same manner as a Yoctopuce sensor. To do so, you only need to define a short script in the Yocto-Serial with the VirtualHub. Data sent by the LuminOx follow the format:
O xxxx.x T yxx.x P xxxx % xxx.xx e xxxx\r\n
You find there the oxygen pressure in mBar, the temperature in ░C, the oxygen percentage, and the state of the sensor. You must therefore define a script that reads the four data that interest you, and that maps them on genericSensor 1 to 4 functions of the Yocto-Serial:
Expect "O ($1:FLOAT) T ($2:FLOAT) P ($3:FLOAT) % ($4:FLOAT).*"
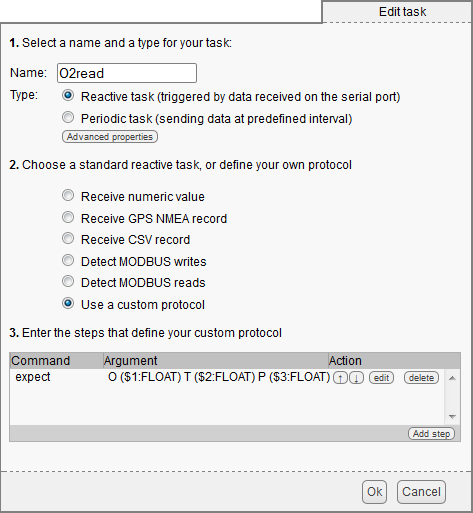
Reading script configuration
Finally you can, if you wish, configure the genericSensor functions to make them more readily available with logical names. For example, you can rename genericSensor1 on which oxygen pressure is mapped into "O2_Pressure".
That's it. You now have an oxygen sensor that you can query with all the Yoctopuce API, for example with a command line:

An oxygen sensor that you can query with a command line
If you add a YoctoHub-Ethernet or a YoctoHub-Wireless to the Yocto-Serial, you obtain an oxygen sensor that you can manage through the Internet. Neat, eh?
Conclusion
The Yocto-Serial and the Yocto-RS232 should allow you to interface almost any device or component with a serial interface. However, make sure to select the correct module: they are complementary but not interchangeable.


