![]() This week, we continue with our "for the beginners" post series and we are going to talk about Java. As for previous introductions to different programming languages, we are going to implement a small application in Java FX which displays the value of a Yoctopuce temperature sensor.
This week, we continue with our "for the beginners" post series and we are going to talk about Java. As for previous introductions to different programming languages, we are going to implement a small application in Java FX which displays the value of a Yoctopuce temperature sensor.
This post assumes that you already have some knowledge of Java and more particularly of Java Fx as its aim is not to be a Java FX tutorial, but to explain how to use our modules in an application written in Java. In the same way, if you are not familiar with Yoctopuce modules, we recommend that you start by reading the previous posts of this series, in particular the one on the logical structure of Yoctopuce modules.
Creating the Java FX project with IntelliJ IDEA
Note: To illustrate this post, we used IntelliJ IDEA because we believe it to be the most practical and the fastest IDE. But Netbeans and Eclipse offer the same features.
After launching IntelliJ, create a new Java FX project.

Create a new Java FX project
Creating the graphical interface
Start by modifying the .fxml file to add two labels which will display the sensor identifier and the current value of the temperature sensor.
<?import javafx.scene.layout.GridPane?>
<?import javafx.scene.control.Button?>
<?import javafx.scene.control.Label?>
<?import javafx.scene.text.Font?>
<?import javafx.scene.layout.RowConstraints?>
<?import javafx.scene.layout.ColumnConstraints?>
<GridPane fx:controller="sample.Controller"
xmlns:fx="http://javafx.com/fxml" alignment="center" hgap="10" vgap="10">
<columnConstraints>
<ColumnConstraints/>
</columnConstraints>
<rowConstraints>
<RowConstraints/>
<RowConstraints/>
</rowConstraints>
<children>
<Label text="Label" fx:id="lab_hwid"/>
<Label text="Label" fx:id="lab_value" GridPane.rowIndex="1">
<font>
<Font size="36.0"/>
</font>
</Label>
</children>
</GridPane>
You must also update the controller Java code so that it can find these two labels. You must declare two attributes lab_hwid and lab_value corresponding to the two labels that you have defined in the .fxml file.
import javafx.scene.control.Label;
import java.net.URL;
import java.util.ResourceBundle;
public class Controller implements Initializable{
public Label lab_hwid;
public Label lab_value;
@Override
public void initialize(URL location, ResourceBundle resources) {
lab_hwid.setText("No sensor detected");
lab_value.setText("N/A");
}
}
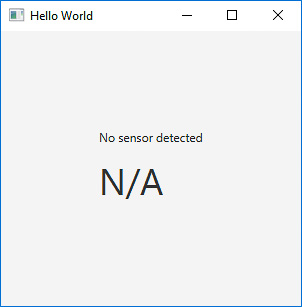
If you run the project, you should obtain a window like this one:
Installing the Yoctopuce library
Java vs. Android
We have two distinct libraries which are written in Java: the Java library and the Android library. If 90% of the code are the same and implement the same public API, they are not interchangeable. As its name indicates it, the Android library works only under Android and cannot therefore be used on a computer. In the same way, the Java library doesn't work correctly under Android: For use on a computer, you must therefore use the Java Yoctopuce library, and not the Android version.
In order to use the Yoctopuce library in this project, you must first download it and install it somewhere on your disk. You can download the library from our site from this page. It's a zip file containing the library sources, a few usage examples, the documentations, and binary files that you can use directly. When you have downloaded it, you must unzip it somewhere on your disk. Note that you can also obtain the library from GitHub or from Maven.
Then you must tell IntelliJ to add the library to the project. You must open the "Project Structure" panel which is available from the "File" menu, and access the "Libraries" tab. Then click on the green "+" shaped icon to add a library of type "Java". In the dialog box, select the Binaries directory of the Yoctopuce library. In this way, all the required .jar files and dynamic libraries are included. At the end, IntelliJ offers to automatically add this library to the project, obviously you must click on "Ok".

You must add a library of type Java
All that is left to do is to add the code that uses this library.
Initializing the API
The first thing to do is to initialize the API with YAPI.RegisterHub. A good place to do so is in the initialize method. Thus, if the Yoctopuce API initialization goes wrong, you can display an error message and stop the application.
public void initialize(URL location, ResourceBundle resources) {
lab_hwid.setText("No sensor detected");
lab_value.setText("N/A");
try {
YAPI.RegisterHub("usb");
} catch (YAPI_Exception e) {
Alert alert = new Alert(Alert.AlertType.ERROR);
alert.setHeaderText("Init error");
alert.setContentText(e.getLocalizedMessage());
alert.showAndWait();
Platform.exit();
}
}
Updating the interface with the temperature
In the opposite to a console application, we cannot use an endless loop to read the sensor permanently. Therefore, we use the Timeline class which allows us to periodically call a periodicTimer method.
This gives us the following code:
..
private Timeline timeline;
@Override
public void initialize(URL location, ResourceBundle resources) {
...
timeline = new Timeline();
timeline.setCycleCount(Timeline.INDEFINITE);
timeline.setAutoReverse(false);
timeline.getKeyFrames().add(
new KeyFrame(Duration.millis(100),
new EventHandler<ActionEvent>() {
@Override
public void handle(ActionEvent event) {
periodicTimer();
}
}));
timeline.play();
}
}
The periodicTimer function takes care of:
- Calling YAPI.HandleEvents on a regular basis. In fact, it's not a 100% necessary in our case, but it's good practice to give control to the Yoctopuce API from time to time.
- Calling YAPI.UpdateDeviceList once every two seconds, which forces the API to re-detect the connection of new modules. It's a rather heavy process, so we avoid doing it too often, hence the two second delay between two calls
- Detecting the first YTemperature function available with YTemperature.FirstTemperature()
- If this function is available, reading the temperature and updating the interface.
private YTemperature sensor;
private void periodicTimer() {
try {
if (hardwaredetect == 0) {
YAPI.UpdateDeviceList();
}
hardwaredetect = (hardwaredetect + 1) % 20;
YAPI.HandleEvents();
if (sensor == null) sensor = YTemperature.FirstTemperature();
if (sensor != null) {
lab_hwid.setText(sensor.get_friendlyName());
lab_value.setText(sensor.get_currentValue() + sensor.get_unit());
}
} catch (YAPI_Exception e) {
lab_hwid.setText("Sensor is offline");
lab_value.setText("OFFLINE");
sensor = null;
}
}
When we compile all this, we obtain the expected result, a Windows window displaying the temperature as soon as a Yoctopuce temperature sensor is connected.

It works!
Note: The complete code of the application is available on GitHub: https://github.com/yoctopuce-examples/java_beginners
A small improvement
This example manages only temperature sensors, but by modifying two lines only, we can make it work with any Yoctopuce sensor: we only have to use the YSensor class instead of the YTemperature class:
public Label lab_hwid;
public Label lab_value;
private int hardwaredetect;
private Timeline timeline;
private YSensor sensor;
@Override
public void initialize(URL location, ResourceBundle resources) {
lab_hwid.setText("No sensor detected");
lab_value.setText("N/A");
try {
YAPI.RegisterHub("usb");
} catch (YAPI_Exception e) {
Alert alert = new Alert(Alert.AlertType.ERROR);
alert.setHeaderText("Init error");
alert.setContentText(e.getLocalizedMessage());
alert.showAndWait();
Platform.exit();
}
timeline = new Timeline();
timeline.setCycleCount(Timeline.INDEFINITE);
timeline.setAutoReverse(false);
timeline.getKeyFrames().add(
new KeyFrame(Duration.millis(100),
new EventHandler<ActionEvent>() {
@Override
public void handle(ActionEvent event) {
periodicTimer();
}
}));
timeline.play();
}
private void periodicTimer() {
try {
if (hardwaredetect == 0) {
YAPI.UpdateDeviceList();
}
hardwaredetect = (hardwaredetect + 1) % 20;
YAPI.HandleEvents();
if (sensor == null) sensor = YSensor.FirstSensor();
if (sensor != null) {
lab_hwid.setText(sensor.get_friendlyName());
lab_value.setText(sensor.get_currentValue() + sensor.get_unit());
}
} catch (YAPI_Exception e) {
lab_hwid.setText("Sensor is offline");
lab_value.setText("OFFLINE");
sensor = null;
}
}
}
Now, the application works also with a light sensor, a voltmeter, or any Yoctopuce sensor.

It works with the other sensors as well
This "magic trick" works because all the Yoctopuce classes corresponding to sensor-type functions inherit from the YSensor class. You can thus use the YSensor class to access the basic functions of a sensor, such as obtaining the current value or the measuring unit.
Use the application outside InteliJ
InteliJ allows you to package the Java FX application as an executable that contains both the Java virtual machine and the application. This procedure is explained on the JetBrains website. Unfortunately, InteliJ is not smart enough to automatically include Yoctopuce library files in this executable.
The work around is to open the "Project Structure" window, access the "artifact" panel and add the Yoctopuce library to the output directory by double clicking on the library we included earlier. In this way InteliJ will include the .jar files of our library in the application.

you need to add the library to the artifact
Unfortunately the dynamic libraries that are needed to access the USB port, will not be copied. The only solution is to manually copy the .dll, .so and .dylib files to the directory where InteliJ exports the executable.
Conclusion
We have purposefully kept this code very simple. For example, it manages only one sensor connected by USB. Obviously, the library allows for the management of several sensors, whether connected by USB or connected to a remote YoctoHub.
The Java library is one of the most versatile of our libraries because on top of its "traditional" use that we just illustrated, there is also an "HTTP callback" mode and a "WebSocket callback" mode that enable Yoctopuce modules connected to a YoctoHub to connect directly to a web service written in Java:
Now that we have seen the basics, you can write your own applications, with the help of the reference documentation. You can also browse our blog, which is full of examples on how to use our modules. And if with all of that you still can't manage on your own, you can always send an email to support@yoctopuce.com.

