![]() This week, we are going to show you how to make your first steps with Yoctopuce modules in JavaScript, in particular in the context of a web server written with node.js. This scenario is particularly interesting because it allows you to create server applications collecting data from many Yoctopuce sensors scattered everywhere, each sensor transmitting its own data independently over Internet over Wifi, GSM, etc.
This week, we are going to show you how to make your first steps with Yoctopuce modules in JavaScript, in particular in the context of a web server written with node.js. This scenario is particularly interesting because it allows you to create server applications collecting data from many Yoctopuce sensors scattered everywhere, each sensor transmitting its own data independently over Internet over Wifi, GSM, etc.
Before we start, let's point out that we could also have shown you a JavaScript example very similar to the Python example presented a few weeks ago: the JavaScript/EcmaScript works as well in a web browser as in a simple Node.js program, or on a Node.js host server. But the specificity of this library is to offer many possibilities to interact remotely with Yoctopuce devices from a web server. This is therefore what we are going to show you.
We assume that you have some basic knowledge of JavaScript and of Node.js and that you have installed a truly recent version of Node.js on your development machine. Indeed, the Yoctopuce library is based on network communications, by nature asynchronous in JavaScript. So we have decided to use the newly standardized asynchronous syntax introduced in the latest version of the language, called EcmaScript 2017. All the Node.js versions from v7.6 onward recognize this syntax. If need be, update your Node.js. You have nothing to fear: backward compatibility is very good.
Installing the Yoctopuce library
This Yoctopuce library is available on npm under the yoctolib-es2017 name. we recommend that you don't use the older versions yoctolib et yoctolib-es. We kept them only to avoid breaking dependencies in existing projects, but they don't present any interest since the occurrence of version es2017.
If you start a new project from scratch, start as usual by creating the package.json file which serves to list the project dependencies, with the command
You can then add the Yoctopuce library to your project with the command:
The program skeleton
This very simple example fits in a single source file. We are going to create a web server able to receive on the one hand the connections of the YoctoHubs which transmit the data of the Yoctopuce sensors, and on the other hand the web connections of the user who comes to retrieve these data.
The structure is therefore the following:
YAPI.LogUnhandledPromiseRejections();
async function HttpCallbackHandler(request, response) {
// HTTP requests from the web browsers land here
response.writeHead(200, {'Content-Type': 'text/html'});
response.write('Hello Browser<br>\n');
response.end();
}
async function WebSocketCallbackHandler(ws)
{
// WebSocket connections from the YoctoHubs land here
...
}
// We create an HTTP server...
var http = require('http');
http.createServer(HttpCallbackHandler).listen(8080);
// ... and we create a WebSocket server
var WebSocketServer = require('ws').Server;
let wss = new WebSocketServer({ port: 8044 });
wss.on('connection', WebSocketCallbackHandler);
console.log('Node.js Web HTTP server running on http://...:8080/');
console.log('Node.js Websocket server running on http://...:8044/');
The first line require(...) is used to load the Yoctopuce library basic functions. Note that you don't need to explicitly list the symbols to be imported, we took the option to automatically export the classes essential to our library: YAPI, YModule, YSensor, and so on.
The second line LogUnhandledPromiseRejections is used to ease debugging: it ensures that errors on asynchronous operations that are not explicitly caught by a try..catch are displayed on the console.
Two functions follow this: the first one manages HTTP connections performed by a usual browser. The second manages WebSocket connections performed by YoctoHubs to communicate with the web server. The advantage of a WebSocket connection compared to a simple HTTP connection is that it's bidirectional and thus enables full questioning of the sensors, while an HTTP connection doesn't allow the server to ask questions of the HTTP client.
The last lines of the program launch the HTTP and WebSocket servers, and link them to the previously defined functions.
The WebSocket callback manager
The most interesting part manages the connection performed by the YoctoHubs to the WebSocket server. This function is called once for each incoming connection, which means that several executions can occur simultaneously if several YoctoHubs connect at the same time. All the executions share a single global memory space, but naturally variables local to the function are specific to each execution.
The first thing to do to use the Yoctopuce library is to initialize it, indicating where the modules should be looked for. In our case, it's naturally on the WebSocket caller that the modules are located. To avoid that our callback get mixed up between the different connections, instead of using the YAPI.RegisterHub global function, we instantiate a specific YAPI context for each connection:
let errmsg = new YErrorMsg();
let yctx = new YAPIContext();
if(await yctx.RegisterHubWebSocketCallback(ws, errmsg) != YAPI.SUCCESS) {
console.log('WebSocket callback error: '+errmsg);
yctx.FreeAPI();
return;
}
Then, we can, for example, enumerate the sensors connected to the YoctoHub, and configure them so that they send their measures every 10 seconds:
let sensor = YSensor.FirstSensorInContext(yctx);
while(sensor) {
console.log('Sensor: ' + (await sensor.get_hardwareId()));
await sensor.set_reportFrequency("6/m");
await sensor.registerTimedReportCallback(sensorCallback);
sensor = sensor.nextSensor();
}
We then only need to wait for the data, while detecting a potential disconnection:
await yctx.Sleep(1000);
}
await yctx.FreeAPI();
The sensorCallback function is automatically called as soon as the sensors send their periodical data. For this example, we'll simply store the values in an array, but this is where you could add code to store the measure in a data base for example:
async function sensorCallback(sensor, measure)
{
Data.push({
"name": await sensor.get_hardwareId(),
"time" : await measure.get_endTimeUTC(),
"value" : await measure.get_averageValue()
});
}
The HTTP callback manager for the browser
Rather than displaying Hello Browser as in the code skeleton above, you can now display the measures stored in memory, regrouping all the transmissions from all the hubs, as the measures were stored in a global array:
for(let i = 0; i < Data.length; i++) {
response.write(Data[i].time + ";" +
Data[i].name + ";" +
Data[i].value + "<br>\n");
}
Running the node.js server locally
When you have put these pieces of code together in a demo.js file (you can find a copy in the library examples under the name Prog-WebSocketCallback), you can run your sever with the command:
You should then go with your browser on the http://127.0.0.1:8080/ address to obtain a list of empty measures (only the header): Our HTTP manager answered you.
Now, configure a YoctoHub-Ethernet or a YoctoHub-Wireless-g so that it posts its data on this server. In the configuration window, click to the right of Callback URL on the edit button:
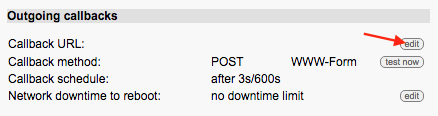
Then reproduce the configuration below. Take care to change the URL type from http:// to ws:// for the connection to happen through WebSocket:

If you click on the Test button, you should obtain a message line appearing on the console of your node.js process and the sensor values that are stored every 10 seconds, and which can then be listed in the browser.
Running the server on a public host
When your server works locally, you can install it on a public server visible on the Internet. This allows you to contact it for example from a YoctoHub-GSM-3G-EU. To do so, you must select an Internet host supporting the Node.js technology. There are two types of Node.js hosts:
Some hosts, such as Heroku, provide a closed Node.js running environment, with tools to perform configuration, to charge your source files, and to retrieve logs remotely.
Other hosts, such as Infomaniak, provide a virtual Cloud server with an ssh connection. You can connect yourself directly on the machine to activate the version of Node.js that you want, with NVM for example, and run your program with the same command line as locally. The forever npm module is in this case very useful to allow the server to go on running, independently from the SSH session lifetime. On this type of host, you may have to authorize, through a management console, the incoming TCP port corresponding to your application so that it can be reached from the Internet.
Conclusion
You now know how to create a Node.js web server to collect data from Yoctopuce sensors. Using WebSockets offers almost limitless interaction possibilities with the modules, and also allows the retrieval of measures stored on the internal data logger of each Yoctopuce sensor, so as to ensure that the measures are stored without interruption.
You can naturally also enrich the HTTP server to provide distinct contents depending on the requested page. You can find examples of this in the Node.js documentation.
There are also npm modules facilitating static and dynamic content publication on an HTTP server in Node.js. They allow you to use the same TCP port for HTTP and WebSocket requests. One of the most well known is ExpressJS. You can find in the ws package documentation an example on the integration of a WebSocket server inside of an ExpressJS server.

