 We published this week our Android library on the jcenter library repository. We take this opportunity to write a short tutorial on how to add our library to an Android Studio project.
Two years ago, when we published the Yoctopuce library for Android, the reference development environment was Eclipse. To compile an application, you had to use Eclipse when developing and ANT scripts to compile the same application from a command line. In both cases, the process was tedious and hardly customizable.
Fortunately, in May 2013, Google announced a new development environment that replaced Eclipse: Android Studio. For a while, Android Studio coexisted with Eclipse, but since last December, Android Studio has become the official IDE to develop an application.
Android Studio offers a much more user-friendly interface but mostly uses a new compilation system: Gradle. All the compilation information is stored in a build.gradle file. You can modify by hand the .gradle files, but it's easier to use the Android Studio wizards (which then modifies the same files).
There are four solutions to add the Yoctopuce library to an Android Studio project:
- Copying source files
- Copying the .jar file containing the compiled classes
- Importing the .aar file containing the compiled classes
- Adding a jcenter dependency to your gradle script
Copying source files
It's the most basic solution. You only need to download our library from our web site and to copy the content of the YoctoLib/src/main/java/ directory into the source directory of your project.
With this solution, you don't have to modify your build scripts. A copy-paste and here you go! The other advantage is that, for the most courageous among you, you can directly modify the library ;-) However, you must take care to copy all the files together. Take particular case not to mix up files from two different versions when updating the library.
Copying the .jar file
In the Binaries directory of the Yoctopuce Android library, there is a YoctoApi.jar file containing all the compiled classes. You must copy the YoctoApi.jar file in the libs directory of your project and modify the gradle script to include it when compiling. You can do it from the IDE with the "Add As Library" function after a right-click on the .jar file, or by adding the following line into the build.gradle file:
The advantages of the .jar file are that compilation time it slightly shorter and that there is only one file to keep updated.
Importing the .aar file
The .aar file type (which stands for Android ARchive) is a new archive format introduced with Android Studio. This archive contains not only the compiled Java classes but can also contain files specific to the Android platform (for instance: AndroidManifest.xml, resources, and so on).
This new library format is very useful for graphic libraries requiring graphic files or external resources on top of the Java classes. With it, you can include everything in a single file, in the opposite to a .jar file. But for our library, it doesn't bring any advantage, as our library contains only compiled Java classes.
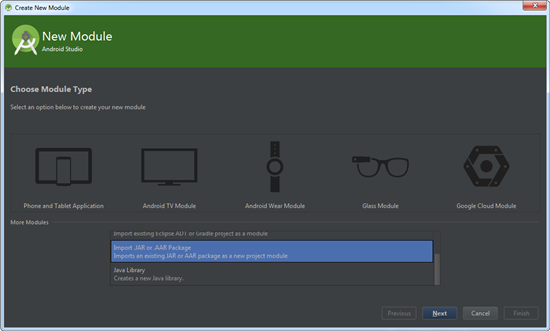
The Yoctopuce library includes a YoctoApi.aar file in the Binaries directory. To import the .aar file into an Android Studio project, you must to go through the "Project Structure" window and add a new module by clicking on the green '+' icon. This triggers a wizard which allows you to include the .aar file into the project.

The wizard to include an AAR format library
Take care: this step only creates a new "YoctoAPI" module that the main module (the application) can use. In the "Project Structure" window, you must also select the application and add a dependency to the "YoctoAPI" that you have just created for the application to be correctly compiled.
Adding a jcenter dependency
Update: Following JFrog announcement to close the JCenter repository, we decided to migrate our library to mavenCentral. The post "Migrating from JCenter to mavenCentral" explains how to use mavenCentral instead of JCenter.
jcenter is the maven library repository which is natively supported by gradle and Android Studio. It is actually a super-set of the maven central repository. It works in the same way: you specify the name and the library version which are used by the application. When compiling, the libraries are automatically downloaded and added to the binary file.
This solution is very easy to set up. You only need to add a reference to "com.yoctopuce.android:YoctoLib" in the list of dependencies for the project to be automatically compiled with the latest available version of the Yoctopuce Android library.
You can add this dependency directly in the build.gradle file in the "dependencies" section:
android {
compileSdkVersion 21
buildToolsVersion "21.1.2"
defaultConfig {
applicationId "com.yoctopuce.examples.myapplication"
minSdkVersion 15
targetSdkVersion 21
versionCode 1
versionName "1.0"
}
}
dependencies {
compile fileTree(include: ['*.jar'], dir: 'libs')
compile 'com.android.support:appcompat-v7:22.1.1'
compile 'com.yoctopuce.android:YoctoLib:+'
}
But you can also use the "Project Structure" window. You must select the application module, open the "dependencies" tab, and add a "com.yoctopuce.android:YoctoLib:+" dependency of type "maven". Looking for "com.yoctopuce.android", the wizard offers the latest published version of the library.
Make sure not to mix the "com.yoctopuce.android:YoctoLib" and the "com.yoctopuce.java:yoctolib" libraries. The "com.yoctopuce.java:yoctolib" is the Yoctopuce Java library for all platforms except Android. If you use this library, you won't be able to access the modules connected on the USB port.
Conclusion
Here is a video illustrating the four methods to add a library to an Android Studio project:
You now have all the keys in hand to select the method best suited to add the Yoctopuce library to your Android application.


