 Quite early on in the development of the Yocto-Display-ePaper-C, we realized that the four fonts 8x8, small, medium, and large, which are included in the OLED display firmware, might not be sufficient due to the high resolution of the ePaper displays compatible with this new module. Rather than adding more arbitrarily chosen fonts and taking up space in the module's firmware, we decided to rewrite a new font editor from scratch to make it more practical and easier to use than the original editor, which no one seems to know exists....
The ability to create custom fonts for Yoctopuce displays has existed since they were first released 13 years ago. The .yfm file format is described in the Yoctopuce display documentation, and the source code for the editor used to create the fonts provided as standard can be found in the Delphi library. Not only does this editor offer only the minimal features needed to create a few basic fonts, but to use it, you also need to be able to recompile a Delphi or Lazarus application. Rather than trying to improve the existing editor, we decided to completely rewrite it as a small web application that we called Yocto-FontEditor.
Installation
You don't need to perform any installation at all. The entire application fits into a single .html file with no dependencies whatsoever.
You can either load this HTML page directly(*), or download the archive, the file you need is dist/Yocto-FontEditor.html. You can open it directly in your favorite web browser.
You can also "install" Yocto-FontEditor on a YoctoHub: simply copy the Yocto-FontEditor.html.gz file to your hub's file system, then use your preferred browser to load the URL:
http://your_hub_IP_address/Yocto-FontEditor
Installing Yocto-FontEditor on a YoctoHub can be very convenient when a display is connected to that hub: if you don't like a character displayed on the screen, you can correct it almost in real time.
(*) The application attempts to contact your local VirtualHub, which may trigger a confirmation prompt from your web browser.
Usage
We've tried to make the user interface as user-friendly as possible, which is why the app features a small welcome screen rather than immediately bombarding you with an interface full of options.
Welcome Screen
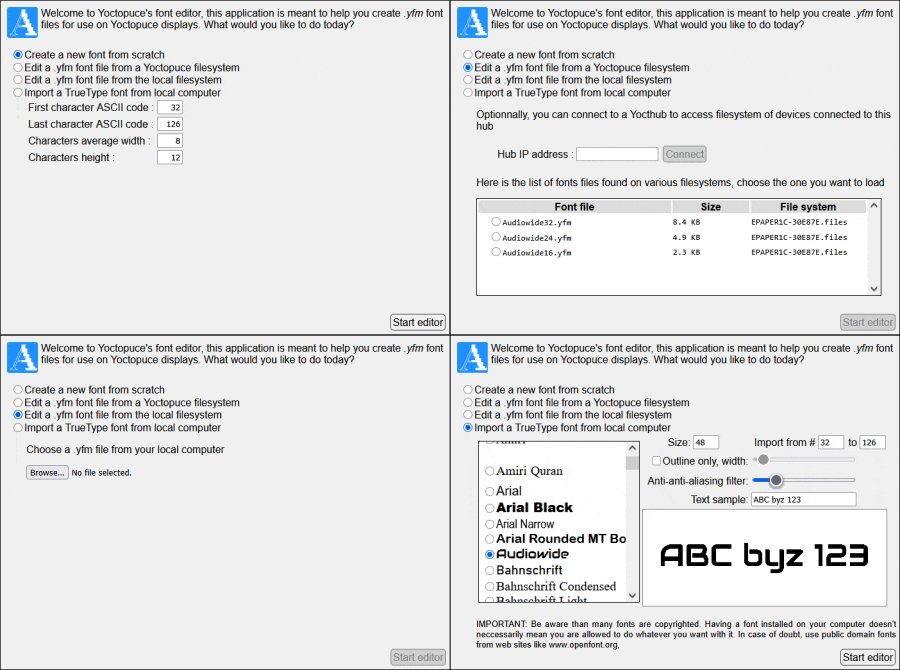
The welcome screen
This welcome screen offers you four ways to get started:
Create your font from scratch
Simply set the average size in pixels of the characters in the font you want to create, as well as the ASCII codes for the first and last characters you want to draw. You can get away with entering somewhat approximate values because you'll be able to add and remove characters, or even change their size, later on.
Edit a font already present on a Yoctopuce file system
This allows you to directly load a .yfm font file located on a Yoctopuce file system, typically that of a display. After editing, you can save the modified font to the same location, thereby shortening the design/testing cycles.
Edit a font located on your computer
If you have a .yfm file on your computer's hard drive, you can load it directly.
Importing a TrueType Font
The editor can import a TTF font from your computer, convert it to a bitmap, and turn it into a font of any size that you can use with your displays. You can even choose to draw only the outlines of the characters. But be aware of a few important details:
- Due to the lack of grayscale, converting a vector character to a bitmap creates artifacts, particularly in small font sizes. You can minimize this by adjusting the "Anti-anti-aliasing filter" setting, but there will always be a few minor imperfections that you'll need to correct manually.
- Due to a technical limitation of HTML, the editor requires VirtualHub-V2 (version 2.1.14003 or later) to be running on the local machine in order to access the list of fonts available on that machine.
- Many fonts are protected by copyright and other rights that vary from country to country. Just because a font is installed on your computer doesn't mean you have the right to do whatever you want with it. If in doubt, purchase a license for the font you fancy or use open-source fonts, this is especially important if you plan to use them publicly.
Once you've decided what you want to do, simply click the "Start editor" button, and you'll be taken to the editor itself.
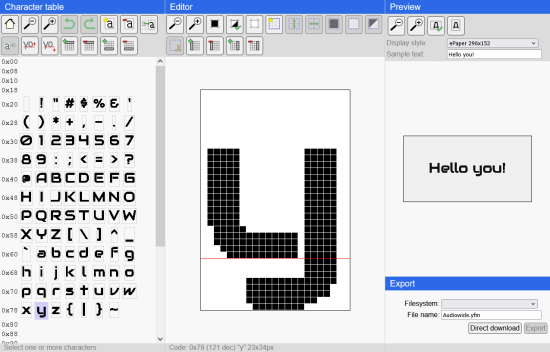
The main interface
The editor is divided into four sections:
Character Table
The character table is a grid which can hold 256 cells numbered from 0 to 255 (0xff). By convention, each letter has its own designated cell, known as an ASCII code, but you're free to draw whatever you want in each of these cells. A cell can be empty or contain a bitmap defining a character. Click on a non-empty cell to edit its contents. You can select multiple cells at once (Ctrl-click / Shift-click). At the top of the table, there is a series of buttons that affect, directly or indirectly, all the characters in the font.

Returns to the welcome screen to start over with a different font. This does not affect the Undo history or the last selection.

Reduces the size of the cells for a better overview. Does not affect the actual size of the characters.

Enlarges the cells for better visibility. Does not affect the actual size of the characters.

Undoes the last action or change.

Undoes the latest undo.

Creates a new empty character in the selected cell(s); the previous content is cleared.

Clears the content of the selected cell(s).

Copies the content of the selected cell(s).
 Pastes the contents of the previously copied cells starting from the first selected cell. Alignment is based on the baseline. The height of the pasted characters is adjusted to match the current font size.

Raises the baseline of all characters by one pixel.

Lowers the baseline of all characters by one pixel.

Adds a row of pixels to the top of all characters.

Removes the first row of pixels from all characters.

Adds a row of pixels to the bottom of all characters.

Removes the bottom row of pixels from all characters.
Editor
This is the editor itself, which allows you to edit a selected character in the character table. Here, too, you have a range of tools available in the form of buttons.
Zoom out the work area by reducing the pixel size, providing a better overview of large characters.
Zoom in the work area by increasing the pixel size, making it easier to work on small characters.

Colors all pixels under the mouse cursor black when the left mouse button is pressed.

Inverts the color of the pixels under the mouse cursor when the left mouse button is pressed.

Colors all pixels under the mouse cursor white when the left mouse button is pressed.

Selects an area and copies its contents, which can then be moved. Right-click to deselect the area.
 Flips the contents of the selection vertically. Combined with moving the selection, this action simplifies the creation of symmetrical characters such as 'E' or 'O'.
 Horizontally flips the contents of the selection. Combined with moving the selection, this action simplifies the creation of symmetrical characters such as 'M' or 'W'.

Colors all pixels in the selection black.

Colors all pixels in the selection white.

Inverts the color of all pixels in the selection.

Pastes the contents of the latest selection. Useful for creating a character from a portion of another. For example, making an 'F' from an 'E' or copying accents.

Adds a column of pixels to the left.

Deletes the leftmost column of pixels.

Adds a column of pixels to the right.

Deletes the rightmost column of pixels.
Preview
The preview section gives you a preview of what your font will look like when displayed on your screen. You can enter sample text to display and select the screen format you plan to use from a list. If you have a Yoctopuce screen connected to your computer and a VirtualHub is running on that machine, you can select that screen from the list of available formats, and the sample text is also displayed on that screen in real time as you make changes. Here, too, you have a few buttons available.
Shrinks the screen emulation area.
Expands the screen emulation area.

Sets the emulation, and any selected screen, to landscape mode.

Sets the emulation, and any selected screen, to portrait mode.
Export
The Export section lets you save your work; you can specify a filename and, if desired, choose a Yoctopuce file system from among those detected. Typically, you'll want to choose the one that corresponds to the screen on which you plan to use your font.
You have two options:
- Direct download to save your work directly to your computer; due to technical limitations, the browser treats this as a simple download.
- Export: The file is saved to the Yoctopuce file system you selected earlier.
Tips
If you hover your mouse cursor over the TTF import preview area or the "Preview" panel, you'll get a magnifying glass effect that lets you spot any pixels that are out of place.
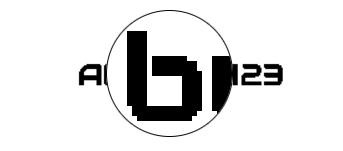
A nice, practical magnifying effect
You have about a hundred undo available, and they are not cleared when you return to the welcome screen to create a new font. This means you can work on a font, return to the welcome screen to load or import a new font, copy the characters you're interested in, use the undo function to return to the original font, and paste the characters. You can also use this trick with selections.
Limitations
Of course, although it's significantly better than the previous version, this new editor doesn't claim to be perfect. There are a few limitations:
- Yocto-FontEditor only works with reasonably recent browsers, typically those released after 2018.
- Importing TTF fonts creates artifacts that you'll need to correct manually.
- Due to the limitations of the .yfm format, creating fonts with extreme italics where each character overlaps the next is problematic.
- You can define all ASCII characters, but in fact, characters before 32 are not displayable.
- If you create a font with outlined characters, the interior of the characters is transparent. If you have a color screen and are feeling adventurous, you can create two fonts: one solid and one outline. Then display your text in the solid font with the color of your choice, and finally overlay the same text with the outline font. It's slow and tedious, but doable.
- Since Yoctopuce fonts are bitmap fonts, if you want the same font available in multiple sizes, you'll need to define one font for each size you require.
- Firefox may decide to replace the rendering of a font it considers a bit too exotic with the rendering of a standard font. The idea is to prevent you from being identified based on the fonts your machine can display. If in doubt, look for a message similar to "Request for font Xxxx blocked at visibility level 2 (requires 3)" in the browser console (Shift-Ctrl-i). You can choose to disable this Firefox protection.
- If you have a zoom level set in your browser and/or your operating system, the combination of the two zoom levels is likely to result in a non-integer virtual pixel size. This creates misleading display artifacts. When the editor pane is not active and this occurs, you'll see a warning. To resolve the issue, adjust your browser's zoom level (Ctrl + mouse wheel) until you reach a round number. For example, if a 125% zoom is set in your OS, you can adjust your browser to 80% or 160%, and the artifacts disappear.
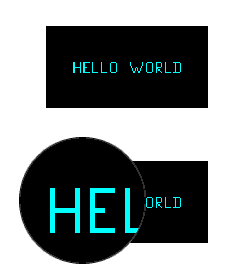
These artifacts are virtual; they do not exist
Conclusion
We suspect that the first font editor wasn't used much by customers because no one ever complained that it had to be recompiled in an environment that reminds many of you of Jurassic Park. We hope this one will be more successful and allow you to get the most out of your Yoctopuce displays.
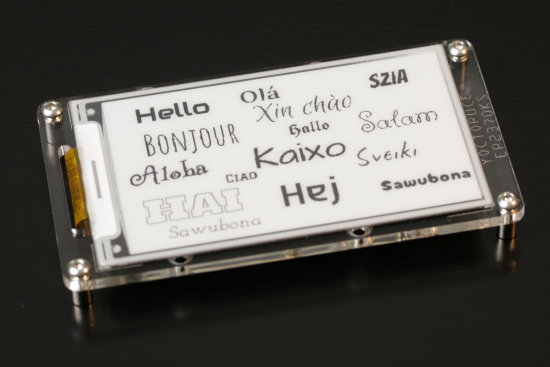
You're going to be able to treat yourself...
Finally, as you've probably already figured out, Yocto-FontEditor is free, and you can even find its source code on GitHub.