![]() A few weeks ago, a customer contacted us to know how to upload data from Yoctopuce sensors on a sensetecnic FRED cloud service. We have published a new firmware to make the YoctoHubs compatible with this service. So this week, we will take this opportunity to explain how to use a Yoctopuce sensor in FRED.
A few weeks ago, a customer contacted us to know how to upload data from Yoctopuce sensors on a sensetecnic FRED cloud service. We have published a new firmware to make the YoctoHubs compatible with this service. So this week, we will take this opportunity to explain how to use a Yoctopuce sensor in FRED.
FRED is a cloud service based on Node-RED enabling you to implement your own small home automation applications by connecting "logical blocks" together. Those of you who pay careful attention will remember that we already wrote about Node-RED last January. We even published a YSensor node enabling you to access Yoctopuce sensors on a local network.
Note: In this post, we are going to talk about Node-RED and MQTT. Both have already been covered by previous posts explaining how to use them. Therefore, we aren't going to write at length on how these services work. If you have never used Node-RED or MQTT, we strongly recommend that you read the following two posts:
Using MQTT with Node-RED
There are two issues preventing to use our YSensor node in FRED: first, it isn't available on the server, and second, you would have to configure your DSL router to open a port so that Node-RED can contact the YoctoHub. Fortunately, FRED is made of both a Node-RED server and an MQTT server. The solution is therefore to configure the YoctoHub so that it connects itself and sends the measured values to an MQTT server in the cloud and to use an MQTT node in the Node-RED schemas.
This solution kills two birds with one stone. No need to modify the router configuration anymore, because it's the YoctoHub which makes the connection to the MQTT server, and no need to install a plugin as Node-RED natively supports the MQTT protocol.
In this post, we are going to configure a YoctoHub so that it sends data from a Yocto-Meteo to FRED. We are going to implement a simple graph which displays the temperature of a room.
Note: Before you start, make sure that your YoctoHubs or VirtualHub are up-to-date. Old versions didn't allow you to specify the MQTT Client ID needed for authentication on sensetecnic MQTT servers.
Configuring the STS-MQTT service
You must first create an account on the fred.sensetecnic.com site and subscribe to one of the paid plans. Unfortunately, the free plan "FRED Short" doesn't include the STS-MQTT service enabling the YoctoHub to connect itself.
When you have logged into the site, you must click on the STS-MQTT link in the left bar, which allows you to access the configuration panel of the MQTT server. On this page, there are several tasks that you need to perform.
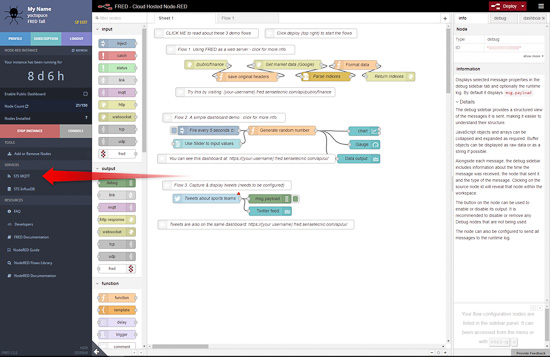
The STS-MQTT button gives you access to the configuration panel of the MQTT server
First, you must create two clients. The first client is used to identify the YoctoHub and the second one for the MQTT node of the Node-RED schema. The operation is relatively simple. In the "client" tab, click on the + sign at the top, which opens a pop-up with the client information. Before clicking on the "Add" button, copy the Client Key and the Client ID, as you'll need them later on.
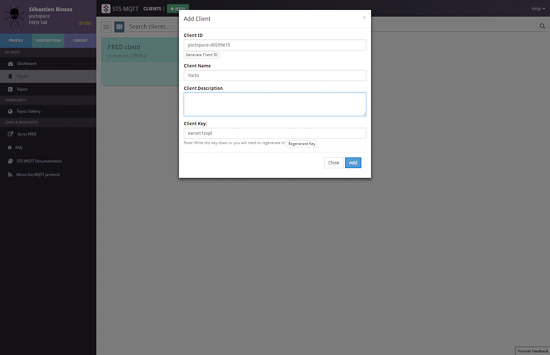
Before clicking on the Add button, copy the Client Key and the Client ID, as you'll need them later on
The second step is to create a topic for each sensor. In the "Topics" tab, click on the + sign at the top, which opens a pop-up enabling you to define the topic name. Beware, you cannot use any topic name. The name must conform to the YoctoHub and STS-MQTT service rules.
The YoctoHubs publish sensor values following the MODULE/FUNCTION syntax. MODULE corresponds to the serial number of the Yoctopuce module or to its logical name if it was defined. FUNCTION corresponds to the sensor function ID or to its logical name if it was defined.
In other words, the topic corresponds to what returns the get_friendlyName() method of a sensor. If you have never used Yoctopuce modules before, we recommend that you read this post in which we explain the logical structure of Yoctopuce modules.
In this example, we use the temperature sensor of a Yocto-Meteo with serial number METEOMK1-1E76B and no logical name was defined on the Yocto-Meteo. The topic is therefore named METEOMK1-1E76B/temperature.
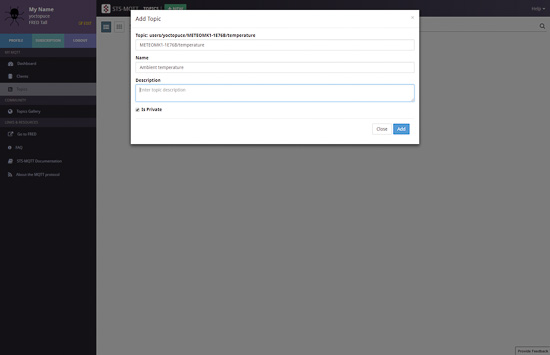
The topic name must correspond to the sensor friendly name
Note that even if the topic field value is METEOMK1-1E76B/temperature, the displayed name is users/yoctopuce/METEOMK1-1E76B/temperature. The STS-MQTT service always prefixes the topic with users/USERNAME where USERNAME corresponds to the FRED login. Consequently, if your login is myFunkyLogin, the topic is users/myFunkyLogin/METEOMK1-1E76B/temperature
Configuring the YoctoHub
When you have performed the MQTT server configuration, you must configure the HTTP callback of the YoctoHub so that it connects to the MQTT server. The configuration page of the MQTT callback is located in the YoctoHub configuration page. You must use a callback of type MQTT and fill in the fields with the following information:
- broker host: mqtt.sensetecnic.com
- broker port: 1883
- Client Id: You must use the client ID defined earlier.
- Username: You must use the user name of your FRED/STS-MQTT account. In our case, it's "yoctopuce".
- Password: Don't use the account password, but the Client Key defined for this client.
- Root topic: You must use users/USERNAME where USERNAME corresponds to your user name. In our case, the field value must be users/yoctopuce.
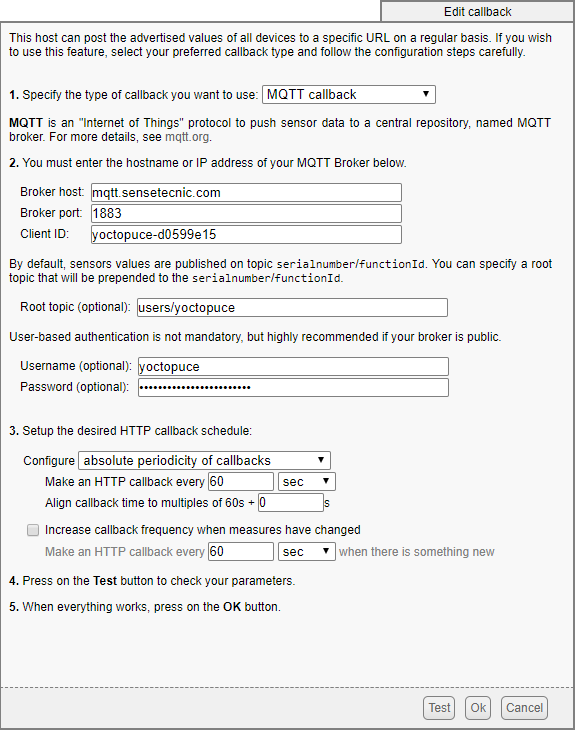
YoctoHub callback configuration parameters
If all the parameters are correct and if you click on the "Test" button, the YoctoHub must display the "Connected to MQTT broker" message. If it is not the case, check for error messages displayed in the MQTT server log window.
The Node-RED schema
Now that you have configured the YoctoHub and the MQTT server, you only have to define the Node-RED schema. For this example, we are simply going to modify the default schema and to replace the node generating random values with an MQTT input node which uses the values that the Yocto-Meteo sends to the MQTT server.
The first step is to add an MQTT input node in the schema and to configure it. To access the node configuration panel, you must double-click it. As for the YoctoHub, you must enter the server address, the port, the client ID, and the authentication parameters. You must however use the parameters of the second MQTT client that you defined earlier.
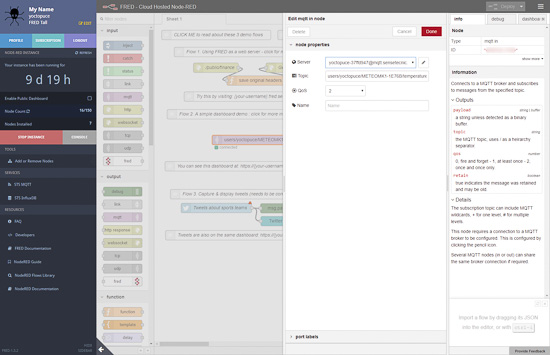
Connection parameters for the MQTT node
Then, you must enter the topic name. As we explained, FRED prefixes all the topics with the user name, we must therefore use users/yoctopuce/METEOMK1-1E76B/temperature and click on "Done".
When you have suppressed the old nodes, you must route this new MQTT node on the three output nodes which used random values.
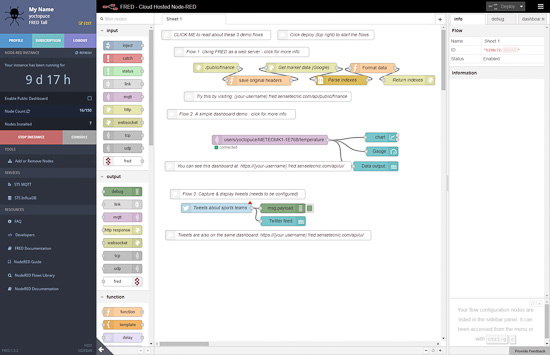
The new schema with the MQTT input node
You now only need to deploy the schema with the "deploy" button on the top right and to access the dashboard with the https://{your-username}.fred.sensetecnic.com/api/ui/ URL.

When the schema is deployed, the interface uses the values of the temperature sensor
Conclusion
The FRED service allows you to easily use Yoctopuce sensors in Node-RED. What makes this offer particularly interesting is the possibility to use their MQTT server directly, without needing to configure your own MQTT broker. This enables you to easily create an IoT application with sensors in different locations without having to manage a server or write code.


