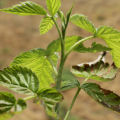
 At Yoctopuce, we like raspberries. So we thought that we would have our own local production, with an automatic watering system controlled by our modules. To do so, we retrieved a raspberry bush from the garden and we planted it in a pot with sensors to monitor its health. The aim is to adjust the water dispensing based on the humidity of the soil. Unfortunately, it's too late in the season to have raspberries this Summer, but we are still going to tell you about the modules used to maintain the raspberry bush alive.
Repotting
As a first step, we repotted the raspberry bush. We selected a large oval pot, which we prepared with care by adding clay balls at the bottom so that water doesn't stagnate in the soil and drown the bush. When the bush was repotted, we set it on the windowsill to be as close as possible to outside temperature and light. A little aside on growing raspberry bushes: they are rather easy to grow, they need about one watering per week, perhaps more often in case of high temperatures, and they need sun to produce raspberries. Our watering project can easily be adapted to any other type of plant, inside or outside.
Description of the system
To best monitor the state of the soil, we decided to use soil sensors from Delta-T Devices. The selected sensor enables us to obtain the temperature, the water content, and the electrical conductivity of the soil. To communicate with the sensors, we use a Yocto-Serial module which we slightly modified because the sensors communicate in SDI-12, but we'll tell you more about this in an upcoming post.
For watering, we used a small peristaltic pumprated for >=39ml/min when using a 6V power supply. In our case, we power the pump with 5V and our tests shows a 40ml/min flow rate. To drive and power the pump, we use a Yocto-PowerRelay-V3.
We also use a Hall effect sensor to check that the pump works and to monitor the number of rotations performed by the pump, thangs to a magnet that we added inside the pump. To power and read the values of the Hall effect sensor, we use a Yocto-PWM-Rx.
We then connect the three modules to a YoctoHub-Ethernet to communicate with the control software. When everything is connected and when communications work correctly, we put everything in an enclosure because, as the electronics needs to be put outside, it needs to be protected from the rain.


Wiring of the electronics
Now that the modules are connected, we install the sensors and the pump as follows:

Module and sensor wiring diagram
Monitoring and driving
A job runs in the Yocto-Serial which queries every 5 seconds all the sensors and publish the values in the GenericSensor functions. All the measured values are posted by HTTP callback and available on a Yocto-Cloud .
Furthermore, a C# program checks every 10 minutes wether the buried sensor has a water content of less than 5% to make sure the raspberry bush is not thirsty by lack of water. The relay triggers the pump if the value is below 5% and the Yocto-PWM-Rx counts the number of revolutions of the pump, by counting the number of activations of the Hall effect sensor due to the magnet in the pump. We let the pump perform 1000 revolutions, then we wait one minute and we retrieve the values of the sensors again until the water content of the soil is at about 25%.

Graph taken directly from the Yocto-Cloud, from the 10th to the 17th of August
We observe above the values measured between the 10th and the 17th of August. There is clearly a decrease in the soil water content. So far, we didn't have any heavy rain or any watering, so there is not much to see on the graphs.
The fourth graph shows when the relay is activated as well as the values measured of the PWM. As watering didn't yet need to be triggered, the graph is still empty except for a manual test.
Real life conditions
We expected the bush to react somewhat badly to repotting, but we were surprised to see the extent of it. Following repotting, we decided to give more water than usual to the raspberry bush to help it getting used to the new pot, except that it didn't at all appreciate having a lot of water in one go. It started to have dried leaves. So we decided to stop watering the soil and we waited to see whether the bush would get used to the new soil, still keeping a eye on the measured values.
After a few days, we see on the graph that water content hasn't decreased much so we decided to repot the bush once more to prevent its death by drowning.
This time, we selected a smaller rectangular pot. We put only two sensors, one at the bottom of the pot and one near the water supply pipe. We'll have at the same time the values in the middle and at the bottom of the pot.

New pot with the sensor locations
Current state
Today, the raspberry bush is doing better, new twigs started growing. A second post is planned in the coming months to observe the new measured values and the state of the raspberry bush.

The raspberry, the water canister and the electronic box
We'll keep an eye on it and on the measured values to ensure lots of raspberries next Summer.

