![]() This week, we wanted to test Windows IoT. To do so, we decided to use a Raspberry Pi 3, our new Yocto-Bridge module and a Yocto-MaxiDisplay to implement a weighing scale.
This week, we wanted to test Windows IoT. To do so, we decided to use a Raspberry Pi 3, our new Yocto-Bridge module and a Yocto-MaxiDisplay to implement a weighing scale.
Note: In this post, we are going to concentrate on Windows 10 IoT and on how to use our modules in this context. If you have never used our modules, we advise you to start by reading the following three posts:
- Introduction to Yoctopuce modules
- New: Yocto-Bridge and Yocto-MaxiBridge
- How to get started with Yoctopuce modules on UWP
Windows 10 IoT is an extremely minimalist version of Windows 10 designed to work on embedded systems or on connected objects. In fact, it's not a Windows OS as most people understand it: there is not start menu, no windowing system, and you can only use applications of Universal Windows (UWP) type.
You should rather see Windows 10 IoT as a platform running a single UWP application on a micro computer such as a Raspberry Pi. As you can see, the approach is radically different from that of Linux, which allows you to use all the OS features. However, as you are going to see, Windows 10 IoT is not without interest, in particular if you are familiar with the development of Windows applications.
In this example, we are using a Raspberry Pi 3 because it's a widely used and cheap system. But you can use other boards which support Windows IoT.
The first step is therefore to install Windows IoT on our Raspberry Pi.
Installing Windows 10 IoT on a Rapsberry Pi
You must start by downloading and installing the Windows 10 IoT Core Dashboard tool, which allows you to both install Windows on the Raspberry Pi SD card, but also to manage already deployed installations.
To install Window 10 on the SD card, you must run this tool and access the "Setup a new device" tab. Select your SD card reader, give a name to this system as well as a password used later to connect to the Raspberry Pi, and finally click on the "Download and install" button. The tool takes care of downloading, installing, and configuring a Windows 10 IoT image on the SD card.
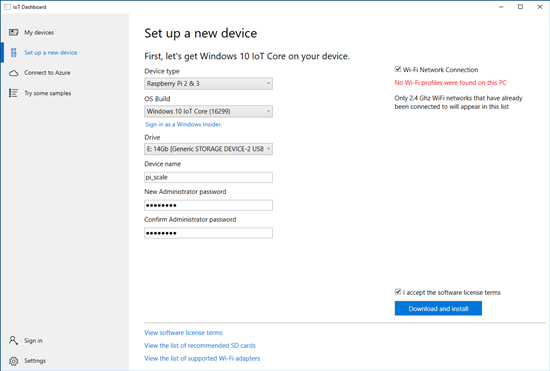
The 'Setup a new device' tab allows you to install Windows 10 IoT on a SD card
After the installation, you can simply insert the SD card into the Raspberry Pi and boot it. The first boot is quite slow but after a few minutes you should have the following display:
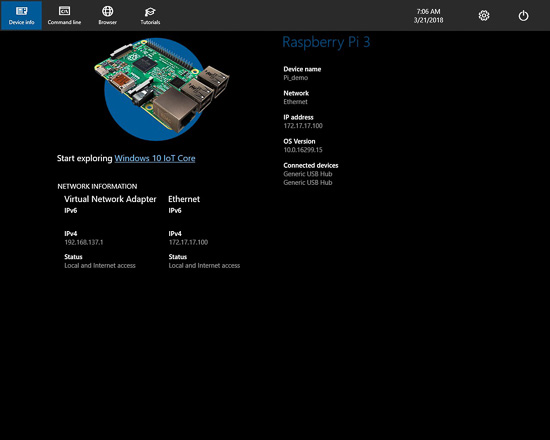
The screen displayed by Windows after the first boot
By default, Windows uses a 1280x1024 resolution, which is not widely used anymore. The first thing to do is therefore to change the resolution to fit your screen, in our case 1920x1080. To modify this parameter, you must connect to the "Windows Device Portal" from a web browser.
Connecting to the Windows Device Portal
The Windows Device Portal is a web interface hosted by Windows 10 IoT and which allows you to configure and manage the system.
By default, it uses port 8080. You can therefore access this interface from any browser using the machine IP and the 8080 port. That's fine because the IP address is one of the information displayed on the Windows IoT welcome screen.
The other solution is to use the "Windows 10 IoT Core Dashboard" tool that we used to prepare the SD card. If the Raspberry Pi is connected to the same network as your computer, it is listed under the "My device" tab, and from there you can directly access the Windows Device Portal.
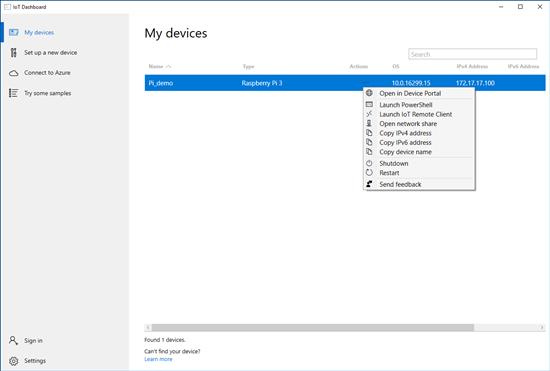
The Windows 10 IoT Core Dashboard lists all the systems which are connected on the sub-network
To access the web interface, you must use the "Administrator" login and the password you have defined during installation. When you are logged in, you can manage the system and modify many parameters:
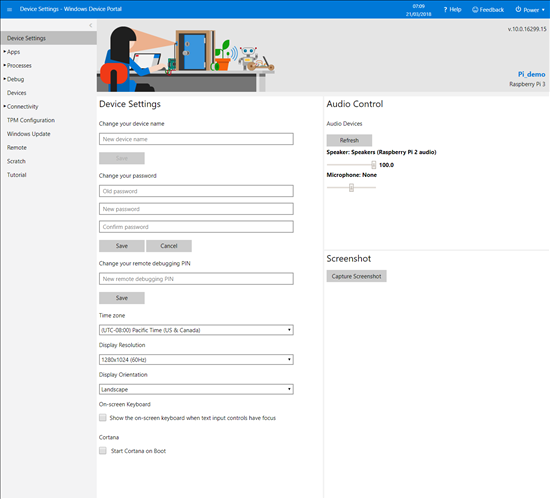
The Windows Device Portal allows you to configure the system remotely
Coding the scale application
As we have seen in details how to use our modules in a UWP application only a few weeks ago, we are not going to spend time on the subject. We are going to concentrate on installing the application on the Raspberry Pi.
But, broadly speaking, here is what the application does: at start up, it checks that there is a YWeighScale function from a Yocto-Bridge and we record a callback function thanks to the registerValueCallback method. If there is a Yocto-MaxiDisplay, we erase the screen and we keep a reference on the YDisplay function. Finally, with a DispatcherTimer, we call 5 times per second the YAPI.HandleEvents() method.
The callback function that we recorded is called as soon as the value measured by the Yocto-Bridge changes. This function must simply update the interface, and potentially the Yocto-MaxiDisplay if one was detected at start up.
{
value += " " + unit;
CurVal.Text = value;
if (display != null) {
try {
await l0.clear();
await l0.drawText(w / 2, h / 2, YDisplayLayer.ALIGN.CENTER_DECIMAL, value);
} catch (YAPI_Exception ex) {
await FatalError(ex.Message);
}
}
}
The complete code is available on GitHub at the following address: https://github.com/yoctopuce-examples/win_iot_scale.
Note that, while developing this application, you don't need to use the Raspberry Pi. It's faster to compile and test the application on your dev machine and when the application works, to check that everything works in the same way under Windows IoT.
To run the application on the Raspberry Pi, you must select in the tool bar "ARM" as platform and "Remote Machine" as target. When running next, Visual Studio open a pop-up enabling you to enter the IP address of the Raspberry Pi. Note that on top of the tool bar, these options are available in the "Debug" tab of the project properties.
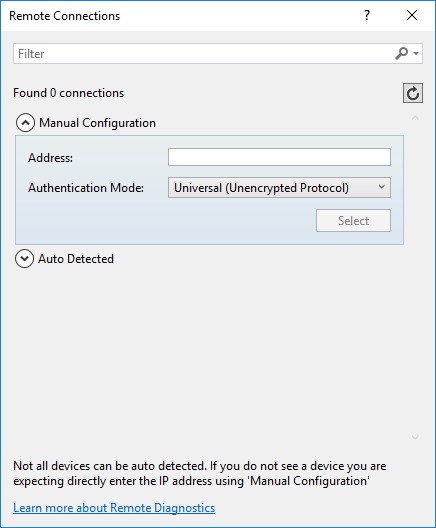
When running for the first time, you must enter the IP address of the Raspberry Pi
Normally, you should have the Raspberry Pi screen displaying the weight measured by the Yocto-Bridge
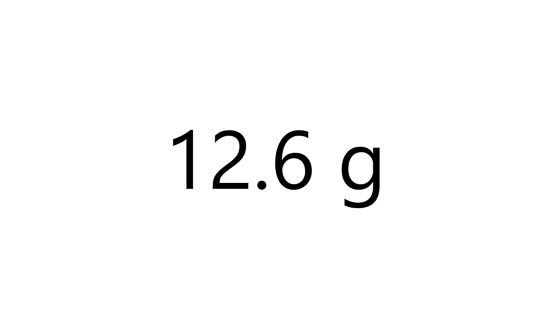
The application displays the weight measured by the Yocto-Bridge
Running the application at start up
Now that our scale application works, we only need to configure Windows for the application to automatically start when the computer boots.
The process is very simple. We only have to connect to the "Windows Device Portal", to select the "App" tab, and to enable the "Startup" radio box for our application. Thus, as soon as the Raspberry Pi is powered on, our application is launched and our scale is available.

It is very easy to configure the application to start automatically
Conclusion
As you can see, we transformed our Raspberry Pi into a weighing scale.
The application is very basic, but if you want to improve this weighing scale to transform it into a smart or a connected scale, you can freely take our example and modify it.
In the end, to quickly realize a prototype of a connected object or a DIY, the combination Windows + Raspberry Pi works surprisingly well and is fast to implement.


