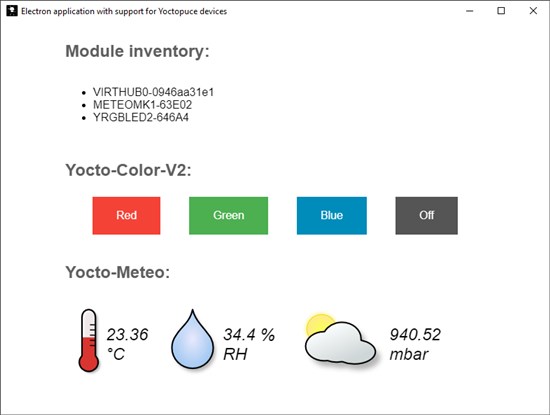
 This week, we look at the Electron framework. We are going to see how to implement a cross-platform application which uses our modules.
Electron is a JavaScript framework enabling you to implement cross-platform applications. But how does it work?
Actually, Electron is the assembly of several technologies: HTML, CSS, and JavaScript. In effect, it is a Chromium web browser customized to use Node.js and display an HTML page. In this way, the JavaScript code of an Electron application can use almost all the features of the OS. You can for example access the filesystem of the machine, or run any command directly from the web page. Ultimately, it enables you to implement an application which looks native but which is in fact a web page.
Another advantage of this solution is that it allows you to package an application for any platform which is supported by Chromium, which means Windows, Linux, and macOS.
Now that we have roughly seen how Electron works, let's have a look at how to use our modules in such an application.
Note: In order to keep this post relatively easy to read and understand, we are going to assume that you know how to write a basic Electron application. If you have never used this framework, we advise you to start by the "Getting Started" section of the Electron documentation and to come back to this post afterwards.
In the same way, if you have never used our JavaScript / EcmaScript 2017 library, you should start by reading this post.
Adding the Yoctopuce library
We are going to start from the electron-quick-start application in the Electron documentation and modify the code to display the list of the modules connected by USB.
First of all, we must add a dependency to our JavaScript / EcmaScript 2017 library in the package.json file and install it with the "npm install" command.
The package.json file with the dependence on the yoctolib-es2017 library:
"name": "demo_electron",
"ProductName": "Electron demo app",
"version": "1.0.0",
"main": "main.js",
"scripts": {
"start": "electron .",
},
"dependencies": {
"yoctolib-es2017": "^1.10.38168"
},
"devDependencies": {
"electron": "^7.1.3",
}
}
Then we have to modify the HTML page of the application, to add a <ul> tag that we fill with the list of the detected modules.
<body>
<h2 class="section_title">Module inventory:</h2>
<div class="section">
<ul id="module_list"></ul>
</div>
...
Then, we "only need to" write the JavaScript code which fills this list.
let serial_list = [];
function refresh_module_list()
{
let ul = document.getElementById('module_list');
ul.innerHTML = '';
for (let i = 0; i < serial_list.length; i++) {
let li = document.createElement("li");
li.appendChild(document.createTextNode(serial_list[i]));
ul.appendChild(li);
}
}
async function deviceArrival(module)
{
let serial = await module.get_serialNumber();
serial_list[serial_list.length] = serial;
refresh_module_list();
}
async function deviceRemoval(module)
{
let serial = await module.get_serialNumber();
serial_list = serial_list.filter(item => item !== serial);
refresh_module_list();
}
function handleHotPlug()
{
YAPI.SetTimeout(handleHotPlug, 1000);
}
async function startDemo()
{
await YAPI.LogUnhandledPromiseRejections();
try {
// Setup the API to use the VirtualHub on local machine
await YAPI.RegisterHub('localhost');
} catch () {
ipcRenderer.send('open-error-dialog', errmsg.msg);
return;
}
await YAPI.RegisterDeviceArrivalCallback(deviceArrival);
await YAPI.RegisterDeviceRemovalCallback(deviceRemoval);
handleHotPlug()
}
startDemo();
The code is simple, we initialize the library with the YAPI.RegisterHub method and we register two callbacks to detect module connections and disconnections. The only specificity of this code compared to the use of our library in a web browser is the use of the require function to load the files of our library.

Our Electron application
Using the VirtualHub
Even with Electron and Node.js, we cannot directly access USB devices from JavaScript code. Therefore, to use the modules connected on the USB ports, the VirtualHub must be running. If the VirtualHub is not running when executing YAPI.RegisterHub('localhost'), a "connect ECONNREFUSED 127.0.0.1:4444" error is returned.
Fortunately, we can include the VirtualHub in our Electron application and automatically run it when starting the application. In this way, we can "hide" the VirtualHub and the user needs to run only one executable.
To add the VirtualHub to the Electron application, we copy it in the directory as any other resource. In this example, we selected to copy all the versions of the VirtualHub in the following sub-directories:
- Windows : VirtualHub/windows/VirtualHub.exe
- Linux Intel 64 bits : VirtualHub/linux/64bits/VirtualHub
- Linux Intel 32 bits : VirtualHub/linux/32bits/VirtualHub
- Linux ARM (Raspberry Pi): VirtualHub/linux/armhf/VirtualHub
- Linux ARM 64 bits: VirtualHub/linux/aarch64/VirtualHub
- macOS : VirtualHub/osx/VirtualHub
This requires us to write a function detecting the OS and the architecture of the machine in order to run the corresponding executable file.
{
let arch = os.arch();
let ostype = os.type().toLowerCase();
let executablePath = "";
if (ostype.startsWith("win")) {
executablePath = "windows/VirtualHub.exe";
} else if (ostype === 'linux') {
if (arch === 'x64') {
executablePath = "linux/64bits/VirtualHub";
} else if (arch === 'ia32') {
executablePath = "linux/32bits/VirtualHub";
} else if (arch === 'arm64') {
executablePath = "linux/aarch64/VirtualHub";
} else if (arch === 'arm') {
executablePath = "linux/armhf/VirtualHub";
}
} else if (ostype === 'darwin') {
executablePath = "osx/VirtualHub";
}
let full_path = "./VirtualHub/" + executablePath;
vhub_process = execFile(full_path, ['-y'], {cwd: app.getAppPath()},
function (error, stdout, stderr) {
if (vhub_ignore_error) {
return;
}
if (stderr) {
console.log("ERR:" + stderr.toString());
dialog.showErrorBox('VirtualHub error', stderr.toString());
} else {
console.log(stdout.toString());
}
if (error) {
console.error(error);
dialog.showErrorBox('VirtualHub error', error.toString());
return;
}
});
}
In the main.js file, we modify the code to call this function before creating the window.
// initialization and is ready to create browser windows.
// Some APIs can only be used after this event occurs.
app.on('ready', function(){
startVirtualHub();
createWindow();
});
We can now test our Electron application with the command:
npm start

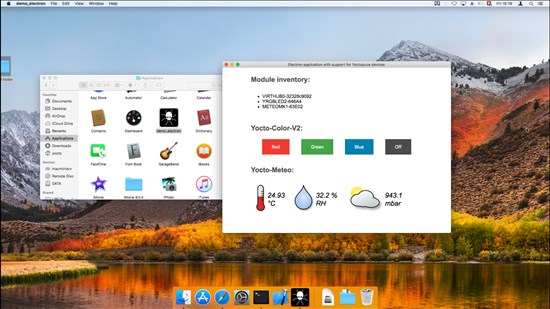
Our Electron application on macOS
Linux specificity
To work correctly, the VirtualHub needs write access to the Yoctopuce USB devices. But, by default, most Linux distributions do not give write privileges to non-root users. One solution is to instal a udev rule on the machine to change this behavior, as explained in this post.
The other solution is to use the sudo command to grant root privileges to the application. But in this case, Electron isn't happy:
yocto@linux-laptop:~/electron/electron_example$ sudo npm start > demo_electron@1.0.0 start /home/yocto/electron/electron_example > electron . [5963:1212/000704.995338:FATAL:atom_main_delegate.cc(211)] Running as root without --no-sandbox is not supported. See https://crbug.com/638180.
As said in the error message, we must add the --no-sandbox option when starting the application. However, as our application is not yet packaged and as we use npm to call Electron, this option is interpreted by npm rather than by Electron.
The trick is to add a new "start_as_root" command which instantiates Electron with the --no-sandbox option in the package.json file.
"name": "demo_electron",
"ProductName": "Electron demo app",
"version": "1.0.0",
"main": "main.js",
"scripts": {
"start": "electron .",
"start_as_root": "electron . --no-sandbox",
},
"dependencies": {
"yoctolib-es2017": "^1.10.38168"
},
"devDependencies": {
"electron": "^7.1.3",
}
}
In this way, you can run the application during the development phase as root with the help of the following command:
sudo npm run start_as_root
Packaging the application
As is, the application is operational but requires Node.js and npm to have been installed. It's very handy to test the application in the development phase but for the application to be easy to distribute, we must package it with the electron-packager package.
This package enables us to generate a completely autonomous application, which we can distribute on any machine.
If not already done, we must add the electron-packager to the list of development packages with the following command:
npm install electron-packager --save-dev
Then, we add to the package.json file a command running electron-packager. This command takes as argument the OS, the architecture, as well as the icon to be used for the executable file.
Here is our final package.json file:
"name": "demo_electron",
"ProductName": "Electron demo app",
"version": "1.0.0",
"main": "main.js",
"scripts": {
"start": "electron .",
"start_as_root": "electron . --no-sandbox",
"package-mac": "electron-packager . --overwrite --platform=darwin --arch=x64 --icon=icons/logo_black_1024.png ",
"package-win": "electron-packager . --overwrite --platform=win32 --arch=ia32 --icon=icons/logo_black.ico --out=release-builds ",
"package-lin-x64": "electron-packager . --overwrite --platform=linux --arch=x64 --icon=icons/logo_black_1024.png ",
"package-lin-ia32": "electron-packager . --overwrite --platform=linux --arch=ia32 --icon=icons/logo_black_1024.png ",
"package-lin-arm": "electron-packager . --overwrite --platform=linux --arch=armv7l --icon=icons/logo_black_1024.png ",
"package-lin-arm64": "electron-packager . --overwrite --platform=linux --arch=arm64 --icon=icons/logo_black_1024.png "
},
"dependencies": {
"yoctolib-es2017": "^1.10.38168"
},
"devDependencies": {
"electron": "^7.1.3",
"electron-packager": "^14.1.1"
}
}
We have 6 commands package-mac, package-win, package-lin-x64, package-lin-ia32, package-lin-arm, and package-lin-arm64 which enable us to respectively package/compile the application for macOS, Windows, Linux Intel 64 bits, Linux Intel 32 bits, Linux ARM, and Linux ARM 64 bits.
Each command creates a sub-directory, with all the files required to make the application work and a "demo-electron" executable which can be used as any native application.
For example, to generate the application for a Raspberry Pi from Windows, we only need to run the following command:
npm package-lin-arm
This command creates a demo_electron-linux-armv7l sub-directory with every thing needed to make the application work.
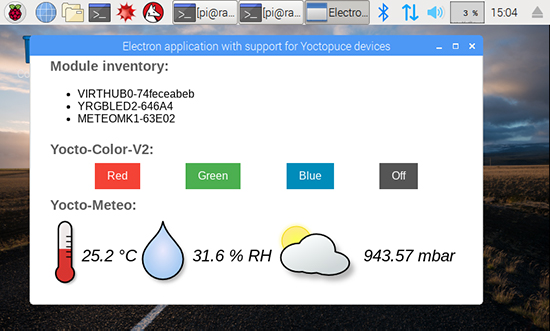
Then we only need to copy all this directory onto the Raspberry Pi and to run the demo_electron executable file to start the application.

The application for Raspberry Pi compiled from Windows
The sources of our example
The sources of this application are available on GitHub: https://github.com/yoctopuce-examples/electron_example
On top of the code that we just now explained, it allows you to drive the leds of a Yocto-Color-V2 and to display the measures of a Yocto-Meteo or a Yocto-Meteo-V2.
The application is basic, but it works on the following platforms:
- Windows
- macOS
- Linux (Intel and ARM)
Conclusion
This framework is very interesting because it allows us to easily implement small applications which work on any platform. Moreover, there are packages that enable us to generate installers for Windows or .deb files for Linux.


