![]() This week, we go on with our post series "for the beginners" and we talk about JavaScript, and more particularly about how to use our JavaScript/EcmaScript 2017 library in a web browser. We are going to see how you can automatically fill an HTML form with data from a Yoctopuce sensor.
This week, we go on with our post series "for the beginners" and we talk about JavaScript, and more particularly about how to use our JavaScript/EcmaScript 2017 library in a web browser. We are going to see how you can automatically fill an HTML form with data from a Yoctopuce sensor.
Before we start, we assume that you have at least some basic knowledge of the HTML and JavaScript languages, as our aim is not to write yet another tutorial on the topic but to understand how to use these languages to interact with our modules. In the same way, if you are not familiar with Yoctopuce modules, we recommend that you start by reading the previous posts of this series, and in particular the post on the logical structure of Yoctopuce devices.
Comment about Node.js
You can also use our JavaScript/EcmaScript 2017 library in Node.js, but the installation differs slightly. For more details, read our post "Beginning in Node.js with Yoctopuce modules".
Characteristics of JavaScript
You cannot directly access USB peripherals from JavaScript code. The script can communicate only with Yoctopuce modules that are connected to a YoctoHub or to a computer running a VirtualHub. Communications between the JS script and the Yoctopuce modules go through a WebSocket connection between the YoctoHub and the browser, and the YoctoHubs then transmit the requests to the appropriate modules.
Therefore, to use modules connected by USB on the machine running the browser, you must have installed the VirtualHub.

Communication between the JavaScript script and the Yoctopuce module always goes through TCP
A short example
To illustrate the use of our JavaScript library, we are going to start from a minimalist web page containing only an HTML form. We are going to see how to add a button to automatically fill this form with the temperature measured by a Yocto-Temperature.
The page we start with:
<html lang="en">
<head>
<meta charset="UTF-8">
<title>JavaScript and Yoctopuce</title>
</head>
<style>
body {
display: flex;
flex-direction: column;
align-items: center;
}
</style>
<body>
<h1>JavaScript and Yoctopuce</h1>
<form method="GET" action="/dummy.html">
<table>
<tr>
<td><label for="hwid">Hardware ID:</label></td>
<td><input id='hwid'></td>
</tr>
<tr>
<td><label for="curVal">Current Value:</label></td>
<td><input id="curVal"></td>
</tr>
<tr>
<td><label for="unit">Unit:</label></td>
<td><input id='unit'></td>
</tr>
<tr>
<td colspan="2">
<button type="submit" value="Submit">Ok</button>
<button type="reset" value="Reset">Cancel</button>
</td>
</tr>
</table>
</form>
</body>
</html>
The VirtualHub
As said before, for the JavaScript code to access the USB port, you must install and run the VirtualHub on the machine displaying the web page. We explain the procedure to install the VirtualHub in this post.
Loading the library
The first thing that you need to do is to load the JavaScript files of our library. There are two solutions:
Private hosting
The first one consists in downloading and hosting the library on your own server. You can download it from the Yoctopuce web site, from npm, or even from GitHub.
The archive contains four directories. The Documentation directory contains the documentation, the lib directory contains the source files of the library, the other two directories contain the library use examples. The eample_html directory gathers all the examples that you can use directly in a web browser, while the example_node directory contains examples which work only under Node.js.
Only the yocto_xxx.js files of the lib directory need to be hosted on your server. The easiest way is to create a ylib sub-directory and to copy all the yocto_xxx.js files there.
Then you must modify the web page to import the files that we are going to use in our script. We need to include the indispensable "yocto_api.js" enabling us to use the library, but also "yocto_temperature.js" to enable us to use the temperature sensor. If you don't know which files to include, you should reread our post on the logical structure of Yoctopuce devices.
Using a Content Delivery Network
The other solution is to use a CDN (Content Delivery Network). The advantage is that you don't need to host the library files, but you become dependent on an external provider.
There are several CDN, but we find jsdelivr.net the easiest to use as it enables us to directly reference our library from our npm package. It also enables you to minify files on the fly.
The link that you must use is composed of 4 parts:
- the base url: "https://cdn.jsdelivr.net/npm/"
- the npm package name: yoctolib-es2017
- the library version fronted by the '@' character : @1.10.30813
- the file name: yocto_api.js
Note that by replacing the '.js' extension by '.min.js', jsdelivr minifies the referenced JavaScript files on the fly. This enables you to reduce the time needed to download the page.
Concretely, to include minified versions of the yocto_api.js and yocto_temperature.js files of the 1.10.30813 version of our JavaScript/EcmaScript 2017 library, you must use the following links:
<script src="https://cdn.jsdelivr.net/npm/yoctolib-es2017@1.10.30813/yocto_api.min.js"></script>
<script src="https://cdn.jsdelivr.net/npm/yoctolib-es2017@1.10.30813/yocto_temperature.min.js"></script>
...
async / await
Our JavaScript/EcmaScript 2017 library uses the new async and await operators which enable you to much more easily manage asynchronous operations. These operators use promises internally to correctly manage asynchronous calls which could otherwise distort the code execution flow. What you must remember is that async functions or methods must imperatively be called with the await operator.
As a reminder, all the methods of our library are of the async type except
- the YAPI.GetTickCount() method
- the FindXXX(hwid), FirstXXX(), and nextXXX() methods
- all the methods of the YMeasure, WlanRecord, and CellRecord classes
For more details on the topic, you can read the dedicated section in our module documentation.
The button to fill the form
Now that we have loaded the library files, we need to add the button which performs the following steps:
Establishing a connection with the VirtualHub
To access the modules, we must tell the library the YoctoHub or VirtualHub address, with the YAPI.RegisterHub method. In this example, the Yocto-Temperature is connected on the same machine, so we can use the "localhost" address.
You can find more details on the various uses of YAPI.RegisterHub in this other post.
Retrieving the YTemperature object
As you have read the post on the logical structure of Yoctopuce devices, you know that the Yocto-Temperature has different functions among which you can find temperature.
To retrieve the object enabling you to interact with this function there are several ways.
FirstXXX
If you are sure to have only one temperature function available, you can keep it simple and use the FirstTemperature method of the YTemperature class.
if (ytemp == null) {
alert("No temperature sensor found");
return;
}
...
The FirstXXX methods return the first occurrence of the desired function, or null if nothing corresponds.
FindXXX and serial number
You can also use the FindTemperature method of the YTemperature class with the serial number of the module. If we assume that the serial number of the Yocto-Temperature is TMPSENS1-019CB, you can use:
if (!await ytemp.isOnline()) {
alert("No temperature sensor found");
return;
}
...
In the opposite to FirstXXX, FindXXX always returns a valid object, therefore you must test if the module is connected with the isOnline() method.
FindXXX and logical name
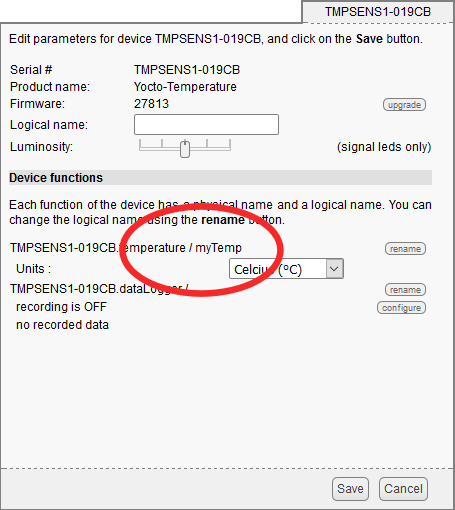
Instead of the serial number, you can use a logical name that you have assigned previously with the VirtualHub.

Assigning a logical name to the Yocto-Temperature sensor
Let's assume that you have called the temperature sensor "myTemp". You then only need to write:
if (! await ytemp.isOnline()) {
alert('Temperature sensor "myTemp" not found');
return;
}
There are two advantages of logical names: first, they make it easier to find your way around complex systems made up of many Yoctopuce modules; and second, they allow you to build systems in several copies without having to adapt the code to the serial numbers of the modules of each copy.
Using the YTemperature object
Now that we have retrieved the YTemperature object, we need to obtain the temperature and the measuring unit with the get_currentValue() and get_unit()methods.
let unit = await ytemp.get_unit();
console.log(hwid + " => " + value.toString() + unit);
document.getElementById("curVal").value = value;
document.getElementById("unit").value = unit;
Stopping the library
Before ending the script, we must call the YAPI.FreeAPI method, which frees all the resources used by the library but above all makes sure that all the communications ended correctly.
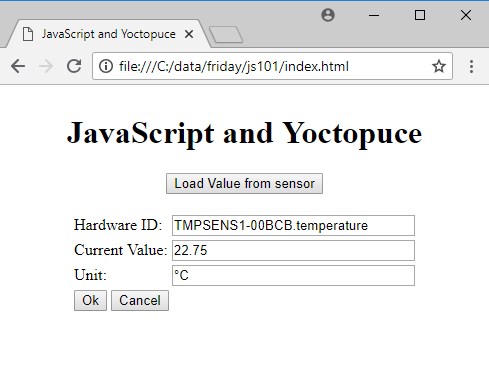
When everything is in place, our web page looks like this:
<html lang="en">
<head>
<meta charset="UTF-8">
<title>JavaScript and Yoctopuce</title>
</head>
<style>
body {
display: flex;
flex-direction: column;
align-items: center;
}
</style>
<script src="https://cdn.jsdelivr.net/npm/yoctolib-es2017@1.10.30813/yocto_api.min.js"></script>
<script src="https://cdn.jsdelivr.net/npm/yoctolib-es2017@1.10.30813/yocto_temperature.min.js"></script>
<body>
<h1>JavaScript and Yoctopuce</h1>
<script>
async function loadValueFromSensor()
{
await YAPI.RegisterHub("localhost");
let ytemp = YTemperature.FirstTemperature();
if (ytemp == null) {
alert("No temperature sensor found");
return;
}
let hwid = await ytemp.get_hardwareId();
let value = await ytemp.get_currentValue();
let unit = await ytemp.get_unit();
console.log(hwid + " => " + value.toString() + unit);
document.getElementById("hwid").value = hwid;
document.getElementById("curVal").value = value;
document.getElementById("unit").value = unit;
await YAPI.FreeAPI();
}
</script>
<button type="button" onclick="loadValueFromSensor()">Load Value from sensor</button><br>
<form method="GET" action="/dummy.html">
<table>
<tr>
<td><label for="hwid">Hardware ID:</label></td>
<td><input id='hwid'></td>
</tr>
<tr>
<td><label for="curVal">Current Value:</label></td>
<td><input id="curVal"></td>
</tr>
<tr>
<td><label for="unit">Unit:</label></td>
<td><input id='unit'></td>
</tr>
<tr>
<td colspan="2">
<button type="submit" value="Submit">Ok</button>
<button type="reset" value="Reset">Cancel</button>
</td>
</tr>
</table>
</form>
</body>
</html>

The form is filled with the value of the Yocto-Temperature
YSensor
Our example manages only temperature sensors, but we can make it work for any Yoctopuce sensor by modifying only a few lines. We only need to use the YSensor class instead of the YTemperature class:
<html lang="en">
<head>
<meta charset="UTF-8">
<title>JavaScript and Yoctopuce</title>
</head>
<style>
body {
display: flex;
flex-direction: column;
align-items: center;
}
</style>
<script src="https://cdn.jsdelivr.net/npm/yoctolib-es2017@1.10.30813/yocto_api.min.js"></script>
<script src="https://cdn.jsdelivr.net/npm/yoctolib-es2017@1.10.30813/yocto_temperature.min.js"></script>
<body>
<h1>JavaScript and Yoctopuce</h1>
<script>
async function loadValueFromSensor()
{
await YAPI.RegisterHub("localhost");
let sensor = YSensor.FirstSensor();
if (sensor == null) {
alert("No temperature sensor found");
return;
}
let hwid = await sensor.get_hardwareId();
let value = await sensor.get_currentValue();
let unit = await sensor.get_unit();
console.log(hwid + " => " + value.toString() + unit);
document.getElementById("hwid").value = hwid;
document.getElementById("curVal").value = value;
document.getElementById("unit").value = unit;
await YAPI.FreeAPI();
}
</script>
<button type="button" onclick="loadValueFromSensor()">Load Value from sensor</button><br>
<form method="GET" action="/dummy.html">
<table>
<tr>
<td><label for="hwid">Hardware ID:</label></td>
<td><input id='hwid'></td>
</tr>
<tr>
<td><label for="curVal">Current Value:</label></td>
<td><input id="curVal"></td>
</tr>
<tr>
<td><label for="unit">Unit:</label></td>
<td><input id='unit'></td>
</tr>
<tr>
<td colspan="2">
<button type="submit" value="Submit">Ok</button>
<button type="reset" value="Reset">Cancel</button>
</td>
</tr>
</table>
</form>
</body>
</html>
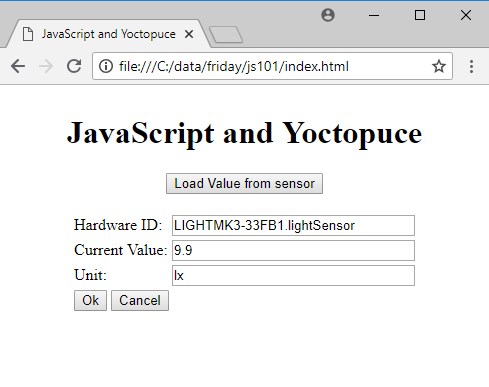
With this version of the code, the page works with any Yoctopuce sensor. This is possible because all the Yoctopuce classes corresponding to sensor type functions inherit from the YSensor class. The get_currentValue() and get_unit() methods are implemented in this class and work on any sensor.

The form is filled with the value of a Yocto-Light-V3
Error handling
By default, if there is an error, the library functions generate an exception. To handle errors and display a correctly formatted message, there are two solutions.
You can catch exceptions with try {} catch() blocks.
Like this for example:
YAPI.RegisterHub("localhost");
} catch (err) {
alert("Erreur:" . err.message;
return;
}
But you can also disable exceptions in the library with the "YAPI.DisableExceptions" method. In this case, you must test the returned value after each call to the library.
let errmsg = new YErrorMsg();
let res = await YAPI.RegisterHub('localhost', errmsg);
if (res != YAPI_SUCCESS) {
alert(errmsg.msg);
return;
}
These two solutions allow you to correctly handle errors and to display clear messages. Using one or the other is mostly a question of programming style and habit.
What follows...
There you are. We explained the bases, now with the reference documentation, you should be able to implement some more ambitious projects :-)


