![]() As Yoctopuce modules can now be controlled by MQTT, we propose this week a concrete example of their use in a system entirely controlled by Home Assistant. The goal of this project is to obtain a control panel gathering all the important parameters to check the state of a private pool, and to implement some simple regulation automations that can then be easily refined to optimize the pool energy consumption.
As Yoctopuce modules can now be controlled by MQTT, we propose this week a concrete example of their use in a system entirely controlled by Home Assistant. The goal of this project is to obtain a control panel gathering all the important parameters to check the state of a private pool, and to implement some simple regulation automations that can then be easily refined to optimize the pool energy consumption.
This project started from the frightening realization that the energy consumption of the filtration system of this pool represented more than 40% of the total energy consumption of the household in 2022. The main consumer is the filtration pump, which is regulated by a simple clock. The filtration hours are adjusted a few times a year depending on the season. Since the pump consumes 1 kW and has been running for more than 3000 hours over the year, its annual consumption is almost equal to that of an average Swiss household. We therefore thought that there must be a way to do better...
Composition of the system
The elements we chose to integrate in our control panel are:
- A Yocto-PowerRelay-V3 to activate the current pump, instead of the clock
- A Yocto-RS485-V2 that will later be used to control an IntelliFlo VSF variable speed pump, more efficient than the current fixed speed pump
- A Yocto-RS485-V2 to receive measures from an Electrex three-phase energy meter, as described in this previous post
- Two Yocto-4-20mA-Rx to receive water quality parameters (Cl-, pH, temperature) from the Bayrol Analyt 2 sterilization system
- A Yocto-RangeFinder and a relay for the level control system described in this previous post
All these modules are connected to the network and to MQTT directly via a YoctoHub-Ethernet. The majority of the modules were integrated into the pool's electrical panel, which dates back to the 1960s, and in which the space previously occupied by an old copper-silver sterilization system was reclaimed:

Electrical panel of the pool with Yoctopuce modules
The modules for the level control are in their own waterproof box, directly in the control cavity, with a dedicated YoctoHub-Ethernet:
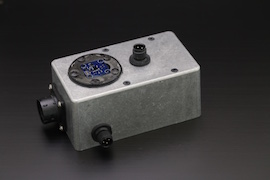
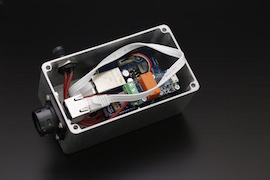
The home-made regulation controller
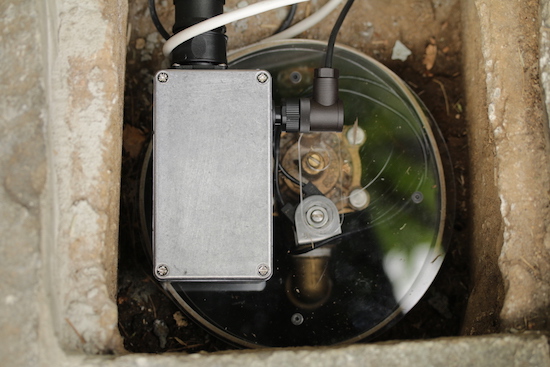
The level regulation system, installed above the valve
Configuring Yoctopuce modules
In order not to get confused in the MQTT environment, when using a large number of modules, it is important to give an explicit logical name to each of them, as well as to all the measure functions. This way, the MQTT discovery tools will find them easily. The logical name of the modules can be configured with the VirtualHub application, or directly via the YoctoHub-Ethernet web interface.

Modules connected to the hub in the electrical panel
For analog inputs like the Yocto-4-20mA-Rx, the correspondence between the 4-20mA signal and the physical measured value is configured, according to the information provided by the manufacturer of the device emitting the signal (Bayrol PM5-SA4 extension board). It is also imperative to activate the Timed reports at the desired frequency so that the measurements are seen and recorded by Home Assistant.
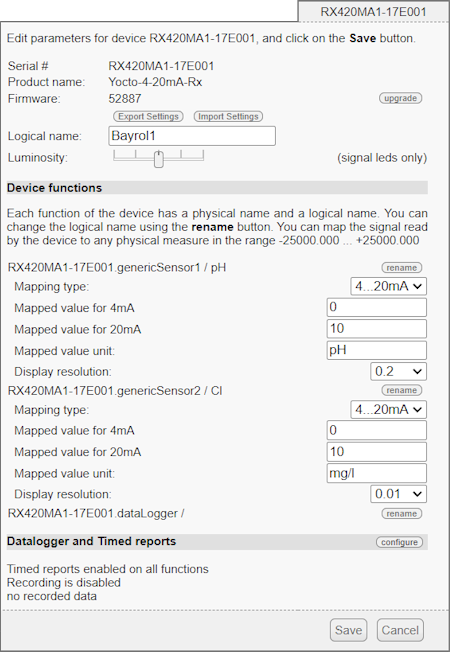
Configuration of the 4-20mA correspondence to the measured value
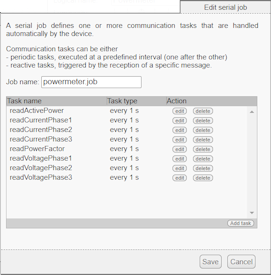
For the energy meter, we create on the Yocto-RS485 a job with eight tasks, each responsible for reading one of the parameters we are interested in on the meter:
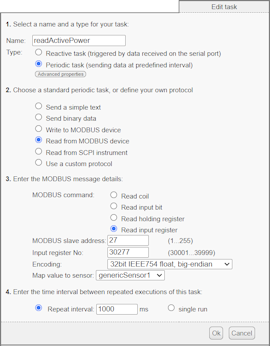
As for the other sensors, it is also necessary to configure on the genericSensors of the Yocto-RS485 timed reports at the desired frequency for the measurements to be transmitted to Home Assistant.
All that remains is to configure the YoctoHub-Ethernet to connect to the MQTT central, the broker. This is done in the Outgoing callbacks section of the hub configuration:
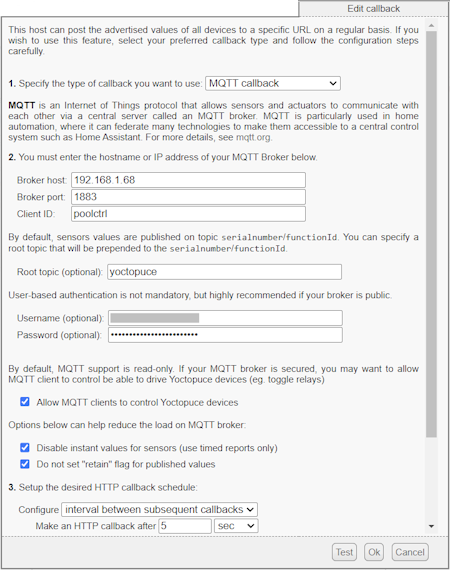
Configuration on an MQTT callback
Take care to assign a different Client ID for each YoctoHub. To make it easier to find your way around your MQTT environment, it is recommended to configure a Root topic of your choice. It can be the same for all YoctoHubs.
Connecting to Home Assistant
If your Home Assistant has MQTT integration configured correctly on the same broker as your YoctoHubs, you should be able to find your Yoctopuce modules in the Settings, Devices & Services section, under the MQTT category, listed by their logical name. By clicking on a module, you can see all the information that Home Assistant has retrieved through MQTT:
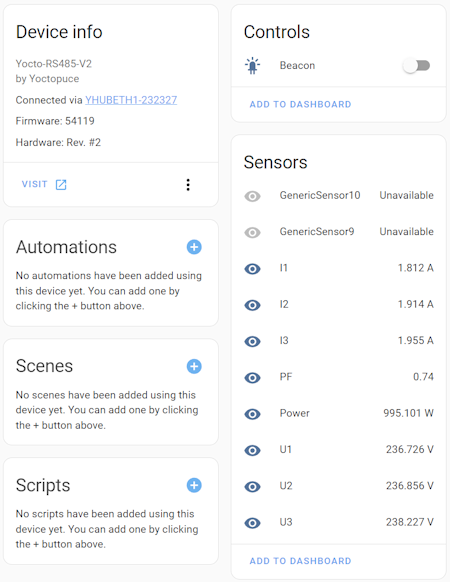
Information about the Yocto-RS485-V2 for the Electrex meter
Clicking on the Add to dashboard link, you can add that module to a Home Assistant control panel. It is then easy to customize the display directly in the control panel to group indicators, change icons and texts, or change the display resolution of measurements. Here is the result:

Our control panel in Home Assistant
Adding automations
Of course, we still have to add the automatic controls. To begin with, we replace the old clock by a strictly equivalent solution. To do this, go to the Settings, Automations & Scenes section, click on Create automation and choose Create new automation. We add a Trigger of type Time for each hour when we want to switch on the pump, and an Action of type Call a service that invokes the Switch: Turn on service with the PoolPump PowerRelay entity as target. We do the same to stop filtration:


At this point, it is a rather trivial automation. But the big difference with the old mechanical clock is that it will be possible later to add conditions to automatically change the filtration duration depending on the water temperature and the use of the pool.
The second automation that we will add is the water level control. The logic of the level control is as follows: every minute, if the distance between the level of the pool and the ground is greater than 180mm, we open the valve for 10 seconds.
Originally, this regulation was implemented by a script programmed in Python. But with Home Assistant, it is no longer necessary to write a line of code for such a simple mechanism:
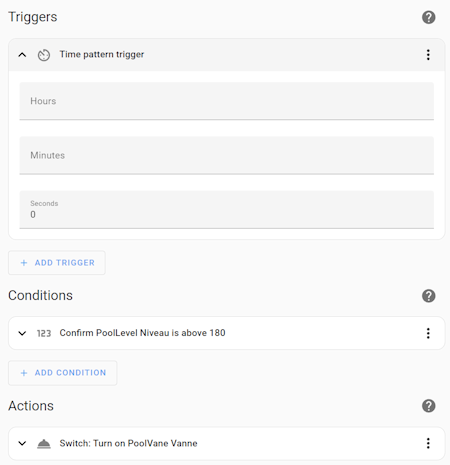
Automation to regulate the level
You will have noticed that this automation only controls the activation of the valve and not its deactivation. To avoid any risk of leaving the valve open in case of infrastructure failure, an automatic deactivation after ten seconds has been configured directly in the Yoctopuce relay settings:

Automatic relay deactivation after 10 seconds
This provides the behavior required by this communicating vessels control system.
Going further with this project
We still need some external components, such as the 4-20mA interface module for the Bayrol measurement system and the IntelliFlo VSF variable speed pump, to be able to implement the most important optimizations. But this first step of the project allowed us to validate the feasibility of a control system based on Yoctopuce modules and Home Assistant, without using external control programs.


