![]() When designing our audio output switch, we thought about using a motorized potentiometer for the volume. The idea was quickly dismissed because this would have added bulkiness and complexity into a project that we wanted simple and compact. However, the question remains: can we use a motorized potentiometer with Yoctopuce modules? We tried it and the answer is yes, although it's quite tricky to do.
When designing our audio output switch, we thought about using a motorized potentiometer for the volume. The idea was quickly dismissed because this would have added bulkiness and complexity into a project that we wanted simple and compact. However, the question remains: can we use a motorized potentiometer with Yoctopuce modules? We tried it and the answer is yes, although it's quite tricky to do.
What is a motorized potentiometer?
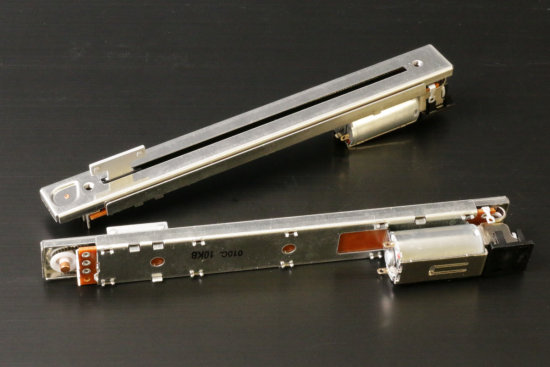
A motorized potentiometer is a potentiometer with an integrated motor. The cursor can still be moved manually, but you can also make it move on its own with the motor. This makes it a rather fascinating human/machine interface. Like the normal potentiometers, they are available in linear and rotary versions.
We have set our sights on a cheap version manufactured by Alps Alpine under the RSA0N11M9A0K reference. It's a 10K linear model, the motor supports up to 10V. After a few tests, we determined that the motor needs at least 3V to move. At this voltage, it consumes about 150mA. However, if we power it above 3V, it moves clearly too fast for us to control it. This model also offers a "Touch sense track" function, we suppose that it's a way to detect whether the user is putting the finger on the cursor, but there is no detail on the topic in the datasheet.

The RSA0N11M9A0K motorized potentiometer
Modules et interconnections
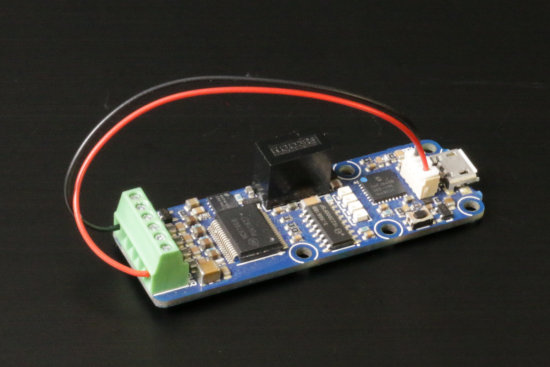
To interface the potentiometer part, we decided to use a Yocto-Knob but a Yocto-MaxiKnob would have done as well. The position of the cursor can thus be evaluated with a value between 0 and 1000, which is largely enough for our application. Note that to obtain a value range that corresponds to the entire travel of potentiometer cursor, you must calibrate the Yocto-Knob beforehand.
Managing the motor part is more complex, you must be able to polarize the motor power supply in both directions. Using a Yocto-Motor-DC could work, but it is an unreasonable overkill. We thus selected a Yocto-IO. The idea is to use both channels of the module and to configure them as follows:
- a "regular" output, that we actively drive
- an "open drain" output, that we keep pulled down to zero at all times
Thus, current can be passed from one channel to the other and we can power our motor. To change direction, we only need to switch the configuration of both channels.
However, we have a problem with power: The Yocto-IO does indeed have an internal power supply, but it can provide only a maximum of 100mA, which is not enough. We therefore decided to take 5V directly from the USB bus with a slightly doctored 1.27-1.27-11 cable.

We take 5V from the USB BUS
This solution introduces another problem: with 5V, the cursor moves much too fast for us to control it accurately. Therefore, we added a 13Ω resistance serially on the motor, which at 150mA creates a voltage drop of about 2V.

The complete wiring
Software
The software part brings its own lot of subtleties. You could think that to move the cursor to a specific position, you only need to power the motor in the correct direction, to read in a loop its position with the Yocto-Knob, and to cut off the power supply when the desired position is reached. But this doesn't work for several reasons:
- This way of doing things is too slow. The time you need to read the value and cut off the power supply, the cursor will be way over the position aimed at.
- The mechanism has a lot of inertia, even if you cut off the power supply at exactly the right time, the cursor will still move on for a few millimeters.
So we chose a different approach:
- Reading the position of the cursor is based on callbacks to be as reactive as possible.
- Rather than simply turning on the power supply, we rather use pulses. We empirically determined that we needed pulses of at least 3ms for the cursor to move, and that to go from point A to point B, we needed a pulse of about |A-B|/3 milliseconds. At each callback for a change of position, the length of the pulse needed to travel the remaining distance is re-evaluated.
- Although the Yocto-Knob provides values between 0 and 1000, it is unreasonable to expect a positioning accuracy of 0.1%. We settle for an accuracy of 1% and consider that the position has been reached when the difference between the read position and the aimed position is below 10 in absolute value.
We must also be able to decide if we receive a position change callback because we are moving the cursor or if it's because the user is sliding it manually. We therefore determined the following rules:
- If we receive a callback when we are moving the cursor to reach a position and that the latest callback is less than a second old, then we continue to reach this position. If the latest callback dates from more than one second, we consider that we can't reach the position and we give up.
- If we receive a callback and that the latest autonomous move was performed more than a second ago, then we consider that it's the user who is sliding the cursor.
We coded all this in the following Python class:
MINIMUMPULSE = 3 # Minimum pulse length required to move the slider
POSPRECISION = 10 # expected tracking precision
ABSORPTION = 3 # reduce bouncing
TIMEOUT = 1 # cancel auto-move after 1 sec with no move detected
_io =None
_ioBit0 = 0
_ioBit1 = 0
_anInput = None
_aninputIndex =0
_lastdir = 999
_lastvalue = -1
_target = -1
_moveCallback = None
_lasttarget = 0
_lastStop = YAPI.GetTickCount()
# automatically called each the slider physically move (resistance change)
# controls the current movement, and calls user callback if cursor is moved
# manually
def buttonChange(self,source,value):
pos = int(value)
self._lastvalue = pos
now = YAPI.GetTickCount()
delta_time = (YAPI.GetTickCount()-self._lastStop).total_seconds()
if (self._target>=0) :
self._lastStop = now
delta = abs(pos - self._target)
if (delta <= self.POSPRECISION) or (delta_time>=1):
self._lasttarget=self._target
self.stop()
return
direction =0
if (self._target>pos):
direction = -1
else:
direction=1
self._move( direction ,delta)
return
else:
delta_pos = abs(self._lastvalue-self._lasttarget)
if (abs(delta_pos)>50) or (delta_time> 1) :
if self._moveCallback!=None :
self._moveCallback(self, self._lastvalue)
# constructor
def __init__(self,io,ioBit0,iobit1, anInput, moveCallback):
self._io = io
self._ioBit0 = ioBit0
self._ioBit1 = iobit1
self._anInput = anInput
self._moveCallback = moveCallback
anInput.registerValueCallback(self.buttonChange)
# stop the current movement
def stop(self):
self._io.set_bitState(self._ioBit0, 0)
self._io.set_bitState(self._ioBit1, 0)
self._target=-1
self._lastdir =0
# return the current slider position
def getPosition(self):
return self._lastvalue
# make the slider automatically reach a position
def setPosition(self,target):
if target<0 or target>999 : return
if abs(self._lastvalue-target)<=self.POSPRECISION : return
self._target=target
delta = abs(self._target-self._lastvalue)
if self._target<self._lastvalue :
self._move(1,delta)
else:
self._move(-1,delta)
# Configure the IO channels according to direction and send an initial
# electrical pulse to the motor to make it move.
def _move(self, direction ,delta):
if (direction>0):
if (direction!=self._lastdir):
self._io.set_bitState(self._ioBit1, 0)
self._io.set_bitDirection(self._ioBit0, 1)
self._io.set_bitOpenDrain(self._ioBit0, 0)
self._io.set_bitDirection(self._ioBit1, 1)
io.set_bitOpenDrain(self._ioBit1, 1)
self._io.pulse(self._ioBit0, max(self.MINIMUMPULSE,delta/ self.ABSORPTION))
self._lastdir =direction
elif (direction<0):
if (direction!=self._lastdir):
self._io.set_bitState(self._ioBit0, 0)
self._io.set_bitDirection(self._ioBit1, 1)
self._io.set_bitOpenDrain(self._ioBit1, 0)
self._io.set_bitDirection(self._ioBit0, 1)
self._io.set_bitOpenDrain(self._ioBit0, 1)
self._io.pulse(self._ioBit1, max(self.MINIMUMPULSE,delta/ self.ABSORPTION))
self._lastdir =direction
else:
self.stop()
The constructor takes 5 parameters:
- The YDigitalIO function used to drive the motor
- The number of the first channel used in the digitalIO function
- The number of the second channel used in the digitalIO function
- The AnButton function used to read the position of the cursor
- A callback function which is called each time the user slides the cursor
The two useful methods are getPosition() and setPosition(target) which enable you to, respectively, know the current position of the cursor, and to move the cursor towards a value given as parameter.
Proof of concept
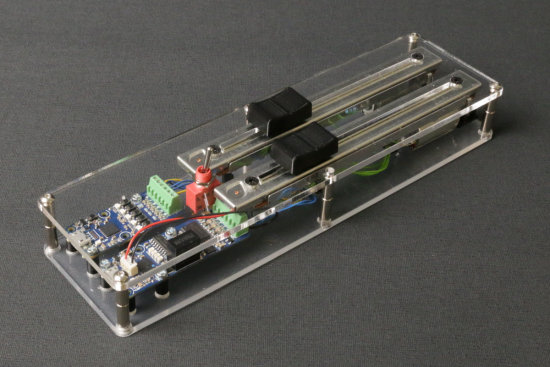
To test our code, we assembled a small test bench with two cursors and a switch. Each time the user slides the cursor, we move the second cursor in a direction determined by the position of the switch.

Our test bench
The control code is very short, the main loop does strictly nothing as everything is managed with callbacks.
def SwitchAction(source,value):
global mirror
mirror= 1 if int(value)>500 else -1
def Slider1HasMoved(source,value):
global mirror
if slider2!=None : slider2.setPosition((mirror-1)*-500 + mirror *value)
def Slider2HasMoved(source,value):
global mirror
if slider1!=None : slider1.setPosition((mirror-1)*-500 + mirror *value)
errmsg = YRefParam()
if YAPI.RegisterHub("usb", errmsg) != YAPI.SUCCESS:
sys.exit("init error" + errmsg.value)
anyButton = YAnButton.FirstAnButton()
if anyButton is None: sys.exit("Yocto-knob not found");
io = YDigitalIO.FirstDigitalIO()
if io is None: sys.exit("Yocto-IO not found");
serial = anyButton.get_module().get_serialNumber()
sliderInput1 = YAnButton.FindAnButton(serial+".anButton1")
sliderInput2 = YAnButton.FindAnButton(serial+".anButton2")
switchInput = YAnButton.FindAnButton(serial+".anButton3")
switchInput.registerValueCallback(SwitchAction)
io.set_outputVoltage(YDigitalIO.OUTPUTVOLTAGE_EXT_V)
slider1 = motorizedSlider(io,0,1,sliderInput1,Slider1HasMoved)
slider2 = motorizedSlider(io,2,3,sliderInput2,Slider2HasMoved)
print("Running...")
while True:
YAPI.Sleep(1000,errmsg)
You can download the whole code here.
To our surprise, the result is quite usable. The cursors move smoothly, which was not a foregone conclusion given the lack of sophistication of the physical control loop. See for yourself on the video below.
Note that we used a Yocto-Knob and a Yocto-IO, which enabled us to control two potentiometers. If we had used a Yocto-MaxiKnob and a Yocto-Maxi-IO, we could have controlled double this number, and still have some spare lines to interface buttons or quadratic encoders.


