 InfluxDB is a database specifically designed to store time series of measures. You already could add measures from Yoctopuce sensors in an InfluxDB 1.0 database with YoctoHubs or with the VirtualHub. But the recently available new version of InfluxDB uses a new API which isn't compatible. We decided to add support for this new version in the firmware of YoctoHubs and of the VirtualHub. Here is how to insert the measures of Yoctopuce sensors into InfluxDB 2.0 directly from a YoctoHub.
In this post, we are going to see how to add measures from Yoctopuce sensors with the Callback HTTP feature which is available in all the YoctoHubs and in the VirtualHub. The advantage of this solution is that it doesn't require any line of code: it's the YoctoHub which automatically connects to the InfluxDB server and stores the measures.
New API
As mentioned above, version 2.0 of InfluxDB is not backward compatible, because the API to connect to the database is different. From now on, to add measures to the database, the YoctoHub needs the following pieces of information:
- The server host name or its IP address
- The server port number
- The name of the organization
- The name of the bucket
- The token to be used for authentication
The host name and the port number of the InfluxDB server don't require any explanation, but note that you can't connect a YoctoHub to InfluxDB Cloud 2.0 servers. We support only InfluxDB OSS 2.0 installations, as InfluxDB Cloud requires an SSL connection and the YoctoHub processor is not powerful enough for that.
Otherwise, an organization is a working space for a group of users. A bucket is a named location where the time series data are stored for a limited duration.
In other words: the new measures are added to a bucket which belongs to an organization which is stored on an InfluxDB 2.0 server.
The latest piece of information is the authentication token. As the name suggests it, this token is used to authenticate the client which connects to the API. You can add, modify, or remove tokens from the InfluxDB web interface.
To configure an InfluxDB 2.0 callback in the VirtualHub or on any YoctoHub, you only need to select "InfluxDB 2.0" and to enter these 5 pieces of information.
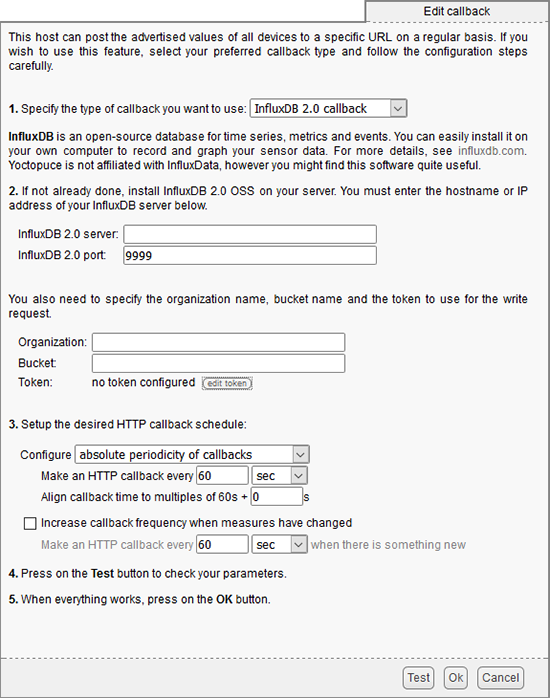
InfluxDB 2.0 callback configuration panel
A practical example
To illustrate this new feature, we are going to show you how to install InfluxDB 2.0 OSS and to configure a YoctoHub so that it records the measures of the three sensors of a Yocto-Meteo-V2 every minute.
The InfluxDB installation process is easy and well documented. You can install it by using Docker or by downloading precompiled binaries. We decided to install Linux binaries on our Ubuntu 64 bit machine.
The installation is dead easy and is limited to three commands:
wget https://dl.influxdata.com/influxdb/releases/influxdb_2.0.0-beta.5_linux_amd64.tar.gz tar -zxvf influxdb_2.0.0-beta.5_linux_amd64.tar.gz sudo cp influxdb_2.0.0-beta.5_linux_amd64/{influx,influxd} /usr/local/bin/
Then you must simply start the server with the influxd command
yocto@laptop-linux:~$ influxd 2020-03-11T16:17:07.871650Z info Welcome to InfluxDB ... 2020-03-11T16:17:07.909999Z info Resources opened ... 2020-03-11T16:17:08.021847Z info Opening Series File (start ... 2020-03-11T16:17:08.025031Z info Opening Series File (end ... 2020-03-11T16:17:08.027645Z info Index opened ... 2020-03-11T16:17:08.028562Z info Reloaded WAL ... 2020-03-11T16:17:08.028704Z info Starting ... 2020-03-11T16:17:08.029491Z info Starting query controller ... 2020-03-11T16:17:08.329894Z info Listening ... 2020-03-11T16:17:08.329923Z info Starting ...
For this example, we settled with starting the server manually, but for a more serious usage, you should automate the InfluxDB server startup when the machine is booting. By the way, we have a post on this topic.
Then, you must connect yourself on the InfluxDB 2.0 web interface and follow the installation wizard. In this wizard, we are requested to create a user as well as a first organization and a first bucket.
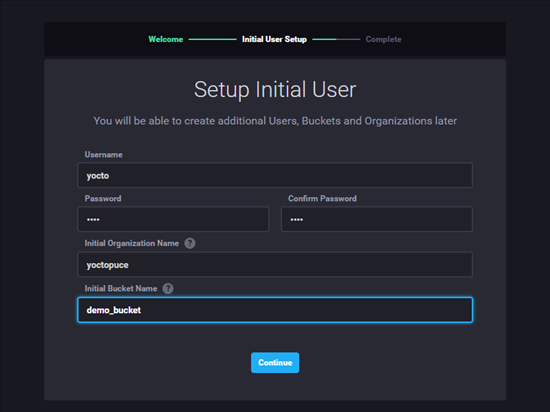
The InfluxDB 2.0 installation wizard
You can find the tokens in the "Load data" section, subsection "Tokens". Note that by default InfluxDB has already created a token with all the privileges. You can either use this one, or create a second more restrictive one.
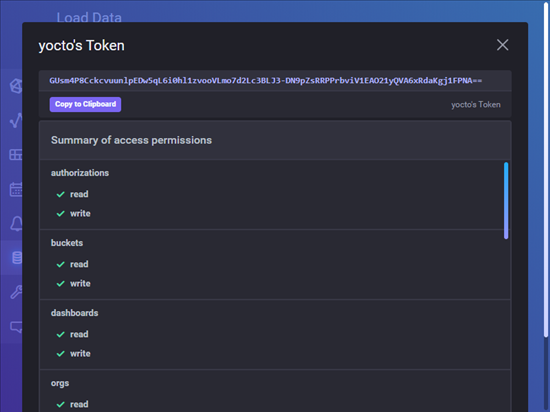
By default, a token with all the privileges is already present
We now have all the required pieces of information to configure the YoctoHub. In the YoctoHub web interface, you only have to fill in the five fields and to modify the interval to one minute.
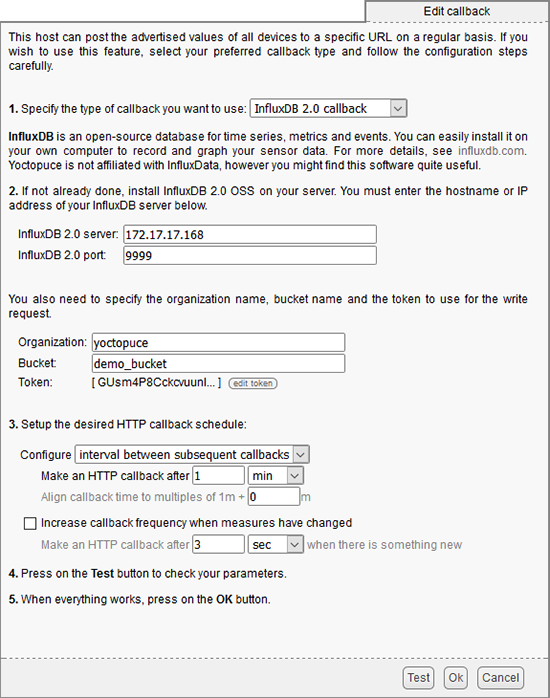
Our InfluxDB 2.0 callback configuration
We can check these parameters with the Test button at the bottom of the window. If everything is in order, you simply obtain the message:
[Connection closed]
You can now close the window with the Ok button.
The YoctoHub is now going to connect itself every minute to the InfluxDB 2.0 server and post the value of all the Yoctopuce sensors which are connected. In our case, as we only have a Yocto-Meteo-V2 connected, this corresponds to the temperature, the humidity and the atmospheric pressure.
You can check that the measures of the sensors are actually there with the InfluxDB 2.0 Data Explorer:
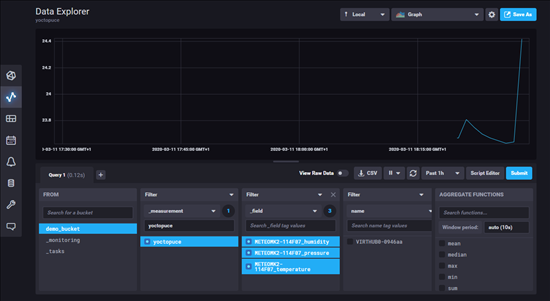
You can find the measures from our sensors in the Data Explorer
For new users of InfluxDB, the Data Explorer might seem complex and you might have trouble locating the measures. Actually, you must take care to select the appropriate bucket in the first column and select yoctopuce in the second column because all the measures sent by the YoctoHubs are tagged yoctopuce.
Conclusion
This new version of InfluxDB 2.0 breaks upward compatibility and forced us to develop a specific callback, but in the end using this new version is simpler. In any case, if you already used InfluxDB 1.0, you can now migrate your server to 2.0 and still use your Yoctopuce sensors.


