![]() A few weeks ago, we shared with you the first steps in integrating an existing pool control system into Home Assistant. This post follows up on that project, with the replacement of the old fixed-speed pump with an IntelliFlo Whisterflo VSF variable-speed pump, which we control using a Yocto-RS485-V2.
A few weeks ago, we shared with you the first steps in integrating an existing pool control system into Home Assistant. This post follows up on that project, with the replacement of the old fixed-speed pump with an IntelliFlo Whisterflo VSF variable-speed pump, which we control using a Yocto-RS485-V2.
Why this new pump?
The main advantage of replacing the old circulation pump with a variable-speed pump is energy savings. Not only is the brushless permanent magnet motor technology driven by an electronic controller more efficient at the same speed, but it also enables the pumping speed to be adapted to the ideal point, depending on the filtration system and environmental conditions.
The best-known variable-speed pool circulation pumps are manufactured by Pentair, under the brand IntelliFlo VSF. Models vary according to capacity, region of purchase and sales channel, but its operation seems to be very similar for all. In Switzerland, we were offered the IntelliFlo WhisperFlo VSF model.
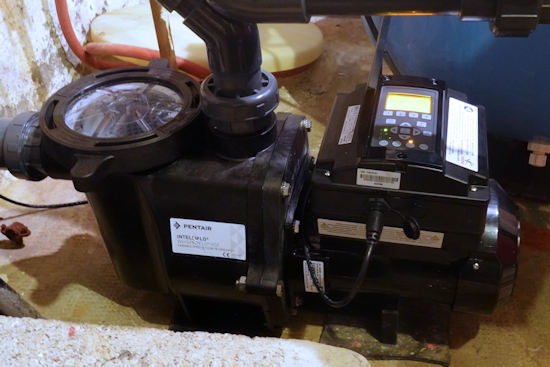
The new racing pump
The pump includes a clock and can therefore operate perfectly autonomously on pre-programmed schedules. But even if the pump's autonomy is an interesting criterion of reliability, we'd obviously also like to be able to control its operation via the Home Assistant control panel we set up a few weeks ago, starting with feedback on the pump's operating speed.
How to control a Pentair IntelliFlo VSF pump?
Pentair pumps are equipped with an RS485 interface for connection to the Pentair control panel. It is therefore possible to obtain pump information and configure the pump via this interface. Unfortunately, the messages exchanged do not follow the MODBUS standard but use a Pentair proprietary protocol, which is not officially documented. So we have to look a little harder...
As a first source of information, we purchased a small Pentair IntelliCom 2 external control module with the pump, which includes binary inputs to activate the pump on predefined programs. By connecting our Yocto-RS485-V2 to the same bus, we can observe the messages exchanged and try to replay them to drive the pump directly.
Secondly, the Pentair protocol has been analyzed and decoded by a number of Pentair control system owners. In particular, the OPNpool project can be found on GitHub, which allows you to control a complete Pentair pool filtration system with a home automation interface, based on an ESP32 module. We can't reuse this project directly, as it relies on the presence of a Pentair control panel whereas we want direct control of the pump, but its documentation contains the explanations needed to understand how Pentair's RS485 protocol works.
Pentair pump protocol
Messages take the following form:
FF 00 FF A5 00 {dst} {src} {type} {len} ... {chksum}
The bytes {dst} {src} indicate the direction of the message:
- 60 10 if the message is for the pump
- 10 60 if the message is from the pump
The {type} {len} bytes indicate the message type and length, for example:
- 07 00 for a status request to the pump
- 07 0f ... for the status response (coded on 15 bytes, see below)
- 04 01 FF to disable manual control of the pump
- 04 01 00 to unlock manual control on the pump
- 01 04 {reg} {val} to modify pump configuration
The checksum {chksum} coded on the last two bytes is directly the sum of the message bytes, in big endian, starting from byte A5 (the FF 00 FF are not taken into account in the sum).
The pump does not send messages spontaneously, but responds to all the correct messages it receives.
Status message
The pump's status message is very interesting, as it provides a wealth of information on its status, encoded in 15 bytes:
- ready (one byte): 04 if the pump has been deactivated, 0A if it is ready to pump
- prog (one byte): the index of the program currently running
- state (one byte): pumping state, normally 02. It would be 00 in the event of an error, and 01 or 04 during priming, but we haven't had a chance to check this.
- power (two bytes, big-endian): power consumption, in watts
- rpm (two bytes, big-endian): rotation speed, in revolutions per minute
- flow (one byte): pump flow rate, in gallons per minute
- pct (one byte): percentage of pump power (?)
- ?? (one byte): a mysterious byte...
- err (one byte): error code, or 00 if all is well
- remain (two bytes, HH:mm): remaining execution time of the current program
- timeOfDay (two bytes, HH:mm): the current time according to the pump
Here's an example of pump polling done manually with the Yocto-RS485-V2, by connecting it directly to the pump (without anything else on the RS485 bus):
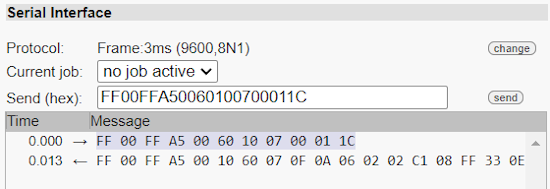
Status request and response
The fifteen status bytes are:
0A 06 02 02 C1 08 FF 33 0E 00 00 04 1D 11 1F
This shows that:
- the pump is ready
- it's running program 6
- it's in pumping mode
- it consumes 705 W (in hexadecimal: 0x02c1)
- it rotates at 2303 rpm (hexadecimal: 0x08ff)
- its flow rate is 51 gpm (hexadecimal: 0x33)
We can now obtain all important pump parameters in real time via the RS485 bus, just as we'd hoped.
Remote pump activation
To activate the pump remotely, we must use the generic 01 command, which is used to modify the pump configuration. The most official way is to pre-configure one or more of the 4 available external programs on the pump - corresponding to different speeds, for example - and activate the desired program by sending command 01 to write to pump register 0321 one of the values 08, 10, 80 or 20 to activate external programs 1, 2, 3 or 4 (the value corresponds to the program number * 8, in hexadecimal). This is the method used by the Pentair IntelliCom 2 module we analyzed.
An external program activated by this method only runs for one minute. After that, the pump stops automatically, probably as a safety precaution. This is why the Pentair IntelliCom 2 module repeats the command every 45 seconds, for as long as the program needs to be kept active. By observing the messages sent by the IntelliCom 2 module, we also discovered another message that unlocks the control panel on the pump. Indeed, after receiving most messages, the manual control panel on the pump remains locked for a few tens of seconds. The exception is command 04 01 00, which immediately unlocks the control panel. Unlocking it is very important to enable manual operation directly on the pump, e.g. to deactivate it for maintenance operations, or to manually trigger a filter backwash.
So here's a trace of a Yocto-RS485-V2 which generates the same messages as the Pentair IntelliCom 2 module to request activation of external program no. 1, but also asks for the pump status before immediately releasing the control panel on the pump:
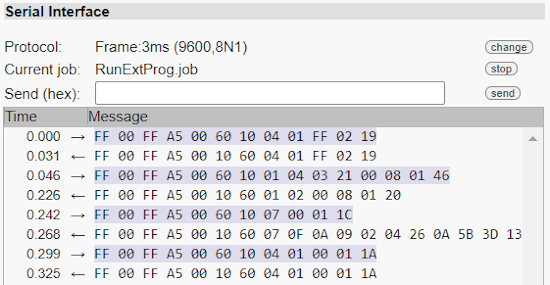
Activation of external program no. 1 and status query
Putting all the pieces together
Now that we know how to control the pump, all that remains is to put all the pieces together to integrate the IntelliFlo WhisperFlo VSF pump into our pool control panel in Home Assistant: the pump is connected via RS485 to the Yocto-RS485-V2, plugged into a YoctoHub-Ethernet which connects directly to the MQTT broker used by Home Assistant.

Integrating the IntelliFlo pump in Home Assistant
Configuring the Yocto-RS485
To begin with, using the VirtualHub tool, we give the Yocto-RS485 module the logical name IntelliFlo, so as not to confuse it with the one used to interrogate the pool's electricity meter. We configure it for 9600 baud 8/N/1, since these are the conventions used by the Pentair IntelliFlo pump.
The best way to send pump status information to the MQTT broker is to configure an automatic polling job on the Yocto-RS485-V2. In this way, measured values are automatically published through the module's genericSensor functions, without the need to configure Home Assistant to explicitly manage serial communication.
We therefore configure a new custom protocol job on the Yocto-RS485-V2, which periodically (every 45 seconds) executes the following commands:
| writeHex | FF00FFA50060100401FF0219 |
| expect | FF00FFA50010600401FF0219 |
| writeHex | FF00FFA50060100700011C |
| expect | FF00FFA5001060070F($ready:BYTE)($prog:BYTE)($state:BYTE)
($power:WORD)($rpm:WORD)($flow:BYTE)($pct:BYTE)(WORD) ($remHour:BYTE)($remMin:BYTE)(DWORD) |
| writeHex | FF00FFA5006010040100011A |
| expect | FF00FFA5001060040100011A |
The writeHex command sends the bytes passed as parameters in hexadecimal format, while the expect command waits for the corresponding response. We've highlighted in bold the part corresponding to the commands themselves, as described above.
In the expect command, which receives the status message, the expressions in brackets are used to assign the value read at this point in the message to a variable, so that it can then be published through a genericSensor1..7 using the following expressions added to the job:
| compute | $1 = $power |
| compute | $2 = $rpm |
| compute | $3 = $flow * 0.2271 |
| compute | $4 = $pct |
| compute | $5 = ($ready != 0xa ? -1 : $state) |
| compute | $6 = $prog |
| compute | $7 = $remHour*60+$remMin |
In reality, for variables such as power($power), which are published as is, we could have put $1 directly into the expect expression. But passing through a variable makes the expression more explicit, which is what we prefer. For the flow rate($flow), the expression allows us to convert the unit from gallon/min to m3/h on the fly. Finally, the expression also allows us to combine several variables into a single value in a single genericSensor when justified.
All that remains is to configure the logical name and unit of measurement of the genericSensors we've used, so that they can be easily found in Home Assistant:
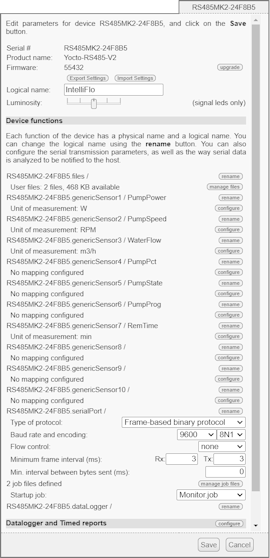
Configuration of the Yocto-RS485-V2
Above all, don't forget to activate timed reports at the desired frequency for sending information over MQTT:
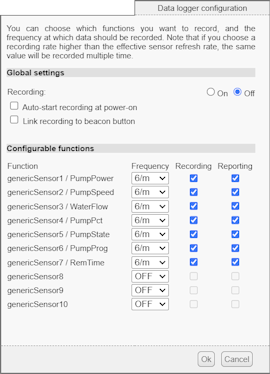
Configuration of the measure transmission frequency
Once the job has been launched, you can check in the Yocto-RS485-V2 interface window (accessible via the YoctoHub-Ethernet web interface) that communication is taking place as expected. You can also view the measured values in the list of modules if you activate the show device functions option.
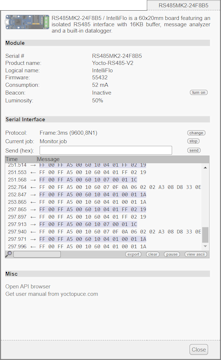
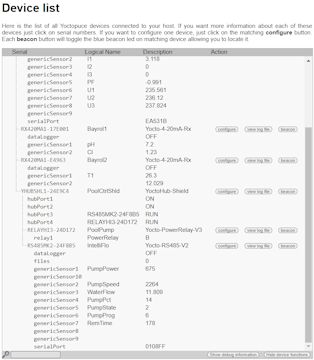
Measurement retrieval in Home Assistant
Thanks to the MQTT callback configured on the YoctoHub-Ethernet in our previous post, these new values are made directly available to Home Assistant. Browsing the list of MQTT Devices, we find our RS485 interface named IntelliFlo:

RS485 interface detected by MQTT discovery
By clicking on it, we obtain the pump's measures, live:
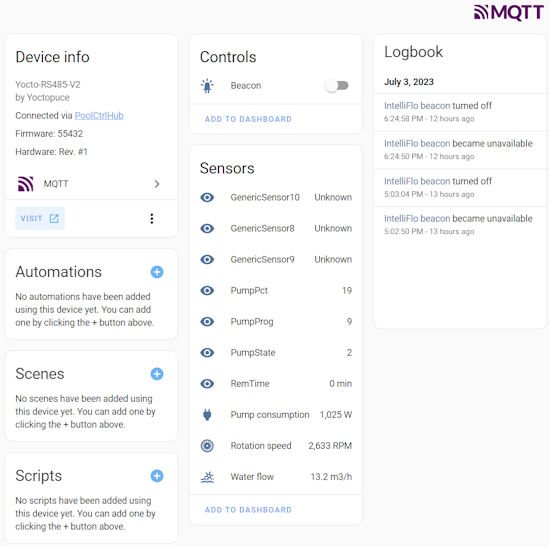
The measures detected by MQTT discovery
We can then add them to the pool control panel on Home Assistant by simply clicking on the Add to dashboard link. Use a few more clicks to add custom icons to make it look nicer, and you're done:
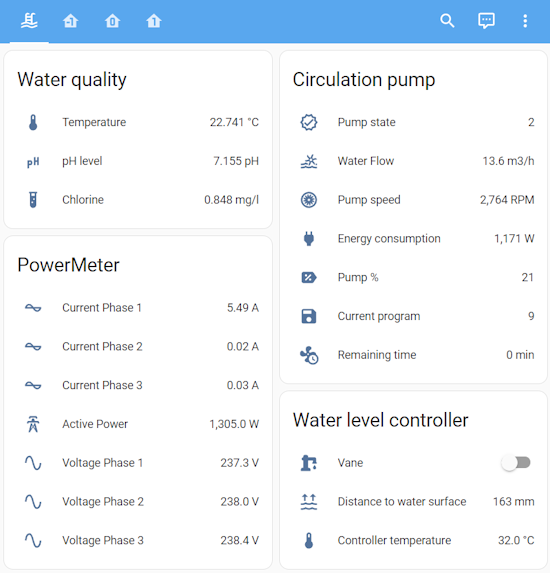
IntelliFlo pump is integrated into the dash board
Clicking on a measurement takes you directly to the history graph. Here, for example, is the power consumption history of the pump, which is currently configured to operate autonomously (on a timetable) at a fixed flow rate of 12 m3/h:
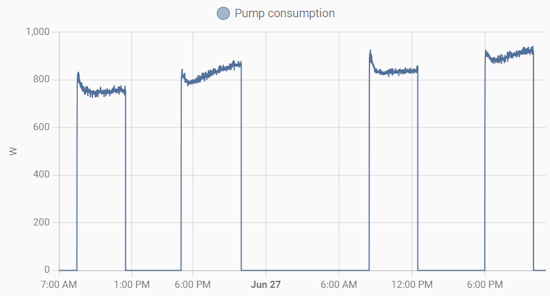
Constant flow IntelliFlo pump power consumption
We can see an interesting increase in power consumption, even though the flow rate required has not changed. Why is this? Because the sand filter was getting seriously dirty. A quick backwash of the filter, and power consumption drops by 20%. Interesting...
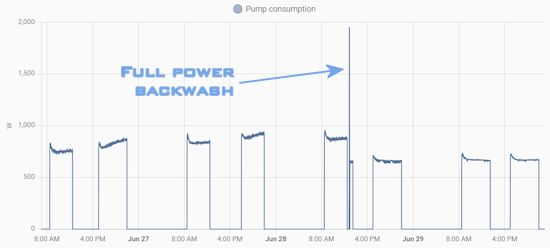
Consumption decreases by 20% after a backwash
Conclusion
We've been able to verify that a Yocto-RS485-V2 is all you need to get the best out of a Pentair IntelliFlo VSF variable speed pump. The addition of a YoctoHub-Ethernet allows us to access it directly via the network, but we could also have put a mini-computer nearby with the VirtualHub tool: the result would have been identical.
We can see that, at equivalent flow rates, according to the manometer on the sand filter, the new pump consumes around 20% less than the old one. But further savings can be made by filtering at a slightly lower flow rate for longer time. The ability to obtain all measurements will help optimize this parameter.
Feedback from the pump to Home Assistant works perfectly, with an unexpected benefit: it will be possible to set up an automatic notification when it's time to backwash the filter, and this washing has a really significant impact on the power consumption of the pool circulation.
Finally, in a future post, we'll look at how Home Assistant can be used to activate additional filtration periods when the water temperature sensor indicates that it is necessary.


