 This week, we are going to talk about a popular topic these days: the ventilation of a work room. CO2 being a good indicator of air "pollution", we are going to see how to automate the opening of motorized Velux skylight windows depending on the CO2 rate inside a room.
Our challenge is to control the ventilation of a large room with 6 motorized Velux Integra skylight windows. The CO2 rate outside is usually between 350 to 450 ppm, while the maximal CO2 level considered as acceptable inside of a room is of 1000 ppm. Our aim is therefore to open the windows as soon as the CO2 rate goes above 800 ppm.
To implement such a system, one must, on the one hand, be able to measure the CO2 rate and, on the other hand, control the opening an closing of these windows.
Measuring the CO2 rate
At Yoctopuce, we propose sensors to measure almost anything. In this instance, we have the Yocto-CO2-V2 which enables us to obtain the ambient CO2 rate. This sensor enables us to measure the CO2 rate between 0 and 40000ppm. Exactly what we need. Note: for more details on the Yocto-CO2-V2, you can read this post.
Controlling motorized windows
To control motorized Velux windows, we decided to use a Velux KLF 200 interface. This box enables you to command motorized Velux windows with physical contacts. You can drive up to 200 Velux Integra products that you can split into a maximum of 5 areas.
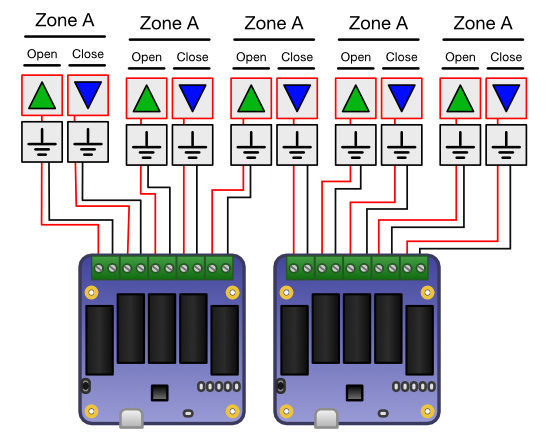
You can drive each area with two pairs of contacts which command the opening and the closing of the windows of that area. Closing the first pair of contacts opens all the windows of the area. Closing the second pair of contacts closes all the windows of the area. If both contact pairs are closed at the same time, it stops the opening or closing in progress, for example to leave the window half-opened. As the box enables you to drive 5 areas, there are 10 contact pairs in all.

Each area is driven by two contact pairs
In our case, we want to drive 6 windows. We grouped the two closest windows into a single area, and the 4 other windows each have their own area. We could have grouped the 6 windows into the same area. But we preferred to be able to control the windows individually, in order to open only some windows depending on the weather conditions.

The two Yocto-MaxiPowerRelay enable us to drive the 10 contact pairs
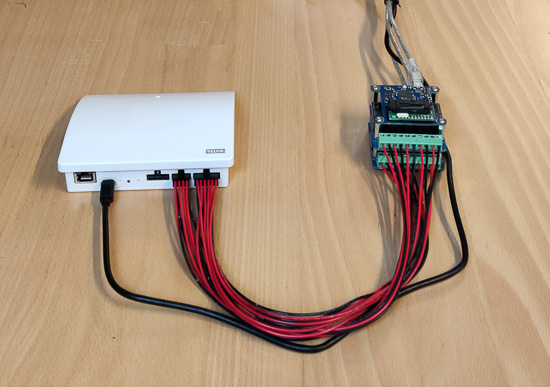
The simplest solution to drive these 10 contact pairs is to use two Yocto-MaxiPowerRelay which can each drive 5 relays. As Velux provides cables with its KLF 200, connections are trivial.

The KLF200 with the Yocto-CO2-V2 and the two Yocto-MaxiPowerRelay
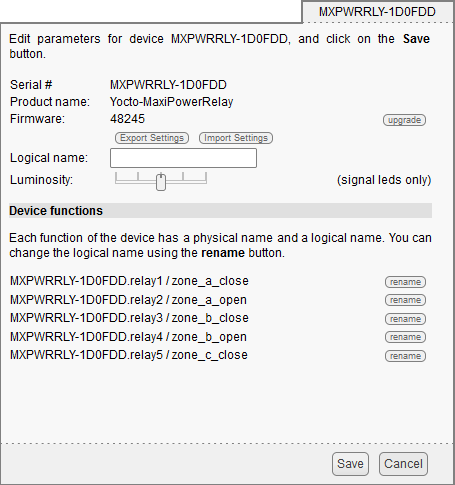
When you have connected everything, you must note which output of which relay corresponds to which command. In order to make the application code simpler, we assigned logical names to each output of the Yocto-MaxiPowerRelay. For example, we assigned the zone_a_close name to the relay controlling the closing of windows in area A.
To do so, we used the VirtualHub. For readers who are not familiar with how our modules work, you can read our tutorial series explaining how the VirtualHub and logical names work.

The logical names of the first Yocto-MaxiPowerRelay
Application
The application is quite simple. It reads the value of the CO2 sensor in a loop and opens all the windows if the CO2 rate is above the threshold.
We wrote the application in Python because this language is very easy to use and is available on almost all the platforms. The application uses our Python library which enables us to easily interact with our modules.
The application code, while quite simple, is however too long to detail it in this post. We are simply going to see the parts which interact with the Yocto-CO2-V2 and the Yocto-MaxiPowerRelay.
When initializing, we retrieve the list of relays and we create a list of VeluxZone objects which implements an open method and a close method, which operate the correct output of the relay.
def __init__(self, zonename, descr, hwid_close, hwid_open):
self.name = zonename
self._desription = descr
self._closeRelay = YRelay.FindRelay(hwid_close)
self._openRelay = YRelay.FindRelay(hwid_open)
def open(self):
self._openRelay.pulse(200)
def close(self):
self._closeRelay.pulse(200)
The application main loop is also very simple. We perform a CO2 rate measure every 5 minutes. If the value is above the threshold, we call the open method on our VeluxZone object list.
for z in self.zones:
z.open()
YAPI.Sleep(500)
self.closed = False
def close(self):
for z in self.zones:
z.close()
YAPI.Sleep(500)
self.closed = True
def auto(self):
self.close()
sleep_delay = 5000
while self.co2sensor.isOnline():
value = self.co2sensor.get_currentValue()
if self.verbose:
print("C02 value: %dppm" % value)
if value > self.co2_open_limit:
# speed up C02 measure when the windows are open
sleep_delay = 5000 # 5 seconds
if self.closed:
self.open()
elif value < self.co2_close_limit:
sleep_delay = 300000 # 5 minute
if not self.closed:
self.close()
YAPI.Sleep(sleep_delay)
if not self.closed:
self.close()
You can configure the CO2 threshold, the name of the relays as well as other parameters in the configuration file. You can also configure the IP address of a YoctoHub if you want to move the system away with a YoctoHub.
Finally, we connected the 3 modules on the USB port of a Windows computer which is always on and the script is started automatically. This small system enables us to keep our premises well ventilated.
This application was written to fulfil our needs, but you can easily modify it to adapt it to your own needs. The complete code of the application is available on GitHub: https://github.com/yoctopuce-examples/velux_controler


