![]() This week, we go on with our "for the beginners" post series and we are going to talk about PHP. PHP scripts are easy to use and to deploy. We are going to see that's it's also easy to interface Yoctopuce modules from a PHP script.
This week, we go on with our "for the beginners" post series and we are going to talk about PHP. PHP scripts are easy to use and to deploy. We are going to see that's it's also easy to interface Yoctopuce modules from a PHP script.
We start from the principle that you have some minimal knowledge of PHP and that you can write a PHP script and deploy it on a web server. The aim of this post isn't to write a post on PHP but to learn to use Yoctopuce modules in a PHP script. In the same way, if you aren't familiar with Yoctopuce modules, we recommend that you start by reading the previous posts of this series, in particular that on the logical structure of Yoctopuce modules .
PHP specificities
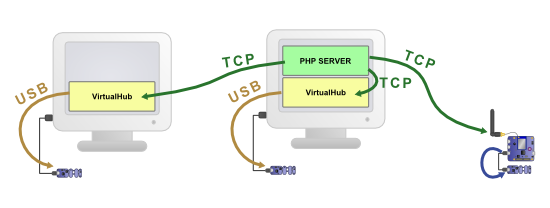
You cannot directly access USB devices from a script. A PHP script can interact only with Yoctopuce modules connected to a YoctoHub or to a computer running a VirtualHub. Communications between the PHP script and the Yoctopuce modules go through a TCP connection between the YoctoHub and the server running the PHP script. The YoctoHubs then transmit the requests to the relevant modules.
You can however use modules connected by USB on the server running the PHP script, as long as this machine is running the VirtualHub. In this case, the PHP script communicates with the VirtualHub by using the server loopback interface and the VirtualHub transmits the requests to the corresponding modules.

Communications between the PHP script and the Yoctopuce module must necessarily happen through TCP
Installation
The first thing you need to do is to install the PHP Yoctopuce library. You can download it from the Yoctopuce web site or from GitHub. The archive contains three directories. The Documentation directory contains documentation, the Sources directory contains the library files, and the Examples directory contains examples on how to use the library.
To install the library on your web server, you must copy the files located in Sources on you web server, in a directory that your PHP script can access. To include the library into your script, you simply need to include these files with the include or require function.
A short example
We are going to write a short PHP script which simply displays the temperature of the server room thanks to a Yocto-Temperature connected to a USB port of the web server.
The VirtualHub
As the PHP script cannot directly access the USB port, we must install and run the VirtualHub on the server so that the Yocto-Temperature becomes available by TCP. You can find explanations on how to install the VirtualHub in this post .
Imports
The first thing that we must do is to import the correct PHP files in the script. We need to include the essential "yocto_api.php" which enables us to use the library, but also the "yocto_temperature.php" which enables us to use the temperature sensor:
Therefore, our PHP scripts starts with the following code:
require_once('Sources/yocto_temperature.php');
In this example, we assume that the library files are located in the Sources sub-directory, but if you put the files in another directory, you must simply replace "Sources/" by the corresponding access path.
Establishing the connection with the VirtualHub
To access the modules, we must tell the library the address of the YoctoHub or of the VirtualHub with the YAPI::RegisterHub method. In this example, the Yocto-Temperature is connected to the same machine, so we can use the "127.0.0.1" address.
You can find more details on the several distinct uses of YAPI::RegisterHub in this other post.
Retrieving the YTemperature object
As you have read the post on the the logical structure of Yoctopuce modules, you know that the Yocto-Temperature offers different functions among which is temperature.
There are several ways to retrieve the object which enables us to interact with this function.
FirstXXX
If you are certain to have only one available temperature function, you can go the simplest way and use the FirstTemperature method of the YTemperature class.
if(is_null($ytemp)) {
die("No temperature sensor found");
}
The FirstXXX methods return the first occurrence of the wanted function, or null if nothing corresponds.
FindXXX and serial number
You can also use the FindTemperature method of the YTemperature class with the serial number of the module. Let's assume that the serial number of the Yocto-Temperature is TMPSENS1-019CB, you can use:
if (!$ytemp->isOnline()) {
die("No temperature sensor found");
}
In the opposite to FirstXXX, FindXXX always returns a valid object. Therefore, you must test that it actually corresponds to a connected module with the isOnline method.
FindXXX and logical name
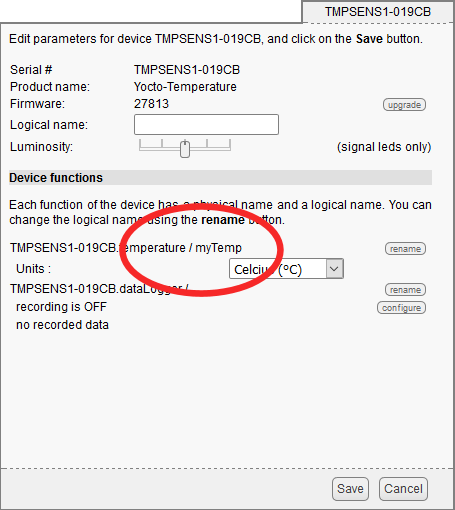
Instead of the serial number, you can use a logical name that you have previously assigned, for example with the VirtualHub.

Assigning a logical name to the Yocto-Temperature sensor
Let's say that you have called the temperature sensor "myTemp". You then only need to write:
if (!$ytemp->isOnline()) {
die("No temperature sensor found");
}
The interest of using logical names is twofold: first, they enable you to navigate more easily in complex systems composed of numerous Yoctopuce modules; second, they enable you to build several copies of the same system without having to adapt the code to the serial numbers of the modules for each copy.
Using the YTemperature object
Now that we have retrieved the YTemperature object, we only have to display the temperature by retrieving the current value with the get_currentValue() and get_unit() methods:
$unit = $ytemp->get_unit();
Print("<h2>Temperature: $value $unit</h2>");
Stopping the library
Before we close the script, we must call the YAPI::FreeAPI method to free all the resources used by the library, but mostly to make sure that all the communications ended correctly.
When you have put everything end to end, our minimalist script looks like this:
<html lang="en">
<body>
<?php
require_once('Sources/yocto_api.php');
require_once('Sources/yocto_temperature.php');
YAPI::RegisterHub("127.0.0.1");
$ytemp = YTemperature::FirstTemperature();
if(is_null($ytemp)) {
die("No temperature sensor found");
}
$value = $ytemp->get_currentValue();
$unit = $ytemp->get_unit();
Print("<h2>Temperature: $value $unit</h2>");
YAPI::FreeAPI();
?>
</body>
</html>
A few comments
YSensor
Our example works only with temperature sensors, but you can make it work with any Yoctopuce sensor by modifying only a few lines: using the YSensor class instead of the YTemperature class:
<html lang="en">
<body>
<?php
require_once('Sources/yocto_api.php');
YAPI::RegisterHub("127.0.0.1");
$ysensor = YSensor::FirstSensor();
if(is_null($ysensor)) {
die("No sensor found");
}
$value = $ysensor->get_currentValue();
$unit = $ysensor->get_unit();
Print("<h2>Sensor: $value $unit</h2>");
YAPI::FreeAPI();
?>
</body>
</html>
With this version of the code, the PHP script works with any Yoctopuce sensor. It's possible because all the Yoctopuce classes corresponding to sensor type features inherit from the YSensor class. The get_currentValue() and get_unit() methods are implemented in this class and work on any sensor.
Handling errors
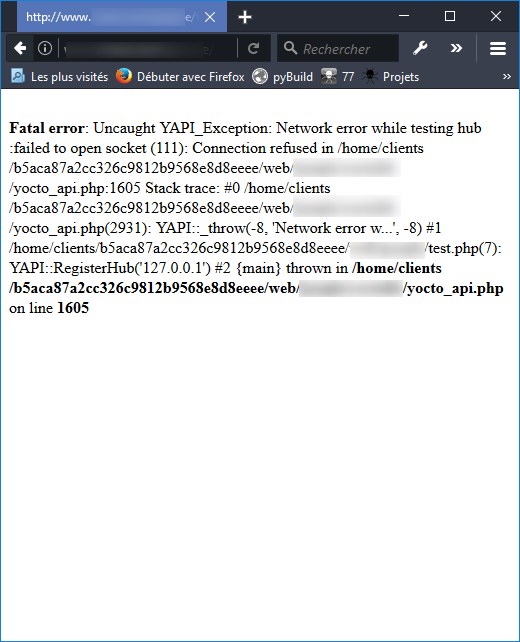
By default, if an error happens, the library functions trigger an exception of the YAPI_Exception type.

Without specific handling, the error is displayed on the web page
To handle the errors and to display a correctly formatted message, there are two solutions. You can catch the exceptions with the help of try {} catch() blocks.
For example like this:
YAPI::RegisterHub("127.0.0.1");
} catch (YAPI_Exception $ex) {
die("Error:" . $ex->getMessage());
}
But you can also disable the generation of exceptions by the PHP library with the "YAPI::DisableExceptions" method. In this case, you must test the return value of each call to the library.
$errmsg='';
$res = YAPI::RegisterHub("127.0.0.1", $errmsg);
if ($res != YAPI_SUCCESS) {
die("Error:" . $errmsg);
}
These two solutions allow you to correctly handle errors and to display a clear message. Using one or the other is mostly a question of programming habits.
What comes next...
Our PHP library can work in two modes: the direct mode and the HTTP callback mode. The script that we just wrote works in direct mode, which means that it's the PHP script that establishes the TCP connection with the YoctoHub or the VirtualHub. This mode is easy to configure and you can use all the functions of the Yoctopuce library.
However, there is another mode, the HTTP callback mode, which works differently: It's the YoctoHub that contacts the PHP script. This mode is particularly useful for scenarios in which several sensors are located in different venues. But we'll talk about this subject in a further post, because this one is quite long enough.


