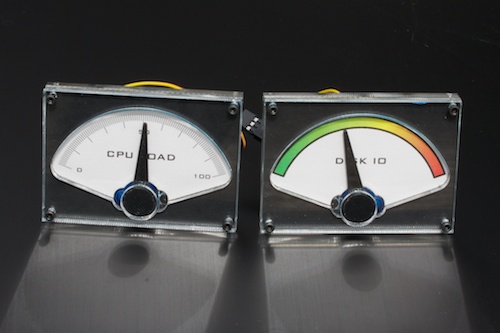
 This week, we are making two gauges which are going to display CPU and disk usage of a machine under Linux, but we are going to make them the Yoctopuce way: two physical gauges controlled by two servomotors! As many customers have been asking whether we support ARM architectures, we are going to create this project on a "computer" which uses this architecture.
Among all the available platforms, we have selected a NAS server (thank you DonPwaro for the suggestion): QNAP TS-219P II. The advantage of this solution is that, on top of all the functions you expect from a network disk, you can have an SSH access and it is possible to compile and run your own programs. Moreover, a NAS is typically the kind of machine which stays always on, which doesn't consume much, and which is relatively silent.
The QNAP uses a Linux Kernel internally. Therefore you "only" have to compile a small C++ program which takes 4 arguments in the command line and which updates the position of the servomotors. The four arguments needed by this program are:
-1 where the Yocto-Servo is connected (USB or on a remote machine)
-2 the value of the CPU gauge (from -1000 to +1000)
-3 the value of the disk gauge (from -1000 to +1000)
-4 the number of milliseconds to move the servomotors (see below)

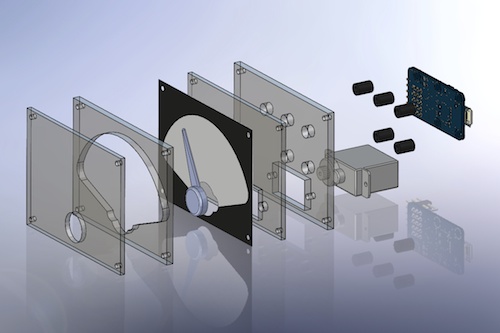
an exploded view of the construction of the gauge
The logical steps to compute the percentage of use of the CPU and of the disk are performed in a small Python script. This script periodically calls our C++ program to update the position of the servomotors. I already hear the comment "If you had a Python API, it would be simpler...", and you are completely right! The Python API is planned for ... soon. We don't like to give dates, but don't worry, as soon as we finish the Java library, we start on the Python one.

the two gauges finished
Moving the servomotors
Let's start with the hard part, the C++:
We are going to start with the example provided in the Yocto-Servo documentation and modify it into a function which takes three arguments:
-1 the name of the servomotor
-2 the position (from -1000 to +1000)
-3 a delay in ms
Using a delay requires a short explanation. The Python loop calls our program every 0.5 seconds. The obvious approach would be to call the set_position(int position) method which updates the position of the servomotor immediately. This works very well, but the end result isn't pretty: the movement of the hand is jerky. Instead of immediately updating the position, we are using the move(int position, int ms) method which moves the hand for it to reach its position after x milliseconds. Thus, if we use a 500 ms delay, the servomotor is always moving and the changes of positions are naturally smoothed. The disadvantage of this method is that the displayed value is always 500 ms late.
| Difference between set_position and move | ||
{
YServo *servo;
servo = yFindServo(name);
if(servo->isOnline())
if(delay>0)
servo->move(pos,delay);
else
servo->set_position(pos);
else {
cerr << "ERROR: servo "<<name <<" is not online"<<endl;
cerr << " check your cable and your device configuration (IE: function name)"<<endl;
return 1;
}
return 0;
}
The code is very simple: you only need to find the servomotor with the correct name with yFindServo(name);. To have a clean code, we check that the servomotor is connected with the isOnline() method. If it is the case, we call the move or the set_position method. The program main only needs to parse the arguments provided in the command line, call yRegisterHub(), then call twice updateServoPos for the two servomotors.
Compiling
The first hurdle is to install GCC on QNAP. Without going too deeply into the details of QNAP configuration, you must first install the Optware IPKG module to enable you to install a whole bunch of applications (among which GCC) through the ipkg manager. When this is done, you only need to log yourself by SSH on QNAP.
To install GCC and make with the ipkg manager, simply type the command:
ipkg install gcc make
If you usually compile your code and then link it with our already linked libraries (available in the /Binaries directory), you don't need to install the libusb 1.0 library sources. Otherwise, you must install by hand all the sources of this library to enable you to compile from the sources.
The sources, the already compiled library, and the makefile are available here.
The Python script
There are numerous code examples available on the Internet which compute CPU or disk usage.
To compute these two values, the principle is the following:
-1 write to memory the CPU statistics by analyzing /proc/stat
-2 write to memory the disk statistics by analyzing /proc/diskstats
-3 wait x milliseconds
-4 again, write to memory the CPU statistics by analyzing /proc/stat
-5 again, write to memory the disk statistics by analyzing /proc/diskstats
-6 compute the difference between the two measures to obtain a current measure
When both statistics have been computed, simply use a rule of three to extend the values on a -1000 to +1000 range.
cpu_pos = (cpu *2000/100) -1000
if disk>MAX_DISK_USAGE:
MAX_DISK_USAGE = disk
disk_pos = (disk*2000/100) -1000
Then, you only need to call the small C++ program which we compiled earlier. We pass as arguments "usb" (because our Yocto-Servo is connected directly on the QNAP), the two values for the CPU and the disk, and finally "500" milliseconds to smooth the changes of position of the servomotors.
Finally, run the Python script as a background task, and this is it, we have two working gauges.
| Here is what happens when we rebuild our library on the QNAP | ||


