![]() We have shown several times how an autonomous sensor can send data through the Internet to a program hosted on a web server. But, until today, we limited ourselves to the most classic development environments for web servers: PHP, Java, or Node.js. Today, you are going to see that it's also easy to send data to a Microsoft Azure data base, enabling us to access it from the new Microsoft ecosystem.
We have shown several times how an autonomous sensor can send data through the Internet to a program hosted on a web server. But, until today, we limited ourselves to the most classic development environments for web servers: PHP, Java, or Node.js. Today, you are going to see that it's also easy to send data to a Microsoft Azure data base, enabling us to access it from the new Microsoft ecosystem.
To begin, you need to request a free trial of Microsoft Azure if you don't already have an Azure account. Take the 5 minutes necessary to view the short video introducing the management console (portal). You'll be more at ease for the remainder of the operations.
Configuring the service under Microsoft Azure
In the Microsoft terminology, you are about to create a Mobile Service: a network service available for mobile devices and other connected objects. The only feature that you are going to use for now is storing into an SQL data base, ready for your future Azure applications.
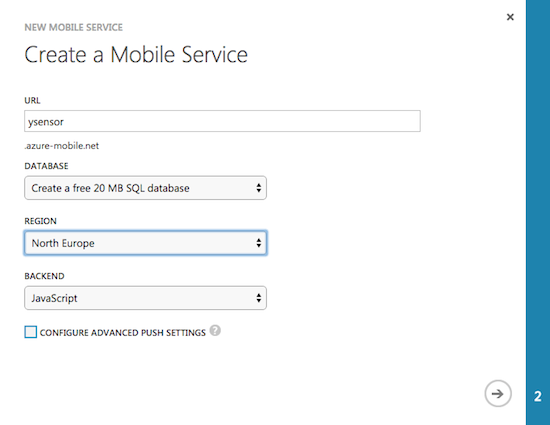
The interface to create a Mobile Service is trivial: Click on the bottom left of the console on "+New", "Compute", "Mobile Service", "Create". Provide a (not too long) name for your application, and request the creation of a new data base. The Backend field enables you to select the language with which you will later code the logic of your application. We used JavaScript in our example as selecting .NET suppresses some features on the portal, because of a Microsoft quirk.
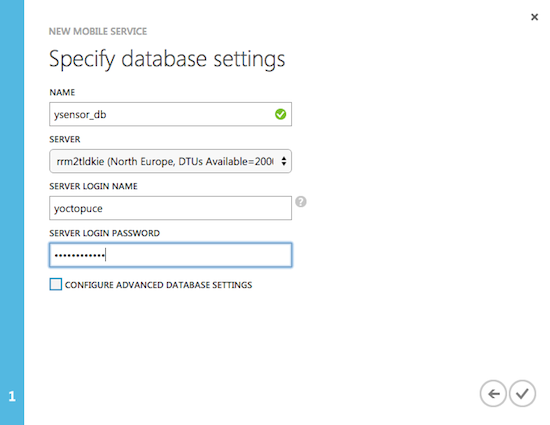
Then, define (arbitrary) parameters for your data base:
Finally, you must create a table to host the measures. To do so, click on the data base that you have just created, then, on top of the page, on the Data menu (which exists only if you have actually chosen the JavaScript backend ...). Click on the center bottom of the console on "+Create" and provide a name of your choice for the table.
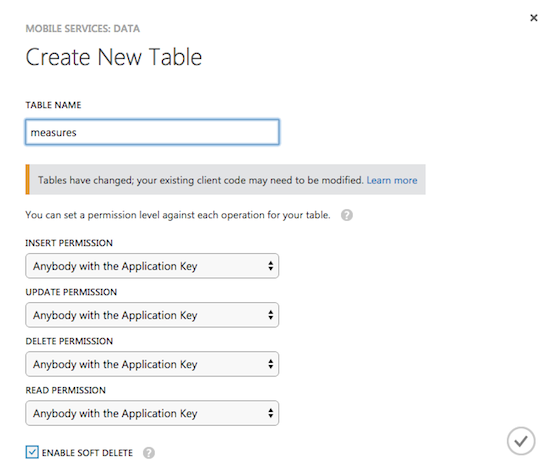
Keep the other default settings and your data base is already set: as you are going to use the REST interface based on NoSQL and provided in Microsoft Azure, you don't even need to define columns as they'll be created on the fly. You only need to retrieve the Application Key enabling you to insert data in the table. To do so, click on the top of the page on the Dashboard menu and on the bottom center on "manage keys". Copy the application key and keep it safe.
Configuring the YoctoHub (or VirtualHub)
Starting from version 20814, YoctoHubs and the VirtualHub offer a callback configuration interface for Microsoft Azure. So you should start by updating your firmware or your VirtualHub if necessary. In the network configuration of your YoctoHub or of your VirtualHub, find the Outgoing callbacks section and click on the edit button. Select the Microsoft Azure type and fill in the information about your application:

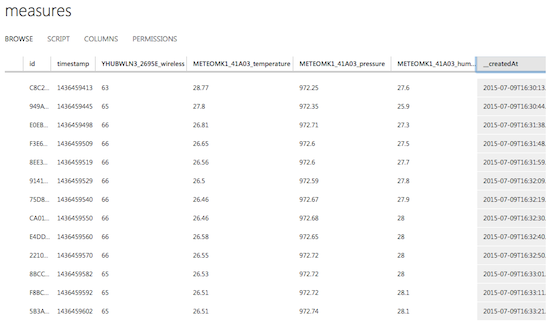
Use the Test button to check that everything works as it should. If you have a Yoctopuce sensor connected to your YoctoHub or VirtualHub, you can see directly on the Microsoft Azure portal that the current measures have been stored:
Here you are, you only need to write an Azure application that does something useful with these data... your turn!

