![]() This week, we continue our "Yoctopuce for beginners" post series. We are going to see how to test and configure a Yoctopuce module. More particularly, we are going to show you how to configure a YoctoHub-Wireless-g so that it connects itself to a wireless network.
This week, we continue our "Yoctopuce for beginners" post series. We are going to see how to test and configure a Yoctopuce module. More particularly, we are going to show you how to configure a YoctoHub-Wireless-g so that it connects itself to a wireless network.
Note: If you have already used Yoctopuce modules, you are probably not going to learn a lot with this post. But we should announce a cool new module next week.
As we have seen it in the first post of this series, Yoctopuce modules are first and foremost designed to be used with your own pieces of software. You can perform the configuration of all the modules directly from your software by using the programming API, but for small projects or for your first time round, it's much easier and practical to use the provided tools. This week, we are going to see how to use the VirtualHub to perform these tasks.
The VirtualHub
As its name indicates it, the VirtualHub allows you to emulate a YoctoHub on your computer. The aim of the VirtualHub is both to make accessible on the local network the modules connected by USB, and to allow you to use and configure Yoctopuce modules quickly. It also allows you to automatically post measures taken by the connected sensors to the cloud, but this feature will be detailed in a further post.
The first time you run the VirtualHub, you might find confusing that it's not a graphical application, but a service designed to work as a background task. If you double click on the executable, at best the OS opens a terminal with a few log lines, at worst the OS doesn't know how to run the application. To run the VirtualHub, you must launch it from a terminal. Then, to reach the VirtualHub interface, your must open a web browser and connect yourself to port 4444 with the http://127.0.0.1:4444 URL.
Which binary file should you use ?
Depending on the OS and on your computer architecture, you are not going to use the same executable. We have four archives for the four operating systems that we support:
- Windows
- Mac OX
- Linux
- QNAP
The Windows version works on all Windows 32 and 64 bits from Windows XP onwards. However, we don't support Windows 10 Mobile and IoT versions.
The archive contains two executables. At the root of the archive, you can find the 32 bit version of the VirtualHub, and in the amd64 directory the 64 bit version of the VirtualHub. Frankly, there is no significant performance gain in using the 64 bit version. Therefore, make your life easy and use the 32 bit version on all your Windows machines.
The Mac OS version works on all 64 bit Mac OS X versions and the archive contains a single executable.
For the Linux version, it's somewhat more complex. We support the following architectures: Intel 32 bits (/32bits), Intel 64 bits (/64bits), ARM hard float (/armhf), ARM soft float (/armel), ARM 64 bits (/aarch64), mips (/mips), and since recently mipsel (/mipsel).
Concretely, if your machine is a personal computer, you must use the 32 or 64 bit Intel version; if you use a Raspberry Pi with an official distribution, you must use the ARM hard float version located in the /armhf directory. In other cases, you can have a look at what the "uname -i" command returns or try all the binaries until one runs. It's dirtier but it works :-)
By default, the VirtualHub needs to be run with root privileges. You must therefore run it with the command
sudo ./VirtualHub
You can run the VirtualHub without root privileges, but this requires you to configure the udev rules correctly. We'll talk about this in a further post.
Finally, the QNAP version is a package which you can install on a NAS of the QNAP brand.
The VirtualHub web interface
The web interface of the VirtualHub lists the VirtualHub and the modules connected to the computer.

The interface of the VirtualHub with a Yocto-Meteo connected to the computer
You can open the details window of a module by clicking on its serial number. Usually, this window displays the state of the module and allows you to use the basic functions of the module, such as switching a relay or displaying the values of the sensors.

The details window of the Yocto-Meteo
The "configure" button opens the configuration panel of the corresponding module. These parameters are stored directly in the module memory. This means that if you assign the "myMeteoSensor" name to the Yocto-Meteo, it keeps this same name even if you connect this module on another machine.
Likewise, the "view log file" button enables you to display the module internal logs. Each module has its own log file.
Finally, true Yoctopuce modules have a third button, "beacon", which is used to turn on the module localization led.
Locked USB ports
If you run the VirtualHub while an application or another VirtualHub is already using the Yoctopuce modules connected to the machine, the VirtualHub cannot access the USB ports and displays the following message:
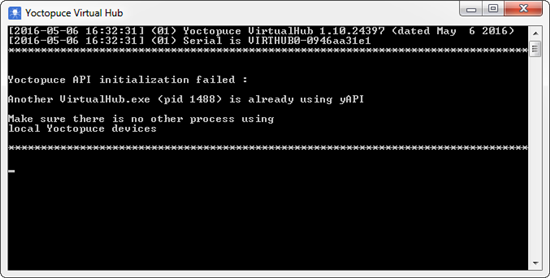
For technical reasons, only one application at a time can access the USB ports. But we will see in a further post that there are ways around this issue.
Example 1: testing the Yocto-Meteo
To test the Yocto-Meteo, connect the module on a USB port and it shows in the interface of the VirtualHub.
As for all modules, the details panel of the Yocto-Meteo displays the name of the module, the firmware version, its power consumption, a button allowing you to control the localization led, and other information.
On top of this information, the Yocto-Meteo displays the current temperature, the humidity and the ambient pressure, as well as minimal and maximal values stored for these same sensors.
When you are done playing have checked that the module works as planned, you can already connect it to the YoctoHub-Wireless-g following one of the numerous possible solutions.
Example 2: configuring the YoctoHub-Wireless-g
To configure the YoctoHub-Wireless-g to a wireless network, you must enter the network parameters (SSID, WPA key, and so on...). Connect the YoctoHub-Wireless-g by USB on a computer running the VirtualHub. The YoctoHub appears in the VirtualHub interface. You can thus configure all the YoctoHub parameters by clicking on its "configure" button.
Note that, if the YoctoHub is listed in the VirtualHub, it's not the case of the modules connected on the YoctoHub ports. The VirtualHub lists only the modules which are directly connected to the computer.

The configuration window of the YoctoHub-Wireless-g
The YoctoHub-Wireless-g configuration panel contains several sections including a "Network configuration" section allowing you to edit the wireless network parameters.

Configuration window for the Wifi parameters
When you have entered the correct parameters, the YoctoHub-Wireless-g connects itself to the wireless network. When the connection is made, you can access the YoctoHub both by USB using the VirtualHub and directly by the network using the IP address that it was assigned. The IP address that the YoctoHub uses is displayed in the configuration window and in the details window.
Connecting oneself to the YoctoHub-Wireless-G
In the opposite to the VirtualHub which answers only to HTTP requests on port 4444, you can access the YoctoHubs through port 4444 and port 80. For example, in our case, the two following URLs work: http://192.168.1.69 and http://192.168.1.69:4444.
Now that your have configured the YoctoHub-Wireless-g so that it connects itself to the wireless network, you can disconnect it from the computer and power it with a USB charger
or any other 5V power supply.

The YoctoHub-Wireless-g web interface
Conclusion
As of now, you know how to quickly configure and test the Yoctopuce modules that you have just ordered. The next post in the series will discuss the different programming libraries that we offer.

