 If you own a swimming pool, you have probably implemented a method to save kids from falling into the pool. One popular method is the use of an automatic pool cover, but often these systems can only be driven using a mechanical switch. This week we will show how to control a system like this using your smartphone.
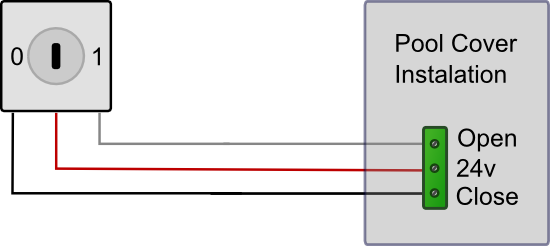
The pool cover of this swimming pool is driven by a key switch at the extremity of the garden. The control box is installed in a small pool house which also holds the pumps and filter for the swimming pool. The control electronics works with 24 Volt and has two inputs ("Close" and "Open") which are kept in default state by a pull-down resistor. When 24V is applied to the "Close" input, the cover starts to close. When 24V is applied to the "Open" input, the cover starts to open. The electronics automatically detect the end of the operation and stops the motor when needed. So the key switch really only has to switch a 24V source from the "Open" to the "Close" inputs.

The original cabling
There are several ways to drive this system. The simplest is to replace the key switch by a Yocto-PowerRelay. This is simple and cheap, but does not allow you to open the pool without a smartphone anymore. This can be solved by using a Yocto-Maxi-IO to the previous solution, to read the position of the key switch, in order to get a complete solution. But this requires an always-on computer to monitor the key switch position and to switch the relay accordingly.
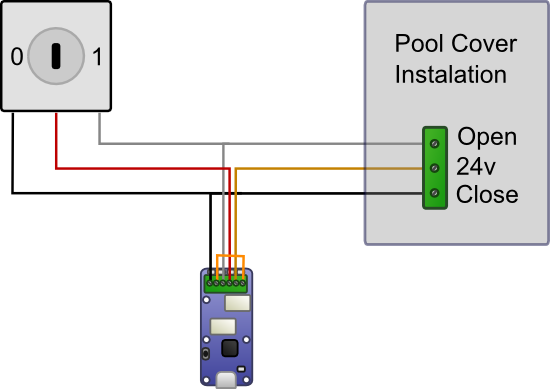
The intermediate solution is to use a Yocto-Relay which includes two relays. The first relay is used to disable the key switch, and the second one is used to send a specific command to the control electronics. This is what we will implement here.

Cabling with a Yocto-Relay
As shown in the schema above, the 24V source goes directly to the relay 1 and is directed either to the key switch (state A) or to the relay 2 input (state B). The relay 2 outputs are connected in parallel to the key switch. With this cabling, it is possible to disconnect the key switch by switching the relay 1 to state B, and to send 24V to the desired input of the pool cover controller using relay 2. In this state, the key switch is not connected to the system anymore.
To open the pool, you have to setup relay 1 to state B (disable key) and relay 2 to state A (open pool). To close the pool, you need to set relay 1 to state B (disable key) and relay 2 to state B (close pool). A third command, "Release", is required to enable the key switch again when needed.
Of course, we don't connect a cable from the smartphone to the relay each time the pool needs to be opened. We therefore plug the Yocto-Relay on a YoctoHub-Ethernet to make it available on the local network. In this way, it is possible to drive the system from a smartphone on the local network, using the WiFi network.

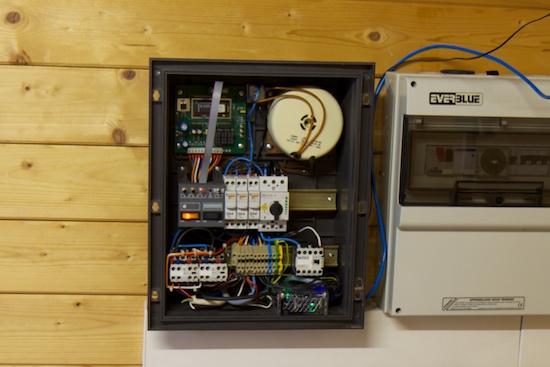
The YoctoHub-Ethernet and the Yocto-Relay are hidden in the corner of the control panel
To drive the pool cover, we write a small Android app with three buttons
- Open
- Close
- Release
.
As always with Android, the networking code cannot run from the main tread. The easiest solution is to implement an AsyncTask which takes as argument the command to execute (Open, Close, Release) and which returns the system state.
public static final int GET_POOL_STATE = 2;
public static final int CLOSE_POOL = 3;
public static final int OPEN_POOL= 4;
public static final int RELEASE_POOL = 5;
public static final String RESULT_RELEASED = "RELEASED";
public static final String RESULT_OPEN = "OPEN";
public static final String RESULT_CLOSE = "CLOSE";
private YRelay pool_key;
private YRelay pool_control;
@Override
protected String doInBackground(Integer... cmd)
{
String res = "";
try {
YAPI.RegisterHub("http://192.168.0.123");
pool_key = YRelay.FindRelay("pool_key");
pool_control = YRelay.FindRelay("pool_control");
switch (cmd[0]) {
case GET_POOL_STATE:
res = getPoolState();
break;
case CLOSE_POOL:
pool_key.set_state(YRelay.STATE_B);
pool_control.set_state(YRelay.STATE_A);
res = getPoolState();
break;
case OPEN_POOL:
pool_key.set_state(YRelay.STATE_B);
pool_control.set_state(YRelay.STATE_B);
res = getPoolState();
break;
case RELEASE_POOL:
pool_key.set_state(YRelay.STATE_A);
res = getPoolState();
break;
default:
break;
}
} catch (YAPI_Exception e) {
e.printStackTrace();
res = e.getLocalizedMessage();
}
YAPI.FreeAPI();
return res;
}
private String getPoolState() throws YAPI_Exception {
if(pool_key.get_state() == YRelay.STATE_B) {
if (pool_control.get_state() == YRelay.STATE_B) {
return RESULT_OPEN;
}else{
return RESULT_CLOSE;
}
}
return RESULT_RELEASED;
}
@Override
protected void onPostExecute(String result) {
if(result == RESULT_RELEASED) {
_statusView.setText(R.string.released);
}else if(result == RESULT_OPEN) {
_statusView.setText(R.string.opened);
}else if(result == RESULT_CLOSE) {
_statusView.setText(R.string.closed);
}else{
_statusView.setText(result);
}
}
}
The doInBackground method is run in its own thread and can freely use the network, but cannot directly refresh the UI.
During each execution, we initialize the API (YAPI.RegisterHub()) to connect itself to the YoctoHub-Ethernet and we stop the API (YAPI.FreeAPI()) at the end of the method. We then have to initialize our two objects pool_key and pool_control that are used to enable/disable the key and open/close the cover.
Instead of hard coding the serial number of the Yocto-Relay in the code, we use the logical name that we have configured for each relay using the web UI of the YoctoHub-Ethernet. Another option would have been to enumerate connected relays, but that would have made the code slightly bigger.
When everything works as expected, doInBackground returns the logical state of the system (open, closed, released). Otherwise, it returns an error message. The character string returned by doInBackground is automatically provided as argument to the onPostExecute() method by Android. This method is executed in the UI thread and can therefore be used to refresh the interface with the result of doInBackground.
You can of course find the complete code on GitHub
That's it. Once the Yocto-Relay and the YoctoHub-Ethernet are installed, we can just enjoy a little swim run a few tests and return to work.


