![]() During the last few years, Web interfaces have progressively replaced native applications in many area, and more than anywhere else in database-related applications. Web user interfaces can now be made as user-friendly as native user interfaces, but from a functional perspective the Web browser puts some limits, in particular with regard to the use of peripherals on the user machine. However, it is possible to provide a web page access to USB peripherals, as long as the peripherals have been designed accordingly, as for instance Yoctopuce devices.
During the last few years, Web interfaces have progressively replaced native applications in many area, and more than anywhere else in database-related applications. Web user interfaces can now be made as user-friendly as native user interfaces, but from a functional perspective the Web browser puts some limits, in particular with regard to the use of peripherals on the user machine. However, it is possible to provide a web page access to USB peripherals, as long as the peripherals have been designed accordingly, as for instance Yoctopuce devices.
As an example, we will show you how we recently solved an issue while implementing our new component inventory system, to extend the solution we implemented in a previous post.

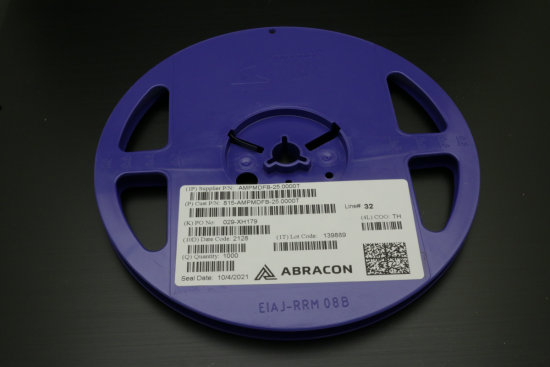
A component reel with a DataMatrix label
The problem
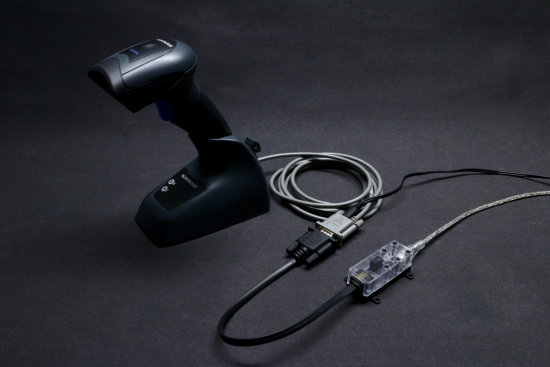
In order to make it possible to double-check stock items without moving them out of their storage area, we want to be able to use a traditional wireless 2D barcode scanner to read the label on component reels or boxes. Data should come directly into the Web UI of our system, when it is running in inventory mode. We have a Datalogic QM-4200 barcode scanner available for this purpose, with a wireless base station connected to the PC via a USB cable. The standard behaviour of the reader is to send the codes directly as keystrokes to the host, as if typed on the keyboard. This is convenient as it can be used with any standard application, but this also comes with some problems:
- The first issue is that in case the focus is not on the right input field, the barcode information will go to the wrong place. This problem can however be detected by adding an audio feedback whenever a barcode is successfully recognized.
- A more serious issue is that some 2D barcodes use control codes as field separator. Such control codes may be filtered out by the reader, or handled inappropriately by the web browser. Unfortunately this is the case for DataMatrix barcodes using ANSI MH10.8.2 standard, which is used for electronic components. Without these control codes, it is not possible to properly parse the label content. But if the reader is configured to send these codes as special keystrokes, the Web browser moves the focus away in the middle of the code.
- Even more dangerous, if the reader is configured to send control codes as keystrokes, it makes it possible for a third-party to trigger any command posing as the operator on the host computer. One simply has to forge a DataMatrix code including desired control keystrokes, and whenever the code will be scanned, a command will be triggered by the operator without knowing about it.
The solution
The best solution is therefore to connect the reader using a RS-232 link, completely separate from the keyboard. As one would expect, this is the solution used by most industrial barcode scanners. For our low-cost barcode scanner, we had to search a bit, but Datalogic does sell a special cable to connect the base station via a RS232 link rather than via USB. So this brings us to the key question of this post: how to access an RS-232 peripheral from a Web UI ?

Connecting a DataLogic QM-4200 reader using a Yocto-RS232
The solution offerd by Yoctopuce is the VirtualHub gateway. This service is started on the same machine where the Web browser runs, and opens an HTTP/WebSocket interface that makes it possible to access all Yoctopuce interface modules connected to the client computer from within a Web browser. However if the Web page that needs to access Yoctopuce devices is comes from a third-party Web server (such as an Intranet server), a few rules must be taken into account and followed carefully:
- CORS rules (cross-origin resource sharing): when an HTML page sent by a web server wants to access a web service from another server -in our case the VirtualHub-, the target service must include specific headers in its HTTP replies to indicate to the Web browser that it is intended to be used from another server. The VirtualHub does take care of this, so in our case CORS should not be an issue.
- HTTPS rules (secure HTTP): when a Web application is secured by https:// URLs, it cannot use a non-secure web service. Due to this rule, the JavaScript code that connects to the VirtualHub must use either https or wss as protocol. Therefore, you should use the VirtualHub 2.0, as the initial version does not include cryptography support.
Implementation
In practice, it is not very difficult to add an automated data input to an existing Web form. The most elegant way to do it is to add to the page a link to an EcmaScript module, which are supported nowadays by all browsers. In order to do so, you only have to add one line to the HTML code of the page, similar to this:
The source code of this barcode handling module can be written either directly in JavaScript, or in TypeScript if you prefer to benefit from some type-checking while coding. We will provide the sample code below in TypeScript, but you can find the corresponding JavaScript source code on GitHub.
To import the Yoctopuce EcmaScript library for an HTML page from an ES2016 module, including serial port support, we use the lines below. In addition, we have copied the two js files from dist/esm directory of the TypeScript library to the Web server,
import { YSerialPort } from './yocto-api-esm/yocto_serialport.js'
To get started, we must setup the Yoctopuce library to connect to the VirtualHub in secure mode, on the host running the browser, using the local host address which is always 127.0.0.1. As all calls to the library are asynchronous, we call them from an async function and prefix them with the keyword await:
{
let errmsg = new YErrorMsg();
if(await YAPI.RegisterHub('wss://127.0.0.1:4443', errmsg) != YAPI.SUCCESS) {
console.error('Cannot contact VirtualHub on 127.0.0.1: '+errmsg.msg);
return;
}
}
enableDeviceHandlers();
To connect to the barcode reader itself, we add a few lines to the function enableDeviceHandlers to look for a serial interface, i.e. the Yocto-RS232, named DataMatrixReader. If the interface is found, we configure it with the proper serial protocol, and configure a callback function that will be invoked for each new message received on the serial interface.
let port = <YSerialPort> YSerialPort.FindSerialPort("DataMatrixReader");
if(!await port.isOnline()) {
console.error('No Yocto-RS232 named DataMatrixReader found');
await YAPI.FreeAPI();
return;
}
await port.set_serialMode("9600,8N1");
await port.set_protocol("Frame:15ms");
await port.reset();
await port.registerValueCallback(barcodeHandler);
console.log('Ready to receive DataMatrix codes');
By the way, note the advantage of using a logical name to identify the serial interface, which would make it possible to use multiple RS-232 devices when needed, without risk of mixing them.
The callback function reads the last message received by the serial interface, decode all NH10.8.2 fields and fill in the form fields accordingly, based on their name:
{
let messages: string[] = await port.readMessages('',1);
await port.reset();
if(messages.length == 0 || !messages[0]) return;
let form: HTMLFormElement =
document.getElementsByName('panelform').item(0) as HTMLFormElement;
var formData = new FormData(form);
for(let msg of messages) {
let mh10: MH10Dict = decodeMH10code(msg);
let fieldname: string;
for(fieldname in mh10) {
if(formData.has(fieldname)) {
let input: HTMLInputElement = document.getElementsByName(fieldname).item(0) as HTMLInputElement
input.value = mh10[fieldname];
}
}
}
}
If you want to reuse this code for your own purpose, make sure to replace the string 'panelform' by the same value as the attribute name of your own form. You can find our complete source code, including the decodeMH10code function, in the sample project on GitHub.
Conclusion
Yoctopuce interface modules make it possible to power Web forms with automated input modes using local peripherals. The example above shows how to do it for a serial interface, but the same code skeleton can be used for a local temperature/humidity/pressure probe in a metrology application, or to read a wheatstone bridge to measure a weight, or a 4-20mA input to measure the output of an industrial sensor.


