 Python is well-suited to tinkering with prototypes based on Yoctopuce modules: the code is compact, so it can be written fairly quickly, and open source libraries are readily available to interface external elements not directly supported by Yoctopuce modules. Today, we're going to show you just such an example...
The idea of the project is to transform a MIDI instrument into a game to train visual and auditory memory, based on the principle of the Simon game. The instrument repeatedly plays an increasing number of notes, showing their location, and asks the user to repeat the exact sequence. As the sequence increases, the user learns to play a melody.
Implementation
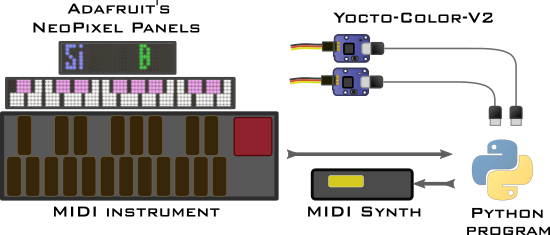
Apart from the MIDI instrument, this project requires a display as large as the instrument itself, so that the user can see where each note is to be played. This is where the Yoctopuce modules come in: they enable us to drive a series of NeoPixel RGB tiles arranged in a line, forming a 60cm-long screen that can be placed right next to the notes. Here's the installation diagram:

Diagram of our installation
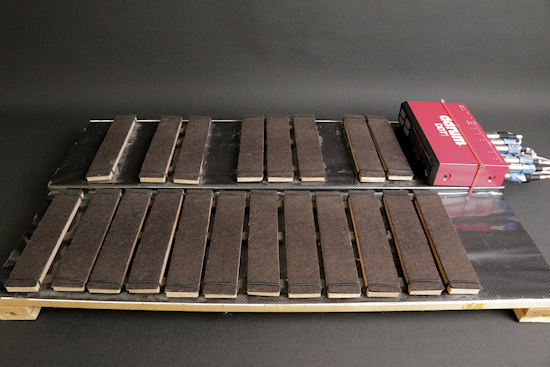
Rather than an ordinary MIDI piano, we're using a MIDI xylophone because it's more fun, and because we have a trainee this week who has one in his basement. If we'd chosen a MIDI piano, we could also have used it to play the notes, but in the case of a MIDI xylophone, we have to use a separate MIDI synthetizer to produce the instrument's sounds.

A home-made MIDI xylophone based on a MIDI trigger interface
Programming
To interact with the MIDI instrument, we use the rtmidi2 package, which provides fairly low-level access but has the advantage of being very easy to install with PyPi. To receive notes played on the MIDI instrument in real time, simply open the MIDI interface and register a callback function that is called for each MIDI event received:
midiIn = MidiIn()
midiIn.open_port()
midiIn.callback = midiCallback
def midiCallback(msg: list, timestamp: float):
msgtype, channel = splitchannel(msg[0])
if msgtype == NOTEON:
note, velocity = msg[1], msg[2]
if velocity > 10:
note -= BaseNote
NoteOn(note, velocity)
Our code only needs to handle note activation events (NOTEON). Moreover, as the piezos under the xylophone keys are sometimes triggered by vibrations on neighboring keys, we keep only sufficiently important events (velocity > 10, out of a maximum of 127). We subtract from the MIDI note index the index of the lowest note on our keyboard, so that the leftmost key is note zero for us.
To play notes, simply call the send_noteon() method. However, as there are several MIDI output ports on the computer, we need to specify which interface to use:
midiOut = MidiOut()
print("MIDI ports:", get_out_ports())
midiOut.open_port('MIDIOUT2 (ESI MIDIMATE eX) 2')
midiOut.send_noteon(0, note + BaseNote, velocity)
To display the notes to be played, we're going to reuse our NeoPixel display built for a previous project. Pixels are represented as an array of HSL colors. We define the shape of the notes on the keyboard in another Python array, using the coordinates of the pixel lines to be lit, and use this in a function that can draw any note at the chosen brightness:
leds = [ 0 ] * n
def showNote(note, luminosity):
shape = NoteSize[note % 12]
color = min(255, max(10, luminosity))
color += NoteColor[note % 12] * 0x100
x = 62 - NotePos[note % 12] - 37 * (note // 12)
for top, bottom in shape:
for y in range(top, bottom):
leds[x * 8 + y] = color
x -= 1
For even better rendering, we've attached a sheet of Japanese paper to the NeoPixel tiles, making an excellent diffuser:

Actual picture of our keyboard display
At startup, the keyboard is displayed in low intensity. You can then call up this function to light up the note to be played, or show the notes played by lighting up the note in proportion to the strength of the keystroke. To achieve a gradual extinction effect that mimics the natural extinction of sound, we keep a countdown of the switch-on time for each note, and gradually extinguish the note during the last four iterations. This is the display update function, which is called in a loop:
# update display
keyboardDisplay.set_hslColorArray(0, leds)
# decay luminosity
for i in range(NoteCount):
time = NoteTime[i]
time -= 1
NoteTime[i] = time
if time > 4:
showNote(i, NoteVelocity[i])
elif time >= 0:
showNote(i, NoteVelocity[i] * time // 4)
The final result
You'll find the complete code, including the memory game logic and note name display, on our GitHub repository. And here's a short video of the result:


