 We have to admit that working with Modbus devices is quite tedious: data are often binary encoded, and all the transactions are validated with a checksum, forcing you to write some code before being able to obtain any result. So, this week, we have a small present for customers using Yoctopuce modules to drive Modbus devices.
It's a small application written in C# which is going to enable you to experiment with the Modbus protocol. For the name, we didn't beat around the bush: it's called Modbus-tool. It's compatible with all the Yoctopuce modules which have a YSerialPort function supporting the Modbus protocol. That is, the Yocto-RS485-V2, but also the Yocto-Serial and the Yocto-RS232.
This application is a simple Windows executable accompanied by the 32- and 64-bit Yapi DLLs. At start up, it automatically uses the VirtualHub if it detects it on the 127.0.0.1:4444 local address, otherwise it tries to use the native USB mode.

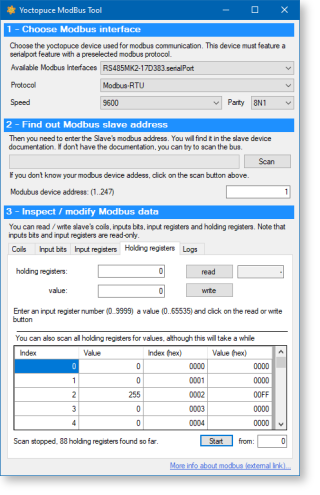
The interface of the Modbus-tool application
The Modbus-tool interface has a single window divided into three sections.
Selecting the interface module

Host module selection
The first section enables you to select the serialPort function that you intend to use to communicate with your devices. All the YSerialPort functions which have been previously configured with a Modbus protocol are available, that is Modbus-RTU or Modbus-ASCII. The interface allows you to configure the protocol, the speed, and the parity of the communications. Note that changes to these communication parameters are applied in real time, but they are not saved in the module.
Entering the address of the Modbus device
When the communication has been configured, you can go to the second section of the interface where you must enter the address of the device that you are interested in. This address is an integer between 1 and 247. If you don't know this address, either because you lost the documentation of your device or because this address was changed, the application can scan the bus to see if something answers . This scan is performed by trying to query the holding register #0 of each address.

Selecting the address
Accessing the device data
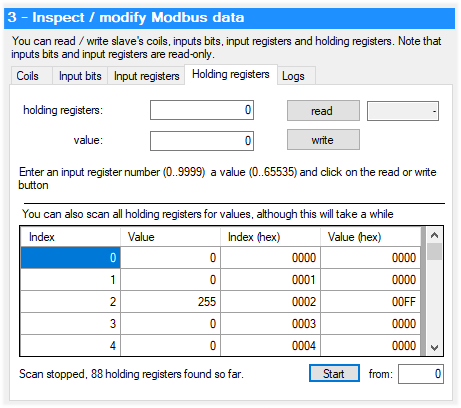
When everything is ready, you can use the third section of the interface to read or write the coils, input bits, input registers, and holding registers of the device. You can simply enter the values and click on the corresponding read and write button. You can enter all the values either in decimal or in hexadecimal ("0x" prefix). Quick reminder, in Modbus, the input bits and input registers are read-only.

Manipulating the coils, input bits, input registers, and holding registers
You can also ask the application to scan all the potential positions of each of the four types of data. The content of the valid positions is presented in the form of a grid. It's quite convenient to have a global view of the memory content of a device.
The logs
The logs tab display the logs of the Yoctopuce API and describes the calls which are performed each time that you click on a read or write button.
Conclusion
This application should help you save a lot of time if you want to test or configure a Modbus device. You can download it here. This zip file contains the sources of the whole VisualStudio project. The pre-compiled executable is located in the bin/release directory. Edit: you can download it from the tools page.
As always, never hesitate to inform us of any difficulties you may encounter while using it.


