 We have been recently asked whether we had a solution to communicate with our modules using SMS. We have a long term plan for a GSM version of our YoctoHub, but for now we focus on the YoctoHub-Wifi and other new modules. However, using an Android phone and with some programming, it is quite possible to communicate with a Yoctopuce module via SMS. A classic use is to remotely turn on and off the heating of your vacation home.
To illustrate this case, we are going to write an Android app to control any Yoctopuce relay by sending an SMS. One year ago, we wouldn't have used this kind of technique as it would have been way over budget. But nowadays, Android phones with USB On The Go support are much more common and some models are available for less than $250.
The "SMS relay" kit

A Galaxy Note II, Yoctopuce modules, and Smart Dock to connect everything
We need an Android (at least Android 4.0) phone, one or several Yoctopuce modules using relays (Yocto-Relay, Yocto-PowerRelay, Yocto-MaxiRelay, Yocto-MaxiCoupler, Yocto-LatchedRelay), and a Samsung Smart Dock or a USB OTG Y-cable if you want a less expensive solution.
The Android app
We must instal an application which listens to all the incoming SMS and then commutes a relay if the message contains the correct keywords. The source code is available on GitHub.
Instead of using the relay name directly in the SMS, we define a logical switch containing the following pieces of information:
- the name of the logical switch (for example "my heater")
- the working logic of the switch
- the hardware Id of the relay to be used (for example "YLTCHRL1-12B98.relay1")
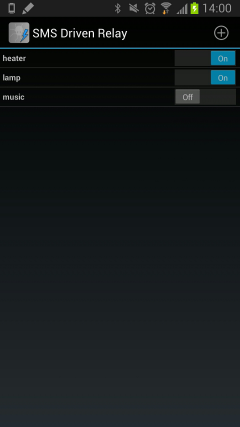

When you have created your configuration with the app, you can directly test that all your switches work as planned without sending any SMS.
Nothing simpler than to drive your switches via SMS. Send an SMS to your phone with the command to run and the name of the logical relay. Commands are:
- "switch" to change the state of the switch in all cases (if off, then turns it on; if on, then turns it off).
- "switch on" turns on the switch (if off, then turns it on; if on, then does nothing).
- "switch off" turns off the switch (if off, then does nothing; if on, then turns it off).
So, to switch the heater on, we simply need to send an SMS with the following text "switch on my heater". The app doesn't need to be in the foreground, or even launched. As soon as you have installed the app, it is automatically run in the background by Android.
How does it work?
We have already described in several blog articles how to interact with our modules under Android. It's quite simple to retrieve the SMS. We must add in our manifest that we are going to listen to the phone SMS with <uses-permission android:name="android.permission.RECEIVE_SMS" />. This line tells the users when installing that this app can access their SMS.
To retrieve the content of the SMS, we must implement a BroadcastReceiver which is called for each incoming SMS. The following code overloads the onReceive method and reconstructs the SMS text as well as the sender's phone number. We must then decode the text of the SMS to find the command and the name of the logical switch to activate.
@Override
public void onReceive(Context context, Intent intent) {
Bundle bundle = intent.getExtras();
if (bundle != null) {
Object[] pdus = (Object[]) bundle.get("pdus");
SmsMessage[] messages = new SmsMessage[pdus.length];
for (int i = 0; i < pdus.length; i++)
messages[i] = SmsMessage.createFromPdu((byte[]) pdus[i]);
for (SmsMessage message : messages) {
String msg = message.getMessageBody();
String from = message.getOriginatingAddress();
if(!parseIncomingSMS(context, from, msg)) {
this.abortBroadcast();
}
}
}
}
protected boolean parseIncomingSMS(Context ctx, String from,String msg) {
...
Cmd cmd = parseCommand(msg)
YSwitch yswitch = findSwitchFromMessage(msg);
switch (cmd) {
case TOGGLE:
Toast.makeText(ctx, appname+" : toggle " +target,
Toast.LENGTH_LONG).show();
yswitch.setOn(ctx,!s.isOn());
break;
case ON:
Toast.makeText(ctx, appname+" : switch on " +target,
Toast.LENGTH_LONG).show();
yswitch.setOn(ctx,true);
break;
case OFF:
Toast.makeText(ctx, appname+" : switch off " +target,
Toast.LENGTH_LONG).show();
yswitch.setOn(ctx,false);
break;
default:
return false;
}
return true;
}
}
Then we must register this BroadcastReceiver in the manifest in order for the OS to automatically run the app and call the method we just implemented.
<intent-filter android:priority="100">
<action android:name="android.provider.Telephony.SMS_RECEIVED" />
</intent-filter>
</receiver>
The class YSwitch is used to store everything about a logical switch: its name, its state (on or off), whether the relay will work inverted or not, as well as the hardwareId of the relay. The method setOn will check if a relay state change is required, and if necessary, it will send an Intent to our background services that will perform the actual call to the corresponding Yoctopuce methode.
private String mName;
private boolean mOn;
private boolean mInverted;
private String mHardwareId;
public YSwitch() {
mName ="";
mOn = false;
mInverted = false;
mHardwareId = "";
}
....
public boolean isOn() {
return mOn;
}
public void setOn(Context ctx, boolean newOn) {
if(mOn == newOn)
return;
mOn = newOn;
Intent msgIntent = new Intent(ctx, YoctoService.class);
msgIntent.putExtra(YoctoService.PARAM_IN_CMD,
YoctoService.COMMANDS.SWITCH);
msgIntent.putExtra(YoctoService.PARAM_IN_YRELAY, mHardwareId);
if (mInverted)
newOn = !newOn;
msgIntent.putExtra(YoctoService.PARAM_IN_SWITCH_ON,newOn);
ctx.startService(msgIntent);
}
...
}
Our service receives the Intent that we have prepare with the method setOn(), then calls the method set_ouput() of the Yoctopuce Library. In this example we only use USB connected devices, and in any case this should not take more than some milliseconds. So we could have skipped the service and called directly the Yoctopuce library in the method setOn(), but Google recommends to execute in background any piece of code that can slow then interface. If we had used modules that were connected to a YoctoHub-Ethernet, it could happen that Android need several seconds to establish the first connexion, so in this case the service would have been mandatory.
@Override
protected void onHandleIntent(Intent intent) {
String hwid;
YRelay relay;
COMMANDS cmd = (COMMANDS) intent.getSerializableExtra(PARAM_IN_CMD);
if(cmd==null)
return;
switch (cmd) {
case QUIT:
Log.d(TAG, "Quit YoctoService");
stopSelf();
break;
case SWITCH:
hwid = intent.getStringExtra(PARAM_IN_YRELAY);
boolean on = intent.getBooleanExtra(PARAM_IN_SWITCH_ON,false);
Log.d(TAG, "Swich " + hwid + (on ? " on" : " off"));
relay = YRelay.FindRelay(hwid);
try {
relay.set_output(on ? YRelay.OUTPUT_ON : YRelay.OUTPUT_OFF);
} catch (YAPI_Exception e) {
e.printStackTrace();
}
break;
....
}
}
...
Here you are. Now you know how to control your Yoctopuce modules via SMS using an Android phone.

