 Most examples that we provided so far to interact with Yoctopuce USB sensors use sequential function calls. This is called the procedural approach, using polling. We recommend this technique as a starting point, because it is generally more intuitive and less risky. There is, however, an alternative approach, sometimes more convenient: the event-based technique, using callbacks. This is the new API feature that we present today.
In this article, we illustrate this new technique with a simple example : building a stand-alone control panel with three rotating pots for changing the color of any Yocto-Color RGB led connected to the host. Each pot is assigned a base color (red, green, blue). You will see below how to implement this example using callbacks, and how this solution can easily be extended to modules connected via the IP network. And by the way, we use a new product that should be available on our shop within a few weeks, the Yocto-PowerColor.
Hardware
Let's start by listing what is needed for this project:
- 3 standard pots. We use one model found at Distrelec, but any other would do as well.
- 1 Yocto-Knob to connect the 3 pots.
- at least a Yocto-Color (or a Yocto-PowerColor, available soon).
- some electric wire.
Hardware setup
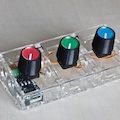
To make this example look nicer, we cut a small Plexiglass enclosure for the pots. Once the pieces are glued together, we connect the three pots to the Yocto-Knob module. Simply solder two wires on any two adjacent pins of the pots, and connect one of them to the common ground of the Yocto-Knob and the other on one of the 5 inputs. Since we can calibrate the inputs by software, there is no need to worry about the impedance of the pots, nor to add any additional component.

Our three pots in their precious enclosure
Configuration
We know have a Yocto-Knob with three pots connected to the first three AnButton inputs. In previous examples, we used serial numbers to refer to the module, or we used yFirst... to locate any available module. This time, we assign a logical name to each button ("Red", "Green", and "Blue"), and use these names in the software. Let's start by running the VirtualHub to configure the name of each button and its operating range.

The Yocto-Knob configuration window
The code
Here we are. We implement a ColorMixer object that is responsible for updating any ColorLed found with the desired color. This object implements three callbacks, used by each of the pots to update its specific color components.
callback
Every function found on Yoctopuce modules includes an attribute named "advertisedValue". It represents the current state of the function. For instance, the advertised value of a sensor is its measured value, for a relay it is its active state, and for an RGB led it is its color. Moreover, one can attach to each function a callback function which is called by the library every time the published value changes. Callbacks must be compatible with the following prototype (here using the C++ syntax):
The func parameter points to the function of which the value has changed, and functionValue is a string describing the new value. In order to simplify the use of callbacks, every function includes a userData attribute, that is never used directly by the Yoctopuce library but can be used to implicitly pass a context to the callback.
To avoid concurrency problems and the resulting memory corruptions, the Yoctopuce library ensures that the callbacks are not called when you do not expect them. They are called only:
- when you invoke yHandleEvents
- when you invoke ySleep()
It is important to call these two functions periodically to make sure that your callbacks are not invoked too late. If you don't fear concurrency and work in a multi-threaded environment, just create a separate thread that calls ySleep in a loop.
In our case, the callback is implemented as follows:
{
// Compute the red component by scaling the calibratedValue
// from 0..1000 to 0..255
unsigned char red = ( atoi(calibratedValue.c_str()) * 255 / 1000 ) & 0xff;
// Use the userData to get the pointer to the instance of ColorMixer
ColorMixer *mixer = (ColorMixer*) button->get_userData();
// Change the color
mixer->changeRed(red);
}
The main function
We start by registering any hub specified on the command line:
if(yRegisterHub(argv[i], errmsg) != YAPI_SUCCESS) {
cerr << "Unable to get access to devices on " << argv[i] << endl;
cerr << "error: " << errmsg << endl;
return 1;
}
}
We then instantiate our ColorMixer object and give it the three selected AnButton functions, as identified by their respective name. We also look for any available ColorLed.
ColorMixer mixer = ColorMixer();
// Get pointers to the 3 knobs, using the logical names
// that we have configured using the VirtualHub
YAnButton* knobRed = yFindAnButton("Red");
YAnButton* knobGreen = yFindAnButton("Green");
YAnButton* knobBlue = yFindAnButton("Blue");
// Register the 3 knobs in the mixer
mixer.assignRedButton( knobRed );
mixer.assignGreenButton( knobGreen );
mixer.assignBlueButton( knobBlue );
// Register all leds connected to the "network"
YColorLed* led = yFirstColorLed();
while(led){
mixer.addLED(led);
nbled++;
led = led->nextColorLed();
}
Once the initialization is done, we simply have to wait for the events to come by themselves, calling ySleep().
while(1) {
// 1. handle all event during 1000 ms, without using much CPU ...
ySleep(1000, errmsg);
// 2. handle device hotplug/unplug if needed
yUpdateDeviceList(errmsg);
}
return 0;
}
If you want to look at the complete example, download the latest Yoctopuce C++ library from here. The full code can be found in the Examples directory.
Demo using a single host
To get started, we check that everything works properly when connecting the modules locally on the machine running the program. All modules are connected by USB on the machine, so we don't even need to start VirtualHub: we simply start the program with "usb" as argument. The call to yRegisterHub(argv[i],errmsg); automatically detects local USB devices and initialize the API. As soon as we move the pots, the Yocto-Knob sends the new value by USB and the callback is invoked.

Everything connected by USB
As shown in the video, it works. But without changing a single line of code, we can do better...
Demo using multiple machines
Suppose now that we want to have the 3 pots connected to a machine at a specific location, and the leds connected to another machine in another room, and the control program running in a server room. Is it possible ? Just for fun, we connect the pots to a Mac OS X host, a RGB led Yocto-PowerColor on a Linux machine, and run the control program on a Windows host (any other combination would have done as well). One would think that this change requires the use of some network functions, or at least to change the control software, but no ! Simply
- start the VirtualHub on the two remote machines
- pass the IP address or hostname of these two machine as command-line argument to our program (instead of "usb").

The pots are connected on another machine, and the RGB led on a third one
As in the previous example, yRegisterHub(argv[i],errmsg); enumerates and initializes the API. Instead of talking to the modules though USB, the Yoctopuce library uses TCP to talk to the remote VirtualHub, which itself uses USB to talk to the device. The encapsulation of USB though TCP is completely transparent for the user software. There is no need for complex network configuration, one only has to ensure that the machine running the control software can reach the remote host using TCP using a single TCP port (using port 4444 by default). All communications are initiated by the host running the control software, which makes it possible to cross a NAT router. As soon as we move the pots, the Yocto-Knob sends the new value by USB, and it is forwarded to the API by TCP to trigger the callback.
You may wonder why we added the call to yUpdateDeviceList(errmsg); in the main program loop. If we remove it, the program still works perfectly well in a static environment, but when we disconnect the Yocto-Knob and connect it somewhere else, the pots do not respond anymore. By adding this line, we perform a new device detection from time to time, making it possible to disconnect the module while the software is running and to connect it again later, without any problem. We can even move it from one machine to the other!

Every machine has a led, and the pots can be connected anywhere
The support for callbacks in the programming API, as described in this article, will be available today for C++, Objective-C and C#. It will be available for all other supported languages within a few days, as soon as we update the library. As always, if you have any question, don't hesitate to contact us!

