![]() As you know, we already provide an Objective-C API which allows you to access our modules from a Mac. There are other devices which use Objective-C: the iPhones, iPads, and iPods. If, currently, it is not possible to directly plug in a Yoctopuce module on an IOS device, it is quite possible to interact with our modules through the network (WiFi or cabled). What would you think of monitoring all your Yoctopuce modules, comfortably lounging in your couch, with an iPad?
As you know, we already provide an Objective-C API which allows you to access our modules from a Mac. There are other devices which use Objective-C: the iPhones, iPads, and iPods. If, currently, it is not possible to directly plug in a Yoctopuce module on an IOS device, it is quite possible to interact with our modules through the network (WiFi or cabled). What would you think of monitoring all your Yoctopuce modules, comfortably lounging in your couch, with an iPad?
All the systems we have created for customers or in our blog posts and which interact with smartphones were implemented either in JavaScript or in PHP. The obvious advantage of these solutions is that they are portable: whether you have an IOS, Android, Windows, or even WebOS phone, your application will work! Nevertheless, and despite the fact that HTML5 is more and more widely supported, the interface is by necessity more simplistic and less dynamic than with native applications. From a marketing stand point, it can also be interesting to keep the sources of your applications private. With the arrival in a little while of the YoctoHub-Wireless, many iPads and iPhones are going to become control centers for Yocto-Relay or Yocto-Meteo. We could have decided to keep the development of this application a secret, but we thought that people would be interested in knowing. The goal of this post is to prove that it is easy to create a basic interface which interacts with our modules.

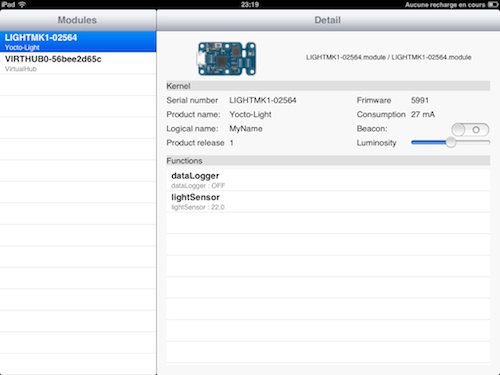
Here is the goal of the week
Initializing
We start from the Xcode Master/detail template and insert a few necessary calls to display module information into the interface. We must first call InitAPI for the API to initialize its internal structures. As we do not need to perform a USB detection, we must call InitAPI with the Y_DETECT_NONE parameter. To simplify error handling, exceptions are disabled. In this configuration, if an error happens during a call to the API, the function returns an invalid value instead of generating an exception which we would need to trap.
[YAPI InitAPI:Y_DETECT_NONE,nil];
Retrieving the list of Yoctopuce modules
It's the bulk of the work! The goal here is not to do pooling and to update the interface, but to use a callback mechanism which is called each time a connection/deconnection happens. In a language like C++ we would use the RegisterDeviceArrivalCallback function, but in Objective-C the tradition is rather to use a delegated object which implements a protocol. Concretely, our YVMasterViewControler object must conform to the YDeviceArrival and YDeviceRemoval protocols and register itself as "delegate" with SetDelegate. The YDeviceArrival protocol defines only one method - (void)yDeviceArrival:(YModule *)module; (for YDeviceRemoval it's -(void)yDeviceRemoval:(YModule *)module;). These two methods can be called by the API only during the execution of the class method UpdateDeviceList:. We must therefore regularly call the UpdateDeviceList method of the YAPI class for the API to call the YDeviceRemoval method of our delegated object. The solution is to use an NSTimer which periodically calls UpdateDeviceList:
Here is the declaration for our YVMasterViewController
@interface YVMasterViewController: UITableViewController<YDeviceArrival,YDeviceRemoval>
...
- (void)yDeviceArrival:(YModule *)module;
- (void)yDeviceRemoval:(YModule *)module;
...
@end
And its implementation
..
- (void)viewDidLoad
{
...
[YAPI SetDelegate:self];
NSError *err;
if(YISERR([YAPI RegisterHub:@"172.17.17.59" :&err])){
NSLog(@"Register Hub failed with : %@",[err localizedDescription]);
}
hotplug_timer = [NSTimer scheduledTimerWithTimeInterval:1
target:self
selector:@selector(timerFired:)
userInfo:nil
repeats:YES];
...
}
-(void)timerFired:(NSTimer *) theTimer
{
[YAPI UpdateDeviceList:nil];
}
- (void)yDeviceArrival:(YModule *)module
{
NSLog(@"yDeviceArrival %@",module);
...
}
- (void)yDeviceRemoval:(YModule *)module
{
NSLog(@"yDeviceRemoval %@",module);
...
}
@end
The remainder of the code is more or less the Xcode Master-Detail template code: instead of adding NSDate objects, we add our YModule objects.
The detailed view
For the detailed view, it is even simpler. The template updates our pointer on our YModule object. We only need to place our widgets with Interface Builder, and to define a method which updates the interface with the values of the YModule object. Here as well, we use an NSTimer to regularly refresh the interface with the values which may have changed (logical name, consumption, and so on).
- (void)updateView
{
// Update the user interface for the detail item for attributes that can change.
if (self.detailItem) {
self.detailDescriptionLabel.text = [self.detailItem description];
[logicalNameView setText:[self.detailItem logicalName]];
[consumptionView setText:[NSString stringWithFormat:@"%0d mA",[self.detailItem usbCurrent]]];
Y_BEACON_enum swVal = [beaconView isOn]?Y_BEACON_ON:Y_BEACON_OFF;
if(swVal != [self.detailItem beacon])
[beaconView setOn:([self.detailItem beacon]==Y_BEACON_ON? YES:NO)];
[luminosityView setValue:[self.detailItem luminosity]];
}
}
- (void)configureView
{
// Update the user interface for the newly selected the detail item.
if (self.detailItem) {
NSLog(@"configureView for %@",self.detailItem);
NSData *data = [self.detailItem loadURL:@"/icon2d.png"];
UIImage *img = [UIImage imageWithData:data];
[_icon2dView setImage:img];
[serialView setText:[self.detailItem serialNumber]];
[prodNameView setText:[self.detailItem productName]];
[prodReleaseView setText:[NSString stringWithFormat:@"%d",[self.detailItem productRelease]]];
[firmwareView setText:[NSString stringWithFormat:@"%d",[self.detailItem firmwareRelease]]];
[self updateView];
NSLog(@"configureView done for %@",self.detailItem);
}
}
-(void)timerFired:(NSTimer *) theTimer
{
[self updateView];
}
...
As you may have noticed, this example is very basic, but it allows you to understand the main steps to interact with our modules. You will find the complete sources of this project in the next version of the Objective-C library. In a few weeks months, you should find a similar but much more complete application directly in your app store. For Android smartphone and tablet owners, the Java API should be available for beta tests soon.


