 Don't you have at home one or two appliances that you just wish you could keep an eye on remotely? Cheer up! We are presenting today a simple, economical, and efficient way to solve this issue. For about 30 EUR, you will finally be able to take these appliances out of the dark...
To illustrate this article, we are going to show you how you can report through Internet the state of an existing alarm installation.

The control panel that we are going to watch remotely
This appliance, which is connected to a security company through public phone networks, does not have a standard way to report its state remotely through Internet. However, it can sometimes be useful to check from afar if the alarm is correctly set, or to be able to automatically trigger actions in case of an alarm, on top of contacting the surveillance company. However, this is not the kind of box you can open and tinker with at will ...
The suitable solution is very simple. As the appliance is equipped with leds, you only need to put in front of each led a device to measure the emitted light and the problem is solved. We could do that by using a Yocto-Light for each led, but this would be really expensive. As the exact light value is of no real importance to us, it is enough to use a Yocto-Knob, and to connect a cheap phototransistor directly on each input, for a total cost under 30 EUR:

Connection diagram: connect the phototransistors directly on the Yocto-Knob, and that's it!
Of course, you will need to connect the Yocto-Knob to a networked computer by USB. If you don't have one near to the appliance to be monitored, you can order a Raspberry Pi, which is powerful enough for this task, and which also costs less than 30 EUR... as soon as it is available. In our case, we have reused an old Fit-PC (1st generation) with Ubuntu Linux.
The Yocto-Knob works by applying on each input a low voltage, through a resistance, and in measuring the resulting tension. This makes it possible to connect to it not only a switch or a potentiometer, but also any component for which a varying quantity of current goes through, such as a phototransistor. Setting the thresholds is trivial: the Yocto-Knob provides an automatic calibration procedure, which measures the input min and input max, and transforms the measured values into a standardized interval between 0 and 1000.

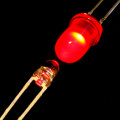
A phototransistor
The DIY part is easy, we only need to position the phototransistors in front of the leds. If the front of the appliance to monitor is flat, record the led positions with tracing paper, and transfer them on a small acrylic glass panel. You need only a few holes and some epoxy to fix the phototransistors in position. The panel can fixed with a double-sided tape, or with corner plates.
If the side of your case is not flat, as it is the case for us, the best is to report the case profile on a cardboard sheet (using the bottom of the case as a guide), that you then cut to check that the profile is correct. You can now cut the profile in an acrylic glass panel, which you fix perpendicularly to the surface of the case. You then cut rectangular notches where you need to put the phototransistors, and fix the phototransistors. We have decided to put for each phototransistor the common leg (the longest) on top, and to solder them one to the other. The other leg goes under the panel and then through a small hole to reach the Yocto-Knob terminal.

Putting the phototransistors on a panel perpendicular to the surface of the case
To end the DIY part, you only need to cover the phototransistors with an opaque adhesive tape to prevent any perturbation from the surrounding light, to fix the panel in position, and that's it.
Let's now have a look at how to make the information accessible on the Internet, as it is the goal of this setup. Here is a first version which uses a web page written in PHP to read the state of the phototransistors and to publish the information, so that you can consult it with an iPhone, for example. As often, a large portion of the code is needed only to make the result look pretty ...
<TITLE>Monitoring system</TITLE>
<STYLE type="text/css">
IMG {
height: 56px;
border: 0px;
}
DIV.frame {
width: 56px;
height: 56px;
padding: 4px;
text-align: center;
border-radius: 7px;
-moz-border-radius: 7px;
-webkit-border-top-left-radius: 7px;
-webkit-border-top-right-radius: 7px;
-webkit-border-bottom-right-radius: 7px;
-webkit-border-bottom-left-radius: 7px;
border:2px solid grey;
}
</STYLE>
</HEAD><BODY>
<TABLE width='100%' height='100%'>
<TR><TD width='50%'></TD>
<?php
include('yocto_api.php');
include('yocto_anbutton.php');
// Setup the API to use the VirtualHub on local machine
if(yRegisterHub('http://127.0.0.1:4444/',$errmsg) != YAPI_SUCCESS) {
die("Cannot contact VirtualHub on 127.0.0.1");
}
// Display each leds
$leds = Array("power" => "LimeGreen",
"locked" => "LimeGreen",
"open" => "Yellow",
"alert" => "Tomato",
"maintenance" => "Tomato");
foreach($leds as $ledname => $ledcolor) {
$detector = yFindAnButton("yoctoMonitor.$ledname");
$style = '';
if($detector->get_calibratedValue() < 500)
$style = "style='background-color:$ledcolor;'";
Print("<TD><DIV class='frame' $style><IMG src='$ledname.png'></DIV></TD>");
}
?>
<TD width='50%'></TD></TR>
</TABLE>
<SCRIPT language='javascript1.5' type='text/JavaScript'>
setTimeout('window.location.reload()',500);
</SCRIPT>
</BODY></HTML>
Here is the result:

Remotely checking the state of the installation with a mobile phone
The PHP code above is very simple, but it is not perfect. As it refreshes itself only twice per second, it cannot faithfully reproduce a blinking led, because refreshing is not dynamic. To improve this, the AJAX technology is needed. You can find the improved implementation in the example file of this article. The web page part is the same, but this time, refreshing is dynamic, with a latency of a few milliseconds only. This new version really provides you with a duplicate of the control led states on your web server.
We offer you a third version of the control code, in case you wish either to trigger automatic actions depending on the states of the control leds, or to simply propagate the led states on another machine, for example to publish the results on the other side of a NAT barrier. In this case, the control code (still in PHP) is run in command line, and for each significant state change detected on the leds, it makes an HTTP request on another server. The implementation is also available in the example file of this article.

