![]() Last year, Microsoft announced the Azure IoT Suite. Behind this somewhat pompous name hides two examples of use of their Azure cloud with connected objects. We are going to see how to use Yoctopuce modules in one of these two examples.
Last year, Microsoft announced the Azure IoT Suite. Behind this somewhat pompous name hides two examples of use of their Azure cloud with connected objects. We are going to see how to use Yoctopuce modules in one of these two examples.
Azure is Microsoft's cloud service, theoretically enabling you to implement any kind of project. Using the Azure cloud is not very intuitive and requires a lengthy learning process to truly take advantage of all of its possibilities. To make the life of the developers easier, Microsoft offers pre-configured solutions using the Azure cloud. For the Internet of Things, Microsoft called these solutions Azure IoT Suite.
This suite is actually a wizard enabling you to instantiate on your own Azure account all the necessary features (web server, data base, and so on) to obtain a complete and working IoT solution. The idea is to save the developers some time because they "only" have to modify the solution instead of starting from scratch.
Currently, there are only two solutions available: "Predictive maintenance" and "Remote monitoring". The "remote monitoring" solution allows you to monitor the temperature and the humidity in several locations. By default, this solution simulates four connected objects which send fictive data, but you can also use real connected objects. We are going to show you how to implement a sensor compatible with this solution using a Raspberry Pi, a Yocto-Meteo, and a Yocto-GPS.
However, before adding our real connected objects, we must start by instantiating our own remote monitoring solution.
Creating a "remote monitoring" solution
You must start by creating a Microsoft Azure account, if you don't have one yet. Azure is a paying cloud service, but you can request a free evaluation version allowing you to test all the features.
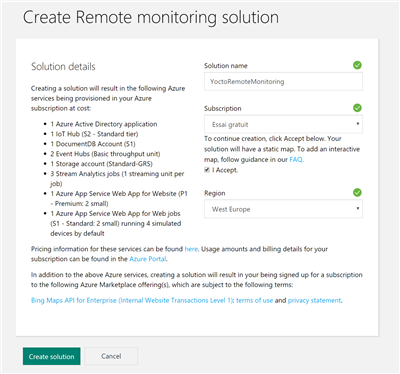
Then you must go on the main page of the Azure IoT Suite and create a new "Remote monitoring" solution. The wizard asks you for an application name as well as the Azure account to use for billing.

The solution creation wizard
Instantiating the solution on your Azure account takes about ten minutes. When done, the application is available directly with the URL https://xxxxxxx.azurewebsites.net where xxxxxxx is the name that you have defined in the creation process.

The application welcome page
The interface enables you to follow in real time the measures of the distinct connected objects and to define alarms. By default, four virtual connected objects are emulated and allow you to test the application features.
Creating a real connected object
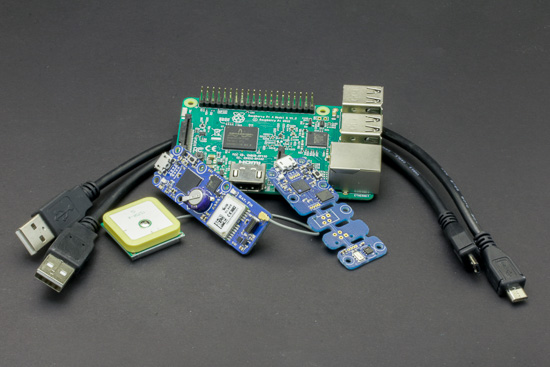
For our connected object, we are going to use a Raspberry Pi with a Yocto-Meteo and a Yocto-GPS connected on the USB port.

The necessary hardware for our connected object
Before we are able to use our Raspberry Pi, we must first create an authentication key for this object in the solution. There is a "devices" tab in the solution which enables you to manage the objects.
By default, there are the four emulated objects, but also a button enabling you to add a new connected object. The first step enables you to select if you want to add another simulated object or a real connected object. The second panel asks you to define an identifier for this new connected object. When done, the wizard displays the authentication parameters for this object. Copy the three fields because you will need them later on.

The new connected object registration wizard
The Raspberry Pi script
We coded a short Python script which uses the Azure REST API to transmit to our solution the temperature, the ambient humidity, as well as the GPS location of the object. The advantage of writing this script in Python is that the code is portable and that you can therefore use the same script on a Windows, Linux or OS X machine.
The code is rather simple and is inspired by the examples provided by Microsoft (https://github.com/Azure-Samples/iot-hub-python-get-started).
We simply included our library and used the YTemperature and YHumiditiy objects to access the sensors of the Yocto-Meteo.
The part of the code sending the temperature and the humidity values every 10 seconds:
tempSensor = YTemperature.FirstTemperature()
humSensor = YHumidity.FirstHumidity()
if tempSensor is None or humSensor is None:
print("No Yocto-Meteo connected. Check your USB cable.")
return
while tempSensor.isOnline():
temp = tempSensor.get_currentValue()
humidity = humSensor.get_currentValue()
print('Send new value: temperature=%2.1f%s and humidity=%2.1f%s' % (
temp, tempSensor.get_unit(), humidity, humSensor.get_unit()))
value_message = json.dumps({
'DeviceID': azure_deviceId,
'Temperature': temp,
'Humidity': humidity,
})
ret = d2cMsgSender.sendD2CMsg(value_message)
if ret[1] != 204:
print("unable to contact Azure Iot Hub:" + ret[0])
return
YAPI.Sleep(10000)
When starting, the script checks if there is a Yocto-GPS and sends its GPS coordinates with other information on the system.
if YAPI.RegisterHub("usb", errmsg) != YAPI.SUCCESS:
sys.exit("init error" + errmsg.value)
latitude = 0
longitude = 0
gps = YGps.FirstGps()
if gps is not None:
if gps.get_isFixed() != YGps.ISFIXED_TRUE:
print("Wait for GPS fix."),
w = 0
while gps.get_isFixed() != YGps.ISFIXED_TRUE and w < 30:
YAPI.Sleep(1000)
w += 1
print".",
if gps.get_isFixed() == YGps.ISFIXED_TRUE:
gps_serial = gps.get_module().get_serialNumber()
ylatitude = YLatitude.FindLatitude(gps_serial + ".latitude")
ylongitude = YLongitude.FindLongitude(gps_serial + ".longitude")
latitude = ylatitude.get_currentValue() / 1000.0
longitude = ylongitude.get_currentValue() / 1000.0
else:
print("unable to get GPS fix in 30 seconds")
d2cMsgSender = D2CMsgSender(deviceid, host_name, args.AccessKey)
machine = platform.machine()
system = platform.system()
deviceMetaData = {
'ObjectType': 'DeviceInfo',
'IsSimulatedDevice': 0,
'Version': '1.0',
'DeviceProperties': {
'DeviceID': deviceid,
'HubEnabledState': 1,
'CreatedTime': '2016-12-12T20:28:55.5448990Z',
'DeviceState': 'normal',
'UpdatedTime': None,
'Manufacturer': 'Yoctopuce',
'ModelNumber': 'azure-iot-brige',
'SerialNumber': socket.gethostname(),
'FirmwareVersion': '1.0',
'Platform': system,
'Processor': machine,
'InstalledRAM': '64 MB',
'Latitude': latitude,
'Longitude': longitude
},
'Commands': [],
"Telemetry": [
{
"Name": "Temperature",
"DisplayName": "Temperature",
"Type": "double"
},
{
"Name": "Humidity",
"DisplayName": "Humidity",
"Type": "double"
}
]
}
# Send device metadata
res = d2cMsgSender.sendD2CMsg(json.dumps(deviceMetaData))
The source code of this small script is available on GitHub: https://github.com/yoctopuce-examples/azure-python-iot-bridge.
Before you can use this script on the Raspberry Pi, you must install our Yoctopuce library with the following command:
sudo pip install yoctopuce
The Python script takes as parameter the deviceId, the hostname, and the authentication key. For example, for the object that we created above, the command to run is the following:
sudo ./azure-iot-brige.py myDevice yoctoremotemonitoring30be8.azure-devices.net \ qC1LFtGOX382cHKscp1rFg==
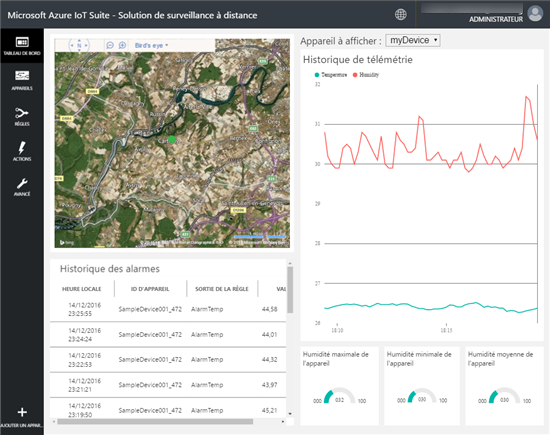
When you have launched the script, you can go back on our solution web interface and see the temperature and humidity graph.

The data graph for our connected object
In the connected object management panel, you can see information on the machine running the Python script.

Information on our Raspberry Pi
Activating geolocation
The application displays a map with the position of the distinct modules. However, by default, this feature is not activated and a static image is displayed instead. To activate the interactive map, you must create a QueryKey for Bing Maps and pass it to the web application. The process i_1s documented in the FAQ of the IoT Suite: https://docs.microsoft.com/en-gb/azure/iot-suite/iot-suite-faq.
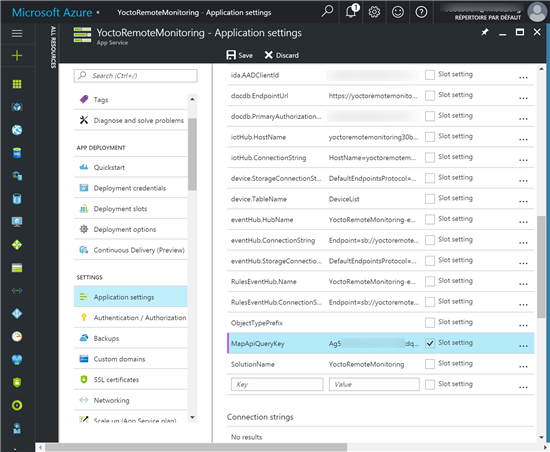
You must know, however, that you can pass this QueryKey to an existing solution without having to modify the sources of the application. To do so, you must modify the MapApiQueryKey parameter from the Azure portal.

The parameter MapApiQueryKey can be modified from the Azure portal
Beware, this solution is not designed to track sensors on the move, such as in a vehicle, in real time, but only to locate in which building the sensors are located. Concretely, the GPS location is transmitted only during the authentication phase.
Conclusion
Ideally, we had wanted to use a YoctoHub with an HTTP callback instead of the Raspberry Pi, but this is not currently possible because the Azure REST API is available only through an HTTPS connection using a TLS 1.2 encryption.
The Azure IoT Suite is a good idea. It allows you to start a project in a short amount of time and allows you to quite easily use Yoctopuce modules. But, at the time of writing, Microsoft offers only two relatively simple scenarios, which could be implemented with less complex and free solutions such as emoncms and our Yocto-Cloud.
You can modify the Microsoft solutions to adapt them to other needs, but then everything becomes much more complex as you must modify the application written in C# and understand the inner workings of the Azure cloud specificities. Too bad...


