![]() Until a few weeks ago, our Yocto-Display required to be connected by USB to a computer in order to update the screen. Now that the YoctoHub-Ethernet has been released, we can free ourselves from this limitation. Here is how to display the content of an RSS feed on a Yocto-MaxiDisplay connected to a YoctoHub-Ethernet, using the PHP API in HTTP Callback mode.
Until a few weeks ago, our Yocto-Display required to be connected by USB to a computer in order to update the screen. Now that the YoctoHub-Ethernet has been released, we can free ourselves from this limitation. Here is how to display the content of an RSS feed on a Yocto-MaxiDisplay connected to a YoctoHub-Ethernet, using the PHP API in HTTP Callback mode.
To build this project, we leverage two key features: the display sequences implemented by the Yocto-MaxiDisplay, and the HTTP Callbacks provided by the YoctoHub-Ethernet. The YoctoHub-Ethernet contacts a PHP script every 10 minutes to get the sequence that is played on the Yocto-MaxiDisplay. This script downloads the RSS feed and creates a display sequence that is played continuously on the screen until the next connection.

Overview of the connections
The code of our PHP callback can be split into three steps. The first step is to download and parse the RSS feeds of all web sites that have to be displayed. The second is to initialize the Yoctopuce API to work in HTTP Callback mode. And the last step is to save on the Yocto-MaxiDisplay an animated sequence that displays one by one the title of the RSS feed items. We only explain in details the third step since the two others are either trivial or have been discussed in previous articles.
To use the PHP API HTTP callback, you need to use the keyword callback for the call to yRegisterHub()
yDisableExceptions();
// Setup the API to use the VirtualHub on local machine
$errmsg = "";
if(yRegisterHub('callback',$errmsg) != YAPI_SUCCESS) {
logtofile("Unable to start the API in callback mode ($errmsg)");
die();
}
During the execution of the HTTP callback, we are not going to display information immediately on the screen; we are going to save an animated sequence to be displayed continuously later on by the screen. This solution has two advantages. First, it requires fewer connections to the PHP callback: with one connection, we can display multiples articles during the next 10 minutes. Moreover, if your network or your web server goes down, the Yocto-MaxiDisplay continues to display the last sequence.
To create a sequence, you have to start recording with the newSequence() method of the YDisplay object, then save the recorded sequence with the saveSequence() method. All commands that are sent to the screen between these two call are interpreted later during the real execution of the sequence. In order to create a never ending sequence, you need to call the method playSequence() with the name of the sequence that we are recording. It is also possible to insert pauses during the execution with the method pauseSequence().
In our example we:
-1 call newSequence() to start the recording.
-2 execute all command to display an RSS item.
-3 call pauseSequence(20000) to pause during 20 seconds the executions of the sequence (so that the user is able to read the screen).
-4 if we have other items to display, we jump again to number 2.
-5 call playSequence('rss') to start again the sequence at the end.
-6 call saveSequence('rss') to save the recorded sequence with the same "rss".
-7 call playSequence('rss') to start playing the saved sequence.
Items 2,3 and 5 are interpreted by the screen only after the execution of point 7.
// start recording a new sequence
$display->newSequence();
...
foreach ($RSSItems as $item) {
...
$layer2 = $display->get_displayLayer(2);
$layer2->clear();
$layer2->drawText(0,0,Y_ALIGN_TOP_LEFT,$item['feed']);
...
$display->pauseSequence(TRANSITION_DURATION+DISPLAY_DURATION);
}
// trick to restart the same sequence
$display->playSequence('rss');
// save command overwrites the previous sequence
$display->saveSequence('rss');
// starts the sequence for real
$display->playSequence('rss');
...
The full code source is freely available on GitHub.
Once the PHP script is written and installed on our web server, we simply have to configure the YoctoHub-Ethernet to execute it every 10 minutes.
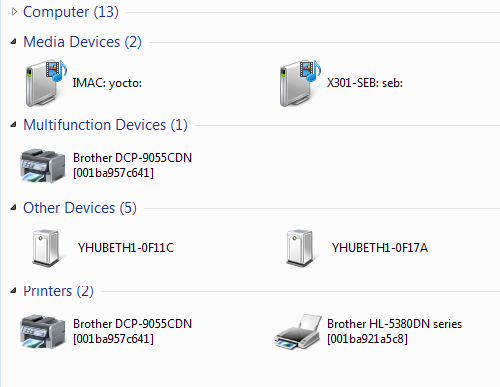
The first step is to verify that we can access to our YoctoHub-Ethernet. On many headless networked devices, it is painful to find the IP address used or to configure the network settings. But we have taken care to make this process as simple as possible. And most of the time you don't need to change the network configuration since by default the YoctoHub-Ethernet gets its IP address using DHCP and announces itself on the network. On a Windows computer, it appears directly on your network neighborhood, and if you open a browser you can access it directly using its serial number (e.g. http://YHUBETH1-0F17A). On OS X, you can type the serial number followed by ".local" on any browser to access to the YoctoHub-Ethernet (e.g. http://YHUBETH1-0F17A.local). If you need to use a static IP address or if you are using Linux, you can configure your YoctoHub-Ethernet by plugging the USB control port into a computer that runs the VirtualHub (see the documentation).

On Windows, the YoctoHub-Ethernet appears in the network neighborhood
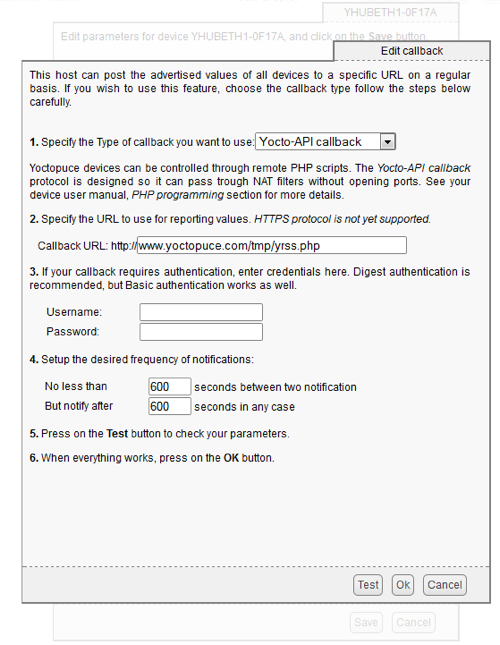
When you have access to the YoctoHub-Ethernet, you have to enter the URL of your PHP callback and to setup the update delay to 600 seconds between each call. When these parameters are saved, the Yocto-MaxiDisplay starts to display the content of your RSS Feed.

The configuration window of the HTTP Callback
By the way, if you just want to display on your screen the articles of our web site, you don't even need to host this script, you can use ours:
http://www.yoctopuce.com/FR/interactive/yrss/yrss.php :-)


