![]() Tablets and other small media players, that enable you to view DivX movies comfortably sprawled on your couch, have relegated to the closet wholesale Media Centers that hummed loudly in the living room. If this new solution is more elegant and less noisy, it doesn't solve all the issues: you must still have somewhere a real machine storing your movie library. Either it is always on, which is not very rational, or you must turn it on and off before and after, which does kill the magic. So, how do we power a computer remotely from the couch?
Tablets and other small media players, that enable you to view DivX movies comfortably sprawled on your couch, have relegated to the closet wholesale Media Centers that hummed loudly in the living room. If this new solution is more elegant and less noisy, it doesn't solve all the issues: you must still have somewhere a real machine storing your movie library. Either it is always on, which is not very rational, or you must turn it on and off before and after, which does kill the magic. So, how do we power a computer remotely from the couch?
You can't switch on a computer like a light bulb, by commuting power with a relay. The power supply voltage remains always partially in, and the power button is in fact a "logical" switch, managed smartly by the operating system to protect disk integrity. By the way, there are even mechanisms designed to drive power on remotely. Let's take a quick overview...
"Standard" remote power on mechanisms
The oldest method is called Wake-on-Lan (WoL). Power is always supplied to the network card, which listens on the network to detect a "magic packet" to power the computer on. Unfortunately, this method is not very reliable. First, any irregularity when powering off the computer puts the network card in a state where it can't listen to magic packets. Second, as the network card is purely passive, it can't participate to the standard network protocols such as ARP and DHCP. After a short delay, some network switches stop transmitting anything to it.
Intel introduced more recently a new method call AMT (Active Management Technology). This method gives to the network card with a very large control over the computer, its power supply, its BIOS settings, and even allows remote access. Everything is done through complex protocols, encrypted to ensure security. And naturally, its implementation is complex and possible only on some computers, usually brand computers designed for the "business" customers. Therefore, not all that useful for a small solution.
A simple and efficient solution
In the end, the most general and simple solution, which we retain, consists in adding a Yocto-Relay in parallel to the power button. It is not necessary to use a Yocto-PowerRelay as we are not going to really commute power from the mains, we are only going to simulate the "user pressed the power button" signal.

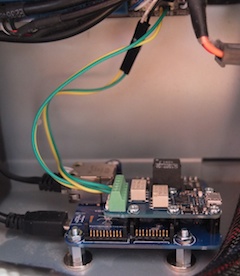
A Yocto-Relay, driven by a YoctoHub-Ethernet is wired in parallel with the PC power button
To be able to power the computer, we can't simply connect the relay by USB on the computer. We must use a YoctoHub-Ethernet which allows us to drive the relay through the network autonomously. In the end, assembly is very simple:

YoctoHub-Ethernet + Yocto-Relay = Yocto-Relay-Ethernet
We are now going to see how to create an interface to power the computer from a mobile phone or a tablet.
An embedded web interface
For a task as simple as an impulsion on a relay, it is not necessary to create a dedicated App for Android or iOS. A simple web interface in HTML/JavaScript is enough. We will host this Web App directly on the YoctoHub-Ethernet.
Here is the HTML code of the web interface. In order to dynamically change the button depending on whether the PC is turned on or off, we have created an image larger than the button itself and we change its position according to the part of the image that we want to show. This is done using a CSS style.
<head><title>Remote PC Power</title>
<meta http-equiv="Content-Type" content="text/html; charset=ISO-8859-1">
<meta name="viewport" content="width=320">
<script src="yoctolib.min.js"></script>
<script src="power.js"></script>
<style>
.magicButton {
background-image: url(button.gif);
background-repeat: no-repeat;
width: 160px;
height: 160px;
border: 0px;
}
.blink { background-position: 0px 0px; }
.off { background-position: -160px 0px; }
.on { background-position: -320px 0px; }
</style>
</head>
<body onload="initUI();">
<div style="text-align:center">
<button id="power" onclick="toggle()" class="magicButton blink"></button>
</div>
</body>
</html>
And here is the JavaScript code. On startup, we want to measure if the PC is turned on or off to setup the right color to the button. To save the expense of a Yocto-Volt, we just request the YoctoHub-Ethernet to ping the computer to see whether it answers.
function initUI()
{
if(YAPI.RegisterHub(location.host) != YAPI.SUCCESS) {
alert("Cannot connect to hub");
}
window.net = yFirstNetwork();
window.pwrButton = document.getElementById("power");
setTimeout(testPower,2000)
}
function setButton(str_mode)
{
window.pwrButton.className = "magicButton "+str_mode;
}
function testPower()
{
// on startup, determine the real state of the PC using a "ping"
var pingTest = net.ping(targetIP);
var is_on = (pingTest.indexOf("Round-trip") >= 0);
setButton(is_on ? "on" : "off");
}
function toggle()
{
// change the visible state of the button
var is_on = window.pwrButton.className.indexOf("off") < 0;
var newstate = (is_on ? "off" : "on");
setButton("blink");
setTimeout(function(){setButton(newstate);}, 3000);
// toggle the relay to do it for real
var relay = yFindRelay("power");
relay.pulse(500);
}
We can now load this interface (HTML, Js, and image files) directly on the YoctoHub-Ethernet, which literally transforms it into a dedicated tool. To do so, click on the manage files button in the YoctoHub-Ethernet configuration interface, and load the files.

You can upload your own HTML interface on the YoctoHub-Ethernet
The file yoctolib.min.js is just the sum of yocto_api.js, yocto_network.js and yocto_relay.js, which has then been put through a JavaScript code optimizer to reduce it to the minimal size in order to enable this page to load as fast as possible.
Here is the result:
The consumption of the YoctoHub-Ethernet is only of 0.5W, which is on par with the best Wake-on-Lan or AMT solutions. Simple and efficient...
The version presented today does however have a small limitation: as we put the web interface directly on the YoctoHub-Ethernet, it is available only from the local network. If you want to power your computer from outside of your home, for instance to log on it with a solution like LogMeIn or Ammy, you would need to cross the NAT filter of you DSL router, which normally protects you from intrusions. The YoctoHub-Ethernet can do that as well. We'll give you the details in a follow up post ...

