![]() Our free VirtualHub (for Web) tool lets you collect measures taken in the middle of nowhere with a YoctoHub-GSM-4G. By adding Yocto-Visualization (for Web), you can easily obtain a web interface for viewing measure graphs in real time. This week, we'll give you a few tips on how to get great results with this configuration, while minimizing the energy consumed by the YoctoHub-GSM-4G.
Our free VirtualHub (for Web) tool lets you collect measures taken in the middle of nowhere with a YoctoHub-GSM-4G. By adding Yocto-Visualization (for Web), you can easily obtain a web interface for viewing measure graphs in real time. This week, we'll give you a few tips on how to get great results with this configuration, while minimizing the energy consumed by the YoctoHub-GSM-4G.
Basic configuration
To set up this solution, start - if you haven't already done so - by
- installing VirtualHub (for Web) on an Internet-accessible server, as described in this post
- installing Yocto-Visualization (for Web) in your VirtualHub (for Web), as described in this post (use method 1)
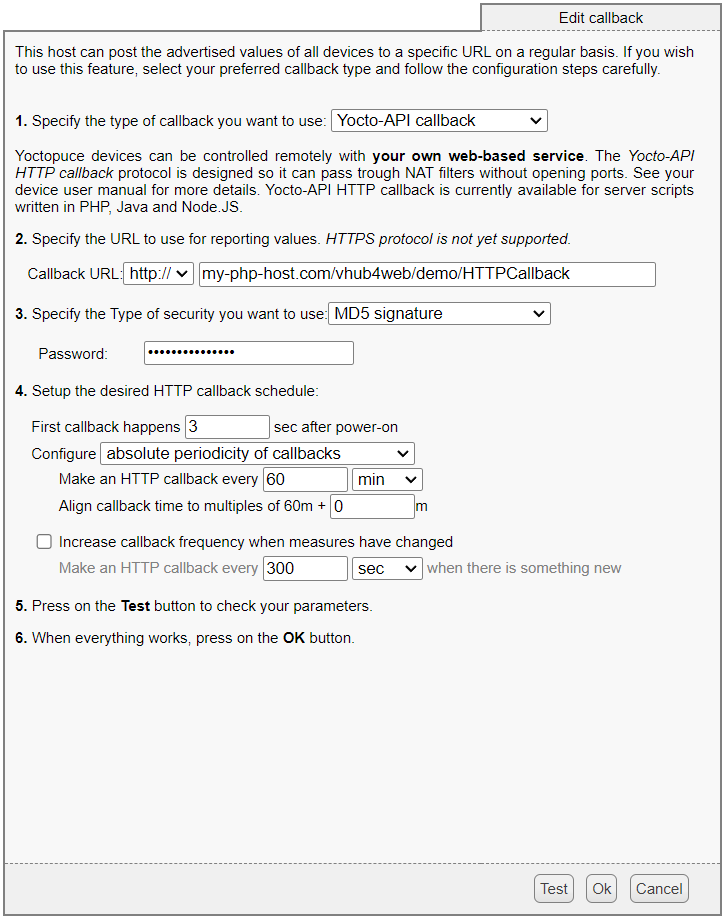
Set up an HTTP callback on your YoctoHub-GSM-4G pointing to your VirtualHub (for Web) server. The callback URL should match that of your Web interface, but without the https:// prefix and replacing webapp.html with the HTTPCallback suffix.
To prevent a hub other than your own from connecting to your server, use the VirtualHub (for web) configuration window to define an Incoming HTTP Yocto-API Callback password (MD5 Signature).

Making HTTP callbacks secure
Once set, only HTTP callbacks signed with this password are taken into account. You therefore need to configure the hub accordingly:

Configuring the security parameters on the hub
Configuring the sending frequency
The next step is to configure the YoctoHub-GSM-4G to send measures to the server at regular intervals, consuming as little power as possible between transmissions.
When you connect Yoctopuce sensors to a YoctoHub-GSM-4G, there are three different places where you can configure a frequency for sending measures, and to get the best result you need to understand the nuance between the three.
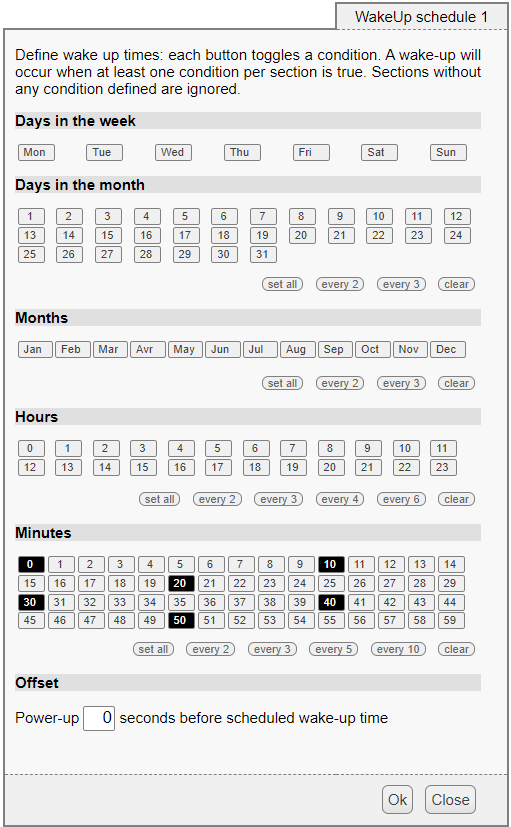
- In the YoctoHub-GSM-4G configuration window, the Wake-up scheduler lets you choose the exact times at which the hub wakes up, if you choose to put the hub into deep sleep between data transmissions. This is the parameter which is most important in choosing the frequency of data transmissions when you want to minimize the energy consumed by the system.
- In the HTTP callback configuration window, you can set the frequency at which the hub should reconnect to the web server to post data. For applications where you don't put the hub into deep sleep between measure transmissions, this is the place to set the frequency of connection to the server. But if the hub goes to sleep between HTTP callbacks anyway, this parameter is not significant, as the hub always makes a first callback each time it wakes up, as soon as network connectivity is established.
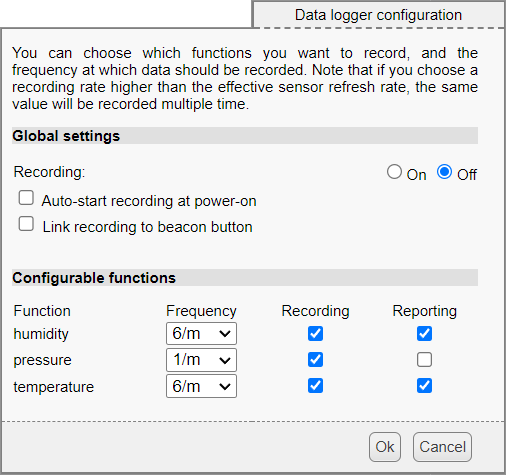
- In the configuration interface for the sensors themselves, the datalogger configuration window lets you choose the frequency at which measures (reporting) are sent from the sensor to the hub. This frequency determines when the sensor sends the measures: if you choose to send one measure per minute, each new measure is sent exactly when the current time changes to a new minute.


The three places where you can configure a measure transmission frequency
When transmitting measures via HTTP callbacks, it's important to configure the reporting frequency from the sensors to the hub, as you need to be sure that the sensors have transmitted a measure to the hub by the time the HTTP callback is performed by the hub, otherwise the hub has nothing to transmit to the server. For example, if the sensors are configured to send values (reporting) once an hour, and you set the hub to wake up every hour on the dot, the sensors just won't wake up in time to send the measure corresponding to the wake-up time.
First tip: to get around this problem, use a new parameter recently introduced at the bottom of the configuration in the Wake-up scheduler: the ability to anticipate wake-up times by a few seconds, to ensure that the modules have been powered up to transmit their periodic measure at the scheduled time.

The wake-up offset parameter
With early wake-up, another problem may arise: if the network connection is established too quickly, the HTTP callback may be performed before the sensor transmits the measure at the correct time.
Tip 2: To avoid this, set the delay before the first HTTP callback (at the bottom of the HTTP callback configuration window) to a value greater than the anticipation value:

The waiting parameter before the first callback
Finally, to save the hub's power source, you need to configure the hub to go into deep sleep once the measures have been transmitted to the server. The first setting, called Maximum power-on duration and which you can find in the YoctoHub-GSM-4G configuration on the hub itself, is used to put the hub into deep sleep after a specified power-on duration, whether or not the connection has been established:

Configuring a maximum power-on duration
Third tip: if you look at the hub sleep configuration through the VirtualHub (for Web) interface, it offers an extra parameter: send hub to sleep after HTTP callback. When enabled, VirtualHub (for Web) sends the hub into deep sleep as soon as all measures have been received.

VirtualHub (for Web) adds a parameter to this section!
This parameter is only available through VirtualHub (for Web), as it is not the hub itself that triggers the sleep in this case, but VirtualHub (for Web). This allows VirtualHub (for Web), when necessary, to request a second, immediate HTTP callback to update parameters, for example.
With these settings, you should be able to get a nice graph like this one, without the hub staying awake for more than 60 seconds per measure transmission under normal circumstances:
A final word of advice: be very careful if you change your hub's wake-up settings remotely using VirtualHub (for Web): you could quickly make a mistake that would prevent the hub from reconnecting to the server, and thus correcting your error.
Last tip: to avoid losing complete control of your hub in the event of an error, take care to create a backup configuration file on the hub, which you can restore by SMS as described in this post. This could save you a long trip to manually reconfigure your hub!


