![]() For already some time, we offer a software solution to connect remotely to your Yoctopuce hubs, even when they are behind a NAT filter: the GatewayHub. However that solution requires to setup an Internet-facing Web hosting with Node.js. Today we will show another different solution, which is not applicable to GSM hubs but can save the effort of setting up a public hosting. Its name is ngrok.
For already some time, we offer a software solution to connect remotely to your Yoctopuce hubs, even when they are behind a NAT filter: the GatewayHub. However that solution requires to setup an Internet-facing Web hosting with Node.js. Today we will show another different solution, which is not applicable to GSM hubs but can save the effort of setting up a public hosting. Its name is ngrok.
What is ngrok ?
ngrok is a solution offered by @inconshreveable, made of public servers connected to the internet and accepting incoming connections, and of a small program that you run on a local machine to establish the bridge between the public server and the services that you want to make available. ngrok can therefore create a specific tunnel between a public address and a service of your choice on your local network.
The typical use-case for ngrok is to provide a temporary public access to a development machine while developing and testing a web service. This can be used for instance to test an HTTP callback or a Websocket callback with a YoctoHub-GSM. But today, we will be looking at the opposite application: providing a secure access to a YoctoHub that has been intentionally installed on a local network protected by a NAT filter.
The use of ngrok is free when you need no more than four tunnels and forty connections per minute, which is more than enough to access a YoctoHub since our Web UI uses persistent Websocket connections. For a long-term usage, plans with a monthly fee offer some interesting extra functionalities:
- You can secure the ngrok tunnel using an end-to-end TLS connection (i.e. https), so that no clear-text data ever appears on the public network.
- You can use your own domain name for the public access point, or even a reserved IP address
- With a "Business" plan, you can restrict access to your tunnel to specific clients, based on IP address
A simple example
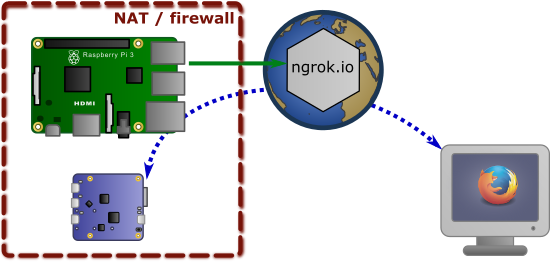
Here is a first example to remotely access a YoctoHub-Ethernet, using a free ngrok account. You can use a Raspberry Pi for instance as local endpoint for the tunnel:

Using ngrok to bridge a YoctoHub-Ethernet to the Internet
Start by creating an account on ngrok.com. Download the Linux (ARM) version of ngrok, and copy the executrable in the zip file to the folder of your choice, for instance /usr/share/bin. To complete the install, bind your software to your ngrok account using the following command (replace YOUR_AUTHTOKEN by the value provided on your account on ngrok.com):
ngrok authtoken YOUR_AUTHTOKEN
You can then create a tunnel to your YoctoHub, in our case at the address 192.168.1.100, using the command
ngrok http 192.168.1.100:4444
The ngrok software will then show the publice address at which you can now reach your YoctoHub, as long as the tunnel is running:
ngrok by @inconshreveable Session Status online Account Yoctopuce (Plan: Pro) Version 2.2.8 Region United States (us) Web Interface http://127.0.0.1:4040 Forwarding http://af55f0c8.ngrok.io -> 192.168.1.100:4444 Forwarding https://af55f0c8.ngrok.io -> 192.168.1.100:4444 Connnections ttl opn rt1 rt5 p50 p90 0 0 0.00 0.00 0.00 0.00
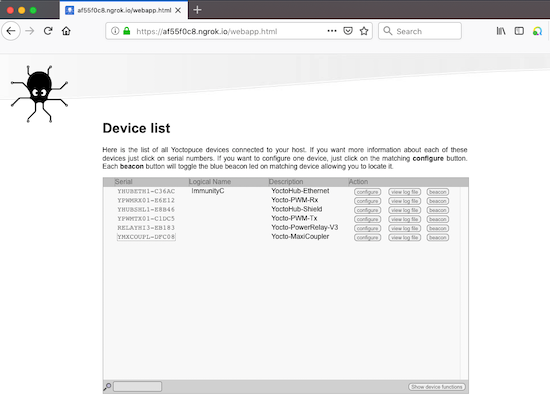
You can now give it a try, it works:

Remote access to a YoctoHub-Ethernet through a ngrok tunnel
Note that we can even access the hub using the https: address, which means that the communication between the browser and the ngrok.io server is encrypted.
Something more serious
In order to provide a higher level of security, you can setup a tunnel with end-to-end encryption from the browser to the local network: instead of relying on ngrok.io to establish the secure connection, it will be the Raspberry Pi that provides the authentication. Data will therefore stay encrypted while going through the grok.io server. In order to do this, we will use:
- a private domain name, reserver for us
- an SSL certificate matching the domain name.
So to try this, you will need to own a domain name and to be able to configure the corresponding DNS server. You will find information about DNS configuration to perform in the ngrok documention, under Tunnels on custom domains (white label URLs).
You will also need to get the .crt and .key certificate files that can assert the legitimity of the https connection for this domain. In order to avoid security warnings on the browser, these certificates must be created by an SSL authority known by the major Web browsers. Once you have them, you only need to put them on the machine, and reference them in the ngrok configuration.
Rather than providing all parameters on ngrok command line, let's create a configuration file under /etc/ngrok/ngrok.yml:
authtoken: VOTRE_AUTHTOKEN region: eu tunnels: demo: proto: tls addr: 192.168.1.100:4444 hostname: www.yoctopuce-demo.org crt: /etc/ngrok/yoctopuce-demo-2019.crt key: /etc/ngrok/yoctopuce-demo-2019.key
You can test your configuration file using the following command line:
/usr/share/bin/ngrok start -config=/etc/ngrok/ngrok.yml -all
Eventually, to make sure the tunnel is automatically started each time the Raspberry Pi restarts, you can create a systemd script under /etc/systemd/system/ngrok.service
[Unit] Description=Start ngrok tunnels [Service] Type=simple ExecStart=/usr/share/bin/ngrok start -config=/etc/ngrok/ngrok.yml -all Restart=on-failure RestartSec=30 User=pi Group=pi [Install] WantedBy=multi-user.target
The ngrok service can then be enabled by default, and started immmediately using the following commands:
sudo systemctl enable ngrok.service sudo systemctl start ngrok.service
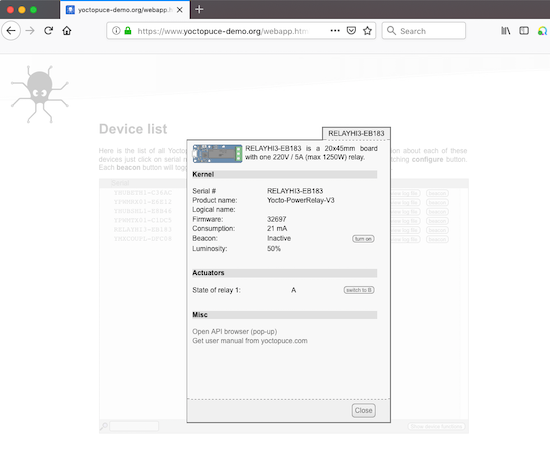
And here is the result:

Accessing a YoctoHub-Ethernet through an end-to-end secure ngrok tunnel
Conclusion
The most important limitation of this solution is that it does require to have at least one computer available in the same local network as the YoctoHub. Therefore it cannot be used to access GSM hubs, for which the GatewayHub remains the best solution. But for other cases, it is a credible alternative to the GatewayHub, more secure than just opening a port in your firewall... as long as you trust ngrok not to contain any vulnerability of course.


