 Do you remember throwing peas using a spoon when you were a kid, at the school cafeteria ? Well, we wanted to try it again, but this time in a more sophisticated and cleaner manner. The idea is to build a little catapult, remotely controlled by USB. For that, we used a YoctoServo, two RC servos and a few rubber bands. The rest is only a matter of mechanical design :-)
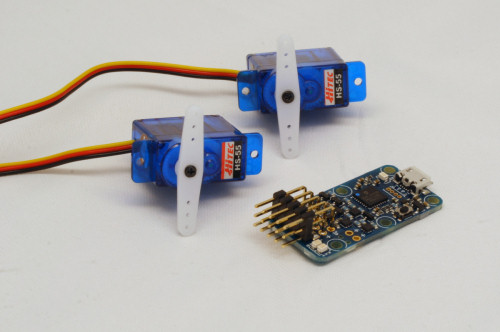
One yocto-Servo, two HS-55, and we can start having fun
Since we didn't want to have to provide external power supply to the Yocto-Servo, we chose servos small enough to work with the USB bus power. We chose two HS-55 from Hitec: these are small, cheap enough, and available from any store selling radio-controlled toys. Unfortunately, they are not powerful enough to extend the catapult arm. That's why we had to think about a detent mechanism: the servo will pump up to extend the catapult arm.
The main part of catapult is the arm, which is coupled with two gears. There is one detent per gear. The first one is operated by one of the servos to extend the arm, the second one to prevent the arm from going backward. The second servo can disengage the two detents to fire the catapult.
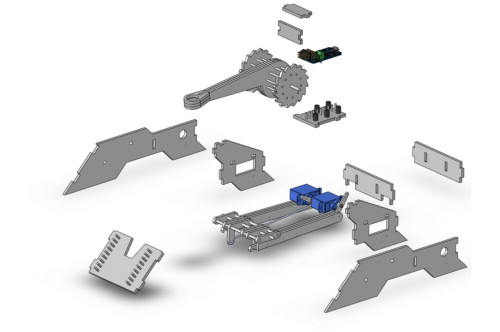
All parts of the catapult
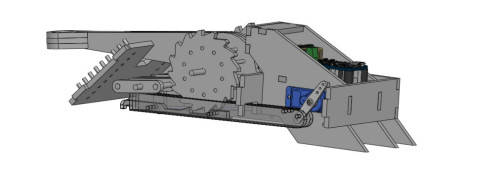
The arming mechanism
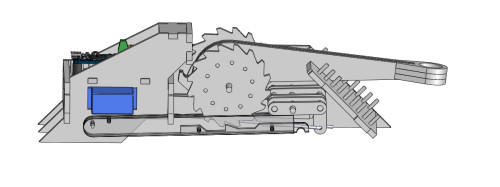
The lock detent
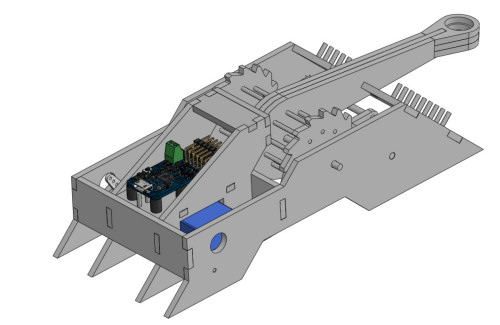
Virtually completed
Once the design is completed, we have to build it. We used regular 3mm poplar plywood, cut with a laser cutter. Axles are made with toothpicks and skewers. All the parts are glued together using wood glue and cyanolit. The time spent building the 3D design is paying back: all parts fit perfectly, it's just like playing Legos.
The laser cutter: a model-maker's dream machine
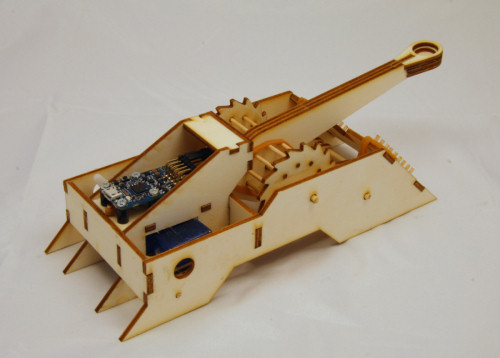
We have glue all over our fingers, but it's ready IRL
Ok, now we have to write the software to control our catapult. Lets use Delphi. The idea is to create a self-contained "CatapultControl" object, so we could reuse it anywhere. This objet will have two public methods: Fire() to (guess what) fire, and isReady() to check if the catapult is ready to fire. We will also add a private Run() method to control the firing sequence. This sequence will be driven by a timer. Since we don't want to hardcode the Yocto-Servo serial, we will set the device logical name to "catapult" and use this name to access it.
private
initOk : boolean;
initError : string;
runningstate : integer ;
runTimer : TTimer;
procedure run(timer: Tobject);
public
constructor create();
procedure fire();
function isReady(var msg:string):boolean;
end;
The constructor has to initialize a few things, including the Yoctopuce API.
begin
initOk := not(YISERR(yRegisterHub('usb',initError)));
runTimer := ttimer.create(nil);
runTimer.enabled := false;
runTimer.onTimer := run;
runningstate :=0;
end;
The firing sequence must disengage both detents with the Servo 2 to release the arm, then servo 1 has to perform 4 two-way movements to rearm the catapult. The sequence is driven by a state machine. At each state, the machine checks the Yocto-Servo, sends commands to the servos, then sets up the timer to schedule the next step.
procedure ScheduleNextStep(delay:integer);
begin
runningstate := runningstate+1;
TTimer(timer).interval := delay;
TTimer(timer).enabled := true;
end;
var
FireServo,ArmingServo: TyServo;
const
FireServoLimitA = -800;
FireServoLimitB = 800;
ArmingServoLimitA = -1000;
ArmningServoLimitB = 1000;
begin
TTimer(timer).enabled:=false;
ArmingServo := yFindServo('catapult.servo1');
FireServo := yFindServo('catapult.servo2');
if not(FireServo.isOnline()) then exit;
if (runningstate=0) then exit;
case runningstate of
1 : begin
FireServo.move(FireServoLimitB,500);
ScheduleNextStep(1000);
end;
2 : begin
FireServo.move(FireServoLimitA,500);
ArmingServo.move(ArmningServoLimitB,500);
ScheduleNextStep(600);
end;
3,5,7,9 :
begin
ArmingServo.move(ArmingServoLimitA,1000);
ScheduleNextStep(1500);
end;
4,6,8,10 :
begin
ArmingServo.move(ArmningServoLimitB,500);
ScheduleNextStep(600);
end;
11 : runningstate :=0;
end;
end;
The isReady() makes sure the catapult is ready to fire. This means checking the API initialization, the Yocto-servo device, and making sure a firing sequence is not running already.
var
module: TyModule;
ok : boolean;
begin
ok := true;
msg := 'Catapult ready';
if not(initOk) then
begin
ok := false;
msg := initError;
end;
if (ok) then
begin
Module := yModule('catapult');
if not(Module.isOnline()) then
begin
ok := false;
msg := 'No catapult device found, check cables';
end;
end;
if (ok) and (runningstate<>0) then
begin
ok := false;
if (runningstate=1) then msg := 'Firing'
else msg := 'Rearming';
end;
isReady:=ok;
end;
The Fire() method just makes sure the catapult is ready and starts the firing sequence.
var
msg:string;
begin
if isReady(msg) then
begin
msg :='firing';
runningstate :=1;
run(runTimer);
end;
end;
Remaining parts of the appplication are only GUI coding, if you are interested in the details, you can download the whole application from here. This time, we are ready, lets have fun.
We don't want to lie to you, a few iterations were required to have a working design.
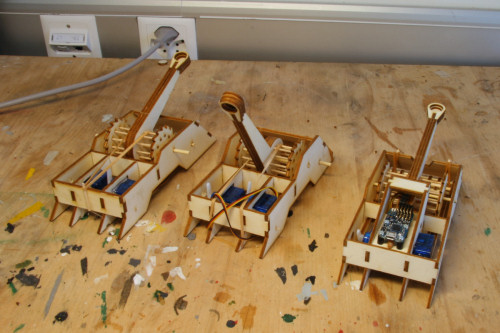
Three iterations to have a working design, not so bad...
Right now, we know what you are thinking, you are thinking that a self-rearming catapult is useless unless it can self-reload too. Well, you are perfectly right, we are working on it. Stay tuned.


