![]() Someone recently asked us whether it was possible to add alarms in the Yocto-Visualization application. That's now done. Let's see how it works...
Someone recently asked us whether it was possible to add alarms in the Yocto-Visualization application. That's now done. Let's see how it works...
As a reminder, the Yocto-Visualization application is a small application designed and implemented by Yoctopuce, running under Windows, and allowing you to easily visualize the values of Yoctopuce sensors, as graphs, gauges, or digital displays. This application is free and, on top of this, its source code is available on GitHub.
The principle of the new alarms
The latest version of Yocto-Visualization adds two alarms per Yoctopuce sensor. These alarms can run a system command line each time they are triggered.

Alarm configuration
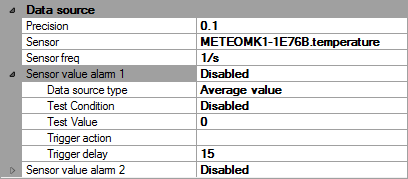
Five parameters define each of these alarms:
- Data source type: allows you to decide if the alarm is triggered by the minimal, average, or maximal value of the latest measuring period. This period is directly linked to the frequency defined for the sensor.
- Test condition: allows you to select which test type is used to trigger the alarm (">=",">","=","<=","<"). The "disabled" value disables the alarm.
- Test value: the value used to test the data.
- Trigger action: the command line to be run when the alarm is triggered.
- Trigger delay: the minimum time interval between two consecutive triggers of the same alarm.
Each time the test returns "true", the command line is run, provided that the specified time has elapsed since the latest alarm. The test is performed at the frequency set for the sensor.
Alarms show up in the application logs, which you can display with a right click on any of the widgets. Although alarms are performed as a background task and should not slow down the main application, we suggest that you define a long enough delay so you don't end up with alarm storms.
The command line
The specified command line is run each time an alarm is triggered. You can use variables which are automatically replaced before the command lines are launched. These variables are:
- $SENSORVALUE$: the sensor value
- $HWDID$: the sensor hardware identifier
- $NAME$: the sensor name
- $UNIT$: the measuring unit used by the sensor
- $CONDITION$: the alarm condition (">=",">","=","<=","<")
- $TRIGGER$: the alarm threshold value
- $DATATYPE$: the data source type ("MIN","MAX","AVG")
- $NOW$: the current time
For example, here is a command line creating an alarm log in a C:\alarms.txt file:
echo $NOW$:$NAME$ Alarm ($SENSORVALUE$^$CONDITION$$TRIGGER$$UNIT$)>>C:\alarms.txt
Using a Yoctopuce actuator
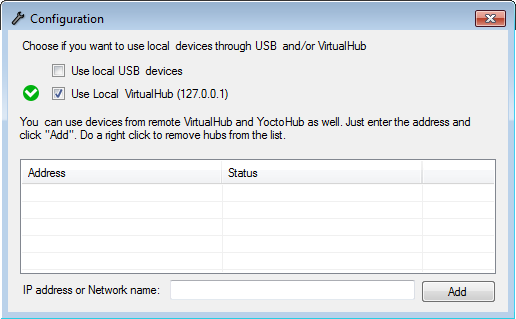
You can perfectly well use alarms to drive Yoctopuce modules, through the command line API, but there is a catch. As there can be only one application accessing Yoctopuce modules in native USB mode, you must use a VirtualHub and configure both the application and the command line to use this VirtualHub.

In order for the alarms to drive Yoctopuce modules, you must use the VirtualHub mode
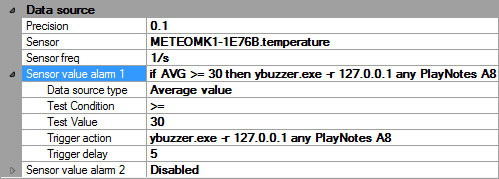
Let's assume that we use a Yocto-Buzzer to make a beep each time an alarm is triggered. We are going to configure the application so that it uses the VirtualHub as illustrated above. And we use the ybuzzer.exe executable to make the beep, taking care to indicate that it too must use the VirtualHub (-r 127.0.0.1).

Triggering a beep every 5 seconds when the temperature is above 30░C
Note that as we have a sensor frequency of 1Hz, if the delay was at 0, we would have obtained a beep every second.
The case of relays
If you want to use alarms to drive relays, you can use the first of the two alarms to switch the relay on and the second one to switch it back off. You can even implement a schmitt-trigger with this method. But you must understand that the alarms are implemented solely at the level of the Yocto-Visualization application. If this application stops, the alarms disappear. This means that if the application stops right after having switched the relay on, the relay stays switched on indefinitely, which may cause some problems.
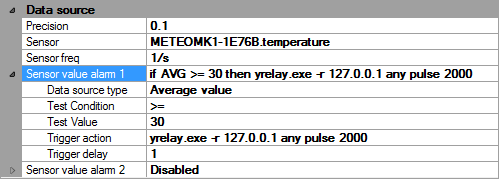
Therefore, you might prefer using the pulse function rather than the set_state function. Thus the relay automatically switches back off after a given delay.

Configuring an alarm for a relay with the pulse function
In the example above, without a new alarm, the relay switches back off automatically after 2 seconds.
Alarm persistency
The Yocto-Visualization manages the alarms completely. They are automatically saved in the configuration file as long as at least one of the two condition below is fulfilled:
- the corresponding sensor has been connected at least once before the configuration is saved
- or the sensor, whether connected or not, is used in one of the widgets
Finally, note that the alarms of a sensor are managed even if the said sensor is not used in a widget. If you want to disable the alarms of a sensor which is not used in the interface, you must
- Create a widget, for example a digital display
- Assign the sensor to this new widget
- Disable the alarms
- Delete the widget
If you have alarms that get triggered without you knowing where they come from, you can find clues in the application logs.
There you go... you know everything.


