![]() To integrate a Yoctopuce sensor into an application, you can use our libraries to communicate directly with the Yoctopuce module. It's the most efficient manner, which also offers the most possibilities. But to do so, you need a minimum of programming knowledge. The other solution is to use a standard protocol and applications which support this protocol. It's the case of MQTT. We just added MQTT support into the VirtualHub and the YoctoHubs.
To integrate a Yoctopuce sensor into an application, you can use our libraries to communicate directly with the Yoctopuce module. It's the most efficient manner, which also offers the most possibilities. But to do so, you need a minimum of programming knowledge. The other solution is to use a standard protocol and applications which support this protocol. It's the case of MQTT. We just added MQTT support into the VirtualHub and the YoctoHubs.
MQTT is an old protocol developed by IBM, which as then moved into Open source. This protocol has been very little used, only some IBM and ZigBee products used it. But it has been making a comeback in recent years.

As Google Trend shows it, MQTT stayed dormant for more than 10 years.
So why should we be interested in this protocol now? Simply because the protocol was designed from the start to be used with machines with limited resources. In the opposite to HTML and XML protocols which are very verbose and complex to parse, MQTT is a binary protocol very easy to format and to parse. With the mass arrival of the Internet of Things, more and more applications started to use MQTT.
MQTT is a message publishing and message subscription protocol. Clients do not communicate directly with one another, they publish messages on a server (broker), the messages are composed of a content and a subject (topic ). The server keeps in memory the latest message for each subject. Clients interested by the messages on a given topic can retrieve them by connecting themselves to the broker. The advantage of this solution is that it allows several clients to communicate even if they are never connected to the server at the same time.
Short example
To illustrate how to use this protocol, we built a small installation which allows you to display the temperature of a Yocto-Meteo on an Android phone. The Yocto-Meteo is connected to a YoctoHub-Wireless-g which is powered by a battery. In order to avoid draining the battery in a day, the YoctoHub-Wireless-g wakes up 4 times a day for the time needed to take a measure, to post it on the MQTT broker, and to go back to sleep.
The first step is to find an MQTT broker. You can user either a paying service on the Internet or simply install an MQTT broker on a machine. We used mosquitto, an Open source broker which works with all OSes. Installing mosquitto on a Raspberry Pi is very simple, you only need to run the following command:
$ sudo apt-get install mosquitto
By defauls, the server starts by itself when the machine starts, there is therefore nothing else to do on the Raspberry Pi.
Then, you must configure the YoctoHub-Wireless-g so that it connects itself to the broker. You can find the MQTT callback configuration page in the YoctoHub-Wireless-g configuration page. Fill in the server IP, the port, possibly the authentication information, and that's it.

MQTT callback configuration page
When you have saved the configuration, the YoctoHub connects itself to the MQTT broker and posts a message for each function of the connected Yoctopuce modules. The topic of the MQTT message is the hardwareId of the function or its friendlyName if a logical name was assigned. The content of the message is the textual representation of the current value.
Our Yocto-Meteo with the serial number METEOMK1-2DED6 has three functions: temperature, humidity, and pressure. Normally, the YoctoHub publishes three messages. The topics of these messages are respectively METEOMK1-2DED6/temperature, METEOMK1-2DED6/humidity, and METEOMK1-2DED6/pressure. But, in our case, we assigned the logical name "garden" to the Yocto-Meteo, the topics of the messages are therefore garden/temperature, garden/humidity, and garden/pressure.
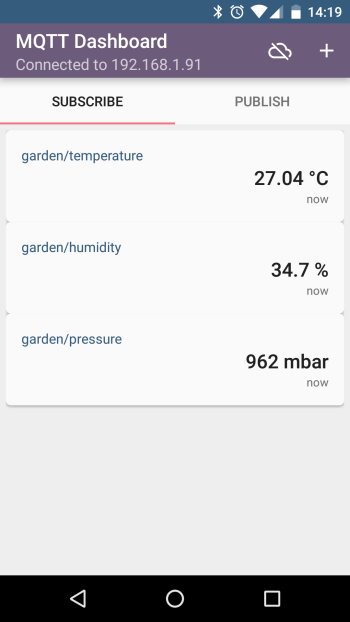
What's left is only to install an MQTT client for Android. There are several, some are even Open source. For this example, we used MQTT Dashboard, which is free, works well, and is not full a ad banners. There too, you need to enter the broker connection information. Then you must subscribe to the messages which you are interested in. For this example, we were interested only in the temperature. So we needed to subscribe only to the messages on the garden/temperature topic.

And here is the temperature directly on your phone...
Yes, but ...
There is however an issue with MQTT: security. The protocol can identify a client with a login and a password, but these pieces of information are transmitted unencrypted when connecting. This makes the protocol very vulnerable to "man-in-the-middle" attacks. If you use your installation on your secured local network, this is not an issue. But if you use your broker on a public network, it's very easy to impersonate an existing client.
Conclusion
MQTT was probably created much too early: in 1999 it's interest was almost null. But in 2016, with more and more connected objects, this protocol gains meaning, because it works very well with limited connectivity and limited resources. Moreover, there are many tools which are compatible with this protocol. It's a very practical solution as long as your network is secure...


