![]() In our "Yoctopuce for beginners" series, we recently described how to use the VirtualHub to configure Yoctopuce modules. But, actually, the VirtualHub does not simply provide a graphical interface to test and configure Yoctopuce modules, it can do much more. This week, we invite you to discover other facets of this rather magical tool.
In our "Yoctopuce for beginners" series, we recently described how to use the VirtualHub to configure Yoctopuce modules. But, actually, the VirtualHub does not simply provide a graphical interface to test and configure Yoctopuce modules, it can do much more. This week, we invite you to discover other facets of this rather magical tool.
As a reminder, the VirtualHub is a small tool available for free on most current platforms: Window, Linux, Mac OSX, 32bits, 64bits, Intel, ARM, MIPS, ... It can provide many services. It comes in the form of an executable that you can simply launch. Then you access its interface thanks to a web browser by going to the http://127.0.0.1:4444 URL.
Firmware update
You can use the VirtualHub to update the firmware of your modules. To do so, open in the VirtualHub interface the configuration window of the module that you want to update, and click on the "upgrade" button. The hub then offers you to select a .byn file that you must have previously downloaded from the Yoctopuce web site.
You can also let the VirtualHub perform the operation automatically. It then downloads the latest version and installs it automatically.
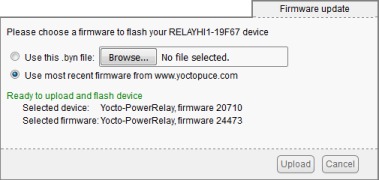
The firmware update window
Upgrade of a bricked module
Obviously, you must absolutely avoid disconnecting a module while performing a software update, or you'll "brick" the module. Fortunately, there is a way to recover a module with a firmware that has been corrupted in this way. You must connect it while you press the Yocto-Button. It then starts in "firmware update" mode and shows up in the VirtualHub interface.
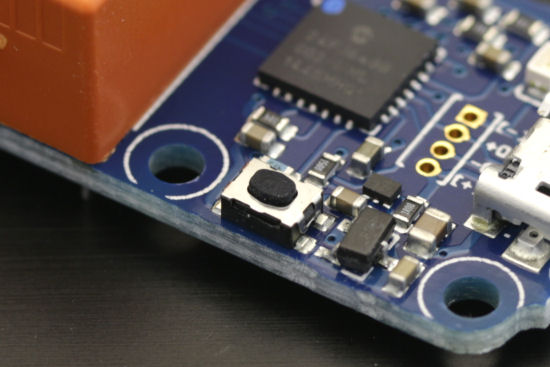
The Yocto-Button, present in all modules, allows you to recover a bricked module
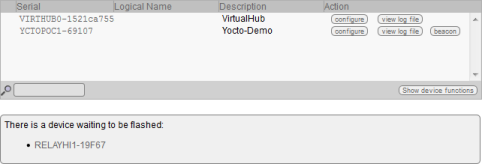
Modules in "firmware update" mode show up in the VirtualHub
A normal firmware update preserves the module configuration. However, the recovery method with the Yocto-Button puts the module back in its original factory configuration. Which means that you can use this method to completely re-initialize a module.
Network interface
The VirtualHub provides a network interface which allows you to remotely access modules connected to the machine on which it runs. You can thus very easily drive modules through an Ethernet network. All the complexity is hidden in the Yoctopuce API. For you, the only difference is located at the API initialization level. When you use your modules directly by USB, you initialize the API with the following line:
But if you want to use the modules connected to a machine on which runs the VirtualHub and which IP address is, for example, 192.168.0.2, you use this other line:
Native USB limitation
The Yoctopuce API suffers from a small limitation. You cannot have on a single machine two applications that run at the same time while using the Yoctopuce modules in native mode, that is in using RegisterHub("usb"). The VirtualHub counts for one native application. If you try to run it while another application already uses the native USB mode, it will share its displeasure with a meaningful message, such as: Another process named demo.exe (pid 6472) is already using yAPI.
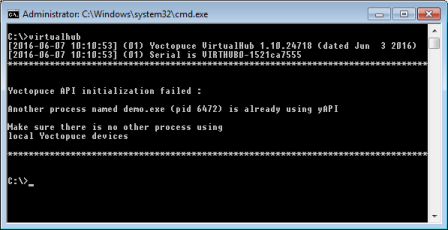
You cannot run at the same time two applications using the native USB mode
However, nothing prevents you from running a VirtualHub and from using the 127.0.0.1 address, which in network terms always designs the local machine. Thus, you can use RegisterHub("127.0.0.1") instead of RegisterHub("usb"). As there is no limitation in network mode, you can then run several Yoctopuce applications at the same time on the same machine.
You can find more information on the "RegisterHub" subtleties in an article that we posted a while ago.
127.0.0.1
The trick with the 127.0.0.1 address is not limited to run several Yoctopuce applications on the same machine. You cannot do without in some programming languages which do not authorize direct hardware access, such as JavaScript. In these languages, RegisterHub("usb") simply doesn't exist and using RegisterHub("127.0.0.1") with a VirtualHub is the rule.
Cloud
The VirtualHub can also automatically communicate with some cloud services. You can configure callbacks which happen at regular intervals. Thus, you can automatically publish values from Yoctopuce sensors connected to a machine. To do so, open the VirtualHub configuration page and edit the "outgoing callback" section.
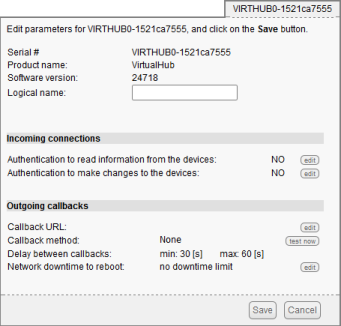
VirtualHub configuration
Currently, the supported services are:
- Emoncms, a free of charge visualization service.
- Valarm, a commercial visualization service.
- Azure, Microsoft cloud service.
- Xively, a commercial visualization service.
- influxDB, a data base service.
- MQTT, a communication protocol dedicated to the "Internet of Things.
- Yocto-API callback, a protocol that allows you to take control of Yoctopuce modules through a NAT filter in PHP, Java, and Node.js.
- the Custom mode, which allows you to create an HTTP GET or POST on the server of your choice.
Service/deamon mode
Finally, you can configure the VirtualHub to automatically start when the machine is powered on, which saves you from doing it by hand.
Windows service
Under Windows, you simply run it once with the option
virtualhub.exe -i
and the VirtualHub is installed permanently as a Windows service. You can reverse this operation with
virtualhub.exe -u
Linux daemon
You can find the scripts to run the VirtualHub in daemon mode in the startup_script directory of the VirtualHub Linux archive.
Conclusion
The VirtualHub is not strictly essential to work with Yoctopuce modules. If you write an application that drives Yoctopuce modules in native USB mode, you don't need it. However, always having a VirtualHub nearby can be very handy :-)


