![]() This week, we are going to do some tinkering and build a hanging scale with a Yocto-Bridge and an Android smart phone. The aim is to weigh objects ranging from a few hundreds of grams to about twenty kilos, in order to weigh objects such a model air planes or bikes. Strangely, two widely popular hobbies at Yoctopuce :-)
This week, we are going to do some tinkering and build a hanging scale with a Yocto-Bridge and an Android smart phone. The aim is to weigh objects ranging from a few hundreds of grams to about twenty kilos, in order to weigh objects such a model air planes or bikes. Strangely, two widely popular hobbies at Yoctopuce :-)
A hanging scale is very simple. One side of the scale hangs from a high location and you hang what you want to weigh on the other side.
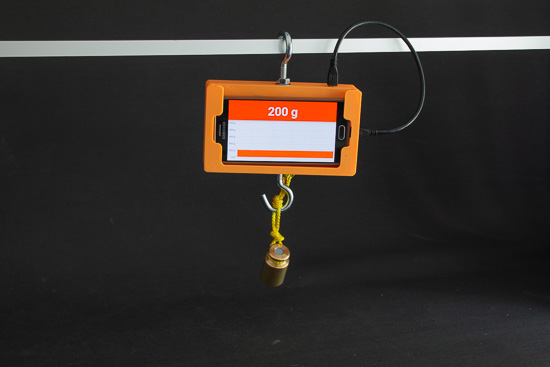
Our hanging scale
In our case, we connected a load cell to our Yocto-Bridge and created an enclosure with a 3D printer.
When the Android smart phone is connected to the USB port of the Yocto-Bridge, the system is powered on and the application which displays the weight starts automatically. The application displays the current value and a graph of the weight over the latest 20 seconds.

Our scale components
Load cells
The first issue that we must solve when implementing a scale is to find the appropriate load cell. On the one hand you must check that the cell accuracy is good enough for the intended use, but on the other hand you must also make sure that the cell supports the maximum weight that you want to measure, otherwise you could damage the cell.
One parameter that you must take into account is the type of the cell, as there are different types of load cells, each with its own advantages and drawbacks.
A shear beam load cell is a straight metallic block mounted at one end and the load to be weighted is attached at the other end. They are usually the cheapest cells, but they are also the harder to use because mechanically the load is cantilevered and to obtain an accurate measure the scale frame must be sufficiently rigid to avoid deforming.

A shear beam load cell
A compression load cell is a block designed to be compressed at a single point. This type of cells is easier to use because there is no cantilever, but the cells are quite expensive and work in compression mode only.
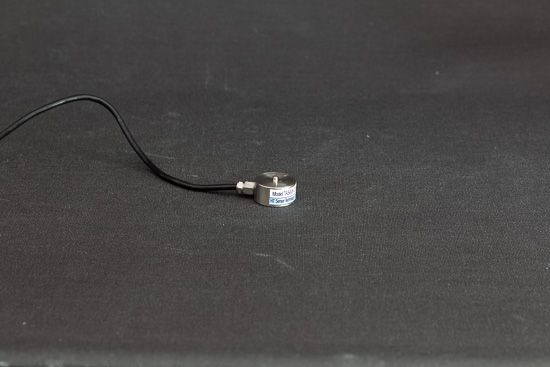
A compression load cell
An S-type load cell is an "S" shaped block which allows you to measure the deformation between the two ends of the "S". This type of cells is usually quite expensive but is very easy to use as you can use the cell in compression or in tension modes. Moreover, as the fixing points are aligned, there is no cantilever which simplifies the design of the scale frame.
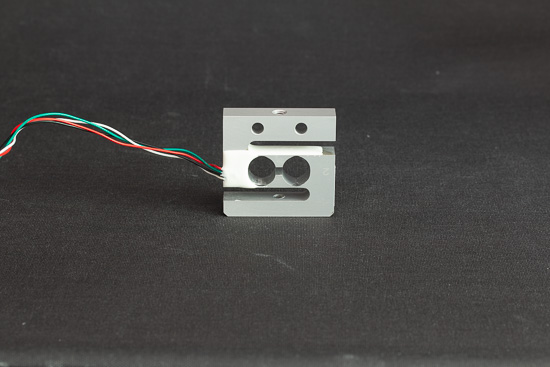
An "S-type" load cell
The most suitable load cell type for our project is the S type as it allows us to work in tension mode and as the fixing points are aligned vertically which makes the implementation easier.
The hardware
For our hanging scale, we selected a Variohm AS3-25kg-C3 cell. It's an S-type load cell which allows you to weight up to 25 kg with a +0.02% accuracy.
Building the scale is limited to finding two threaded hooks of the right size and to screw them on the load cell. For the enclosure, you must fix the cell on one side only. On the other side, the cell must stay free so that it can be deformed without stress during measurement.
The enclosure is composed of three parts: a base that is used to mount the cell and the Yocto-Bridge, a cover to close this base, and a third part which is used to support the smart phone.
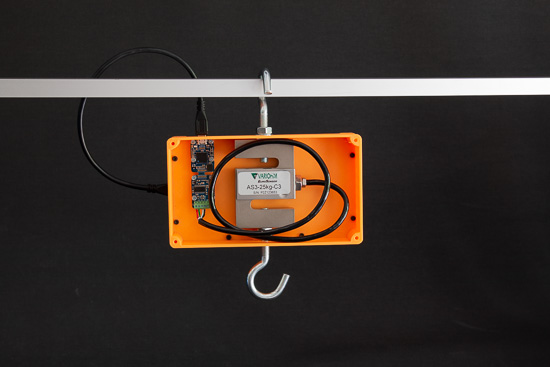
Our scale enclosure
The 3D model of the enclosure is available on thingiverse :
https://www.thingiverse.com/thing:2823006
The software
Note: if you have never used our modules with an Android phone, we recommend that you start by reading our post on "how to start with Yoctopuce modules on Android", as the application we wrote for today is an improvement on the one described in this previous post.
The application is composed of a single activity which displays two widgets, a TextView to display the measured weight and a graph to display the weight changes during the last few seconds. We used the GraphView library to create the graph. This library is open source and very easy to use.
As the source code of the application is available on GitHub, we are going to detail only the part of the code interacting with the Yocto-Bridge.
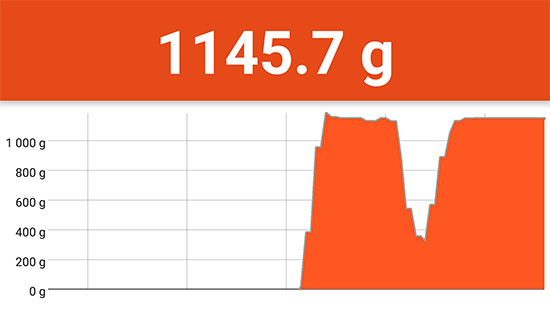
The application displays the weight and a graph
We decided to obtain the measures with periodic notifications instead of using the get_currentValue() method. Periodic notifications have a double advantage: first, they are more efficient because fewer data are transmitted by USB; and second, the measures arrive at a fixed interval which is always easier to display on a graph.
When a new module is detected, we check that it is indeed a Yocto-Bridge and if it is the case, we retrieve the corresponding YWeighScale object and we initialize the cell zero tracking and excitation parameters. Then, we record the newMeasure callback function which is called 4 times per second with the measured value.
try {
String serial = module.get_serialNumber();
if (!serial.startsWith("YWBRIDG1")) {
return;
}
if (_serialNumber != null && !_serialNumber.equals(serial)) {
removal(YModule.FindModuleInContext(_yctx,
_serialNumber + ".module"));
}
_serialNumber = serial;
_yWeighScale = YWeighScale.FindWeighScaleInContext(_yctx,
_serialNumber + ".weighScale1");
_unit = _yWeighScale.get_unit();
_yWeighScale.set_zeroTracking(1);
_yWeighScale.set_excitation(YWeighScale.EXCITATION_AC);
_yWeighScale.set_reportFrequency("4/s");
_yWeighScale.registerTimedReportCallback(
new YWeighScale.TimedReportCallback() {
@Override
public void timedReportCallback(YWeighScale function, YMeasure measure) {
newMeasure(measure);
}
});
} catch (YAPI_Exception e) {
e.printStackTrace();
}
}
The callback function updates the TextField and adds a point on the graph.
final double averageValue = measure.get_averageValue();
final String text = String.format(Locale.US, "%.1f %s", averageValue, _unit);
_textView.setText(text);
if (averageValue > _maxY) {
_maxY = averageValue;
_viewport.setMaxY(_maxY);
}
_series.appendData(new DataPoint(_lastXValue, averageValue), true, MAX_X);
_lastXValue += 1d;
}
As always, the source code of the application is available on GitHub:
https://github.com/yoctopuce-examples/yscale
Conclusion
Here we are, we created our own hanging scale quite easily.

The completed hanging scale in action
Obviously, to simply weigh a bike, it's somewhat of an overkill, but it's nice to show off in front of your pals.
More seriously, by fleshing out the Android application, we could imagine other uses, for example a version dedicated to fishing which would allow you to post on a web site the weight and location of caught fish.


