 This week we are going to see how to control the valve of a hydronic radiator remotely using a Siemens SSA61 valve, a Yocto-0-10V-Tx and a YoctoHub-Wireless-N .
The radiator we want to control is an old hydronic radiator that is installed in a garage. The installation dates from the early 1980s and the radiator is not even equipped with a thermostatic valve. Although the garage is separate from the main building, the radiator is connected to the central heating of the house. The objective is to be able to control this valve from the house in order to keep the garage frost-free and to preheat the garage when you want to go to work in the garage.
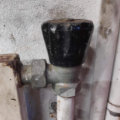
The first step is to replace the old valve with a valve equipped with an actuator. The choice fell on a Siemens SSA61 valve which can be driven by a 0-10V signal. The valve has been installed on the radiator by a professional, but the electrical connection needs to be made.

The Siemens SSA61 valve
To drive this valve, we need a Yocto-0-10V-Tx which can generate voltages between 0 and 10V. We have connected this module to a YoctoHub-Wireless-n which allows us to communicate with the module from the home WiFi network.
As the Siemens valve requires 24V, but as our modules require 5V, we used a Mean Well RT-50D power supply which allows three voltage outputs, 24V, 12V and 5V from a standard 220V wall socket.

The Mean Well RT-50D power supply
The electrical connection of the valve is simple, the gray wire, which corresponds to the 0-10V signal is connected to the + terminal of the first output of the Yocto-0-10V-Tx. The red wire, which corresponds to the 24V power supply, is connected directly to the 24V output of the power supply. The black wire, which corresponds to the ground, is connected both to the power supply ground and to the - terminal of Yocto-0-10V-Tx. Finally, the YoctoHub is powered by the 5V output of the power supply.

The wiring diagram
All the electronics are fixed in a box mounted on the wall. In the end, we end up with the following system:

The mounted system
The Siemens valve self-calibrates as soon as it is powered up and you do not need to make any adjustments on the Yocto-0-10V-Tx. Before closing the box, we must configure the YoctoHub so that it connects to the WiFi network and memorizes its IP address.

The installed system
We can then use our command line library to change the valve opening. For example, the following command opens the valve halfway:
Conclusion
This article only intends to describe the hardware part of this installation. We have simply verified that we can control the valve using our command line API, but it is now possible to use any of our programming libraries to make an automatic system.
As we have seen, it is not very difficult to remotely control a valve of an old hydronic radiator. The Siemens valve works great and is very easy to install. The biggest difficulty is choosing the right size of fittings for the radiator, it is for this reason that we went through a professional :-)

