![]() When you install a home automation system at home, a common problem is to control it from outside. Indeed, network connection through a DSL router usually protects the home network through an address translation mechanism (NAT). This renders local machines invisible from the outside. Today, we present a solution to work around this issue without lowering the security of your private network. A practical example in home automation will follow in the post of next week.
When you install a home automation system at home, a common problem is to control it from outside. Indeed, network connection through a DSL router usually protects the home network through an address translation mechanism (NAT). This renders local machines invisible from the outside. Today, we present a solution to work around this issue without lowering the security of your private network. A practical example in home automation will follow in the post of next week.
Theory: network address translation, problems and solutions
A DSL router which translates network addresses (NAT) works somewhat like a private phone switchboard (a PBX): internal extensions can call each other and call the outside; but seen from the outside, there is only one official phone number, that of the switchboard itself. You cannot reach the internal extensions from the outside.
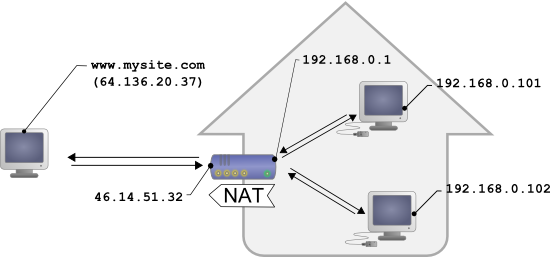
Typical configuration for a home network
Transposed to the network, we have the following: appliances connected to your home automation network can communicate with one another using a local IP address (of the 192.168.xxx.yyy type), and contact Internet servers through their public address. However, seen from the outside, you have only one official IP address, assigned to the DSL router only, and you cannot reach your network appliances directly from the outside. It is rather restrictive, but in fact, this protects you from viruses which cannot that easily take advantage remotely of the weaknesses present in everyone's computer.
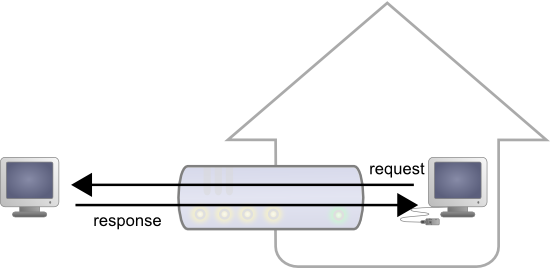
Replies to outgoing requests are transparently forwarded to the correct computer
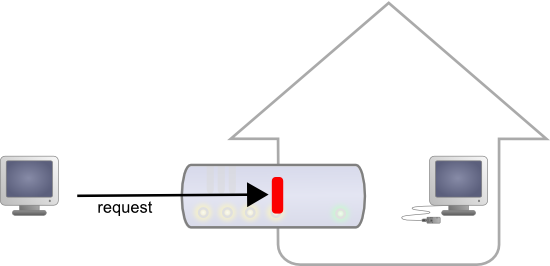
... but incoming connections are blocked by the router
Seeing Internet without being seen provides an enormous security advantage. However, this signifies that you cannot, a priori, set up your own web server at home to control a home automation installation from the outside. A solution to this problem, advised by numerous home automation system dealers, consists in providing outside visibility to your home automation server itself, by adding a routing rule in the NAT configuration of the DSL router. The issue of this solution is that it exposes the home automation server to external attacks from viruses and pirates. And as the heart of the home automation server is usually a common operating system, it is most likely that one day a vulnerability will be discovered enabling someone to penetrate your private network. So this is not the safest solution.
We presented a first solution which did not require you to modify the router NAT configuration some time ago: it consists in controlling your home through emails. However, this requires you to write numerous lines of specific code and limits the interaction possibilities.
The solution we propose today is based on using our PHP programming API from an HTTP callback request. We have already seen how to automatically save measures on the Internet. Toady we extend this approach to react to a callback with actions on the machine which has invoked the callback.
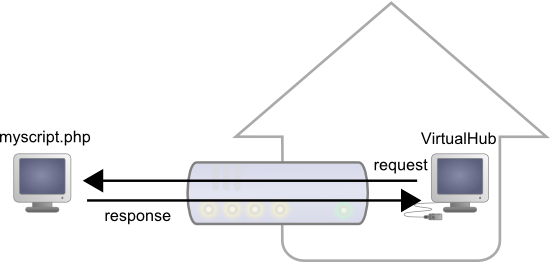
The HTTP callback approach
The VirtualHub and the HTTP callback API
The software to install on your PC that will work as home automation center is very simple: simply copy the VirtualHub version for your computer, and set it up to automatically run at start up, for example in the rc.local file. When this is done, connect yourself with a web browser (from your local network) on port 4444, and verify that you are able to drive the Yoctopuce modules manually.
The driving logics of your personalized home automation solution will be located on a public web server, for example on a shared hosting. Thanks to this, you'll be able to reach it from anywhere without having to add a NAT rule in your DSL router. You can find shared hosting offers from EUR 2/month at OVH.com, for example, but almost any provider offering PHP version 5.2 or later should work.
The PHP script controlling devices in this way can use the usual Yoctopuce API. For example, to activate a Yocto-PowerRelay, we use:
$powerstrip->set_output(Y_OUTPUT_ON);
The only difference with a usual script is that we have to indicate at the very beginning of our PHP script how to locate the VirtualHub and to configure the VirtualHub to find our PHP script. Nothing simpler:
include("yocto_relay.php");
//the modules are on the VirtualHub performing the callback
yRegisterHub("http://callback");
Save your PHP driving script in a file at your provider (for example under domotics/tests.php), and add in the same directory the Yoctopuce PHP library files (at least the yocto_api.php and yocto_relay.php files). You will have to use the latest and greatest version of the PHP library, available here until we ship it officially in a few days.
To configure the VirtualHub callback, open a browser on the VirtualHub interface, click on the configure button, than on the edit button close to Callback URL and select the POST setting in Yocto-API mode, like below;
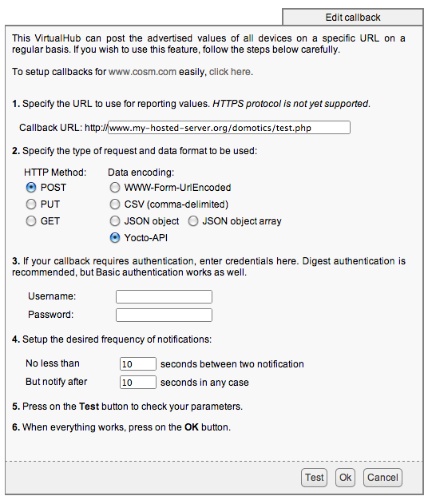
By pressing the Test button, you can directly check if your HTTP callback command works, and see potential error messages returned by PHP. For example, depending on the settings of your Internet provider, you may get the following message:
error: URL file-access is disabled in the server configuration
If this happens, you must add a .htaccess file in the repertory where your script is located, containing simply the following line:
php_flag "allow_url_fopen" "On"
How does it work?
If you know somewhat of the HTTP protocol, you must ask yourself how we can run our API the other way around through the NAT. It's very simple. It is in fact a simplified behavior: when the VirtualHub calls the callback in Yocto-API mode, it posts in the request the complete state of all the connected sensors, in JSON format. On the server, the initial call to InitAPI("http://callback") starts an analysis of all the posted data and their indexation in a cache memory.
Then, when the PHP script makes calls to the Yoctopuce API,
- Value readings are performed from the content of the cache memory
- State changes (actions) are sent directly by the standard HTTP channel with a simple marker allowing the VirtualHub to detect them among the page output flow, and to execute them, while ignoring all the other displays performed by the script.
Therefore, it's a perfectly standard use of the HTTP protocol which can work perfectly well through the NAT.
Do you want a real-world application ? Stay tuned, our next blog article will show you how to use this...


