 We recently put together a photo booth for a family party and thought others might be interested. We are therefore going to see how to build a photo booth with a Raspberry Pi, a Canon Selphi photo printer, two lights, and a Yocto-PowerRelay-V3.
We didn't start from scratch. The TouchSelfie project, which was first an article published in Make Magazine, documents step by step how to build the photo booth with a Raspberry Pi, the camera module, and a photo printer.
However, for our own photo booth, we needed to add two big lights to light the subject while taking the picture. So we added two led lights which the application drives using a Yocto-PowerRelay-V3. These two lights are off by default and are only turned on during the shooting.
Building
The photo booth is made of the following elements:
- A Raspberry Pi 4
- A Raspberry Pi touch display
- A Raspberry HQ camera
- A Canon Selphy CP900 printer
- A Yocto-PowerRelay-V3
- Two led lights
The authors and developers of the article made an excellent documentation job. Each step is well documented and there even are Youtube videos on the topic. We won't spend time on how to set up the basic photo booth. We are going to see what needs to be done to add the possibility to control the lighting.
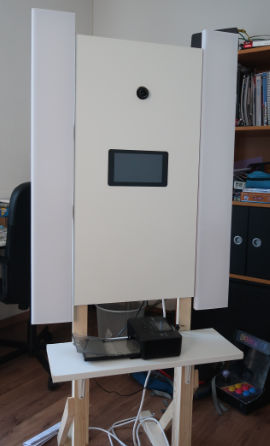

Here is our assembled photo booth
Wiring is very easy. We connected the Yocto-PowerRelay-V3 on one of the USB ports of the Raspberry Pi 4. The 220V power supply for the lights is connected on the B output of the Yocto-PowerRelay-V3. Everything is put in a junction box mounted at the back of the photo booth.

The Yocto-PowerRelay-V3 enables us to control the power supply of the lights
When the Yocto-PowerRelay-V3 is idle (state A), the lights are off. When the relay is activated (state B), the lights are on.
Modifying the application
The original application was written in Python and is therefore easily adaptable. By looking at the code, we see that the modifications must all be made in the user_interface.py file.
To enable us to use our programming library, we must start by installing it with PyPI and the following command:
In the source file, we must start by adding the imports for the YAPI and YRelay classes that we are going to use later.
from yoctopuce.yocto_api import *
from yoctopuce.yocto_relay import *
...
We must then initialize the library with the YAPI.RegisterHub method at the beginning of the application.
...
log.info("Yoctopuce lib : " + YAPI.GetAPIVersion())
errmsg = YRefParam()
if YAPI.RegisterHub("usb", errmsg) != YAPI.SUCCESS:
log.critical("Unable to access USB port: "+errmsg.value)
sys.exit()
Finally, the snap() method of the UserInterface object doesn't take the picture immediately, but it displays a countdown on the screen and then takes the picture. We must therefore switch the relay at the beginning of the countdown until the picture is taken.
The code is the following:
YAPI.UpdateDeviceList(errmsg)
yrelay = YRelay.FirstRelay()
if yrelay is not None:
nb_sec = (2 + config.countdown1)
yrelay.pulse(nb_sec * 1000)
We could do without the call to YAPI.UpdateDeviceList but it enables us to detect whether a Yocto-PowerRelay-V3 is connected after the start of the application. It's not the most efficient way to deal with this issue, but it's the one which required the fewer changes in the application code. Thanks to this call, you don't need to restart the application if you forget to connect the relay.
Then, we look for a Yocto-PowerRelay-V3 with the FirstRelay method. If it is the case, we call the pulse method with the duration of the countdown plus 2 seconds. Note that it's simpler and safer to use the pulse method than to turn the lights on at the beginning of the function and to turn them off after the picture was taken. Indeed, the pulse method ensures that the lights are turned off after x seconds. In this way even if the application crashes during the shoot, for example if there is no disk space available anymore, the lights won't stay on.
We performed a few other changes to the software to customize the interface, but these modifications are not linked to the Yoctopuce modules, so we won't detail them in this post.
The source code of the application is available on GitHub:
https://github.com/yoctopuce-examples/TouchSelfie-extended

The photo booth in action
Conclusion
As we just saw it, it's quite easy to adapt a project to integrate our modules into it. In the case of this photo booth, the bulk of the work had already been done by two developers: @laurentalacoque and @wyolum. The changes took us only about an hour.

