 In our series of posts on using Yoctopuce modules with Home Assistant, we're going to show you how to integrate the more advanced functions of Yoctopuce modules, which are not directly offered by MQTT discovery. This will enable you, for example, to control a Neopixel RGB LED panel from Home Assistant, display information on an external Yoctopuce screen, or control an external device via an RS-485 link.
The automatic discovery of Yoctopuce functions by MQTT in Home Assistant is limited to basic functions for which the usage scenario is unambiguous. For example, reading a sensor value or switching a relay. For other modules, the most suitable user interface in Home Assistant depends too much on your intended application for us to be able to propose it automatically via the MQTT discovery mechanism. But that doesn't mean you can't integrate them into your control panel in Home Assistant, with a few manual configuration steps.
Principle
Home Assistant does not directly allow you to customize or enrich the entities defined by an MQTT device to add more advanced behaviors. However, it is possible to add generic interface widgets to the interface, and link them to MQTT devices via automations.
The two essential components of an automation are the trigger, which triggers the automation, and the action that is triggered. To add an advanced command widget to a Yoctopuce module, we add an automation with
- a trigger based on the change of state of an interface widget
- an action that publishes one or more MQTT messages to trigger an action on the Yoctopuce module.
To carry out this type of integration, we recommend the use of a tool such as MQTT Explorer, which enables you to view in real time and in detail all the MQTT messages exchanged between Home Assistant and Yoctopuce modules.
Adding a custom control widget
To begin with, you need to choose the interface widget for your advanced function. To do this, open the Home Assistant configuration window (Settings), and in the Devices & Services section choose the Helpers tab.

Accessing the Helpers page
Click on the Create Helper button and choose the type of control widget that you want:
- A Button
- A numeric parameter (Number)
- A textual parameter (Text )
- A Multiple choice (Dropdown)
- An on/off switch (Toggle)
Then give the widget a name that reflects its role (remember it!), and choose an icon to represent it.

Defining a multiple choice widget
You can then add the widget to your control panel using the Edit Dashboard function. By clicking on Add Card and selecting the By Entity tab, you'll see a list of all defined entities. Type a keyword corresponding to the name you've given your widget, and you'll find it instantly.

Adding the widget to the control panel
When you confirm, the new widget appears in your control panel.
Adding an action to the widget
Now that the control widget exists, we need to create the automation that produces an action when the user changes the widget. To do this, return to the Home Assistant Settings window, and open the Automations & scenes section.

Accessing the Automations page
Click on the Create new automation button and choose the first option, Start with an empty automation from scratch.

Creating manually a new automation
We're now going to define the Trigger that triggers the automation and the corresponding action.
As mentioned above, in this case, we want a trigger based on the change of state of a widget. So click on Add trigger, and choose the State option. Find the entity corresponding to your widget (by typing a keyword corresponding to the widget name), and your trigger is already complete.

Defining the trigger
The action is to send an MQTT message. So click on Add action and choose the Call service option. In the input field, type mqtt and you'll see the MQTT:Publish service, which you can select.
The two important parameters are the recipient of the MQTT message, defined by the topic, and the message content, the payload.
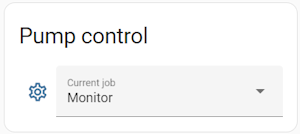
The topic corresponds to the full path of the Yoctopuce function to which you want to send a command, followed by the "/set/" suffix and the attribute you want to change. For example, for a Yocto-RS485-V2 module named IntelliFlo, the topic used to select a job on the serialPort function is:
yoctopuce/IntelliFlo/serialPort/set/currentJob
We recommend using MQTT Explorer or a similar tool to check the exact path under which your YoctoHub publishes and expects to receive messages about your module.
If the value you want to configure is fixed, you can put it directly in the payload field. If you want to build a value dynamically on the basis of one or more interface widgets, you can use Home Assistant's template mechanism, by entering a value such as
{{ states('input_select.current_job') }}.job
Note that in this case, as soon as you type the double-accolade, the display of your action switches to YAML mode, Home Assistant's advanced configuration mode. Don't worry, it's not more complicated...
Testing the result
Now all you have to do is test your widget. Once again, MQTT Explorer helps you understand what happens if your command is ignored...
Other examples
To activate a display sequence on a Yoctopuce screen like the Yocto-MaxiDisplay, you can proceed as described above, but instead of using the currentJob attribute, use the command attribute and set as payload:
S{{ states('input_select.play_seq') }}.seq
To launch an animation sequence on a NeoPixel RGB LED panel driven by a Yocto-Color-V2, use the command attribute and set the payload to SS3 to launch sequence 3, for example.
Virtually all the high-level functions available in the Yoctopuce library can be executed by an MQTT message of this type. To find out which attribute should be used, and possibly what magic value should be passed to the command attribute to trigger a particular action, open the source file of our Python library corresponding to the desired function, and you'll easily find the information you're looking for. Or send an e-mail to support@yoctopuce.com if this seems too complicated :-)

