![]() We designed the Yoctopuce sensors so that you can easily integrate them in all kinds of computer systems: connecting them to a computer, to an Android phone, or even to a web server. On this latter point, we have so far discussed web integration examples destined to seasoned programmers, working directly in PHP or in Java. Today, we discuss a solution which is simpler to implement for web developers using the WordPress platform.
We designed the Yoctopuce sensors so that you can easily integrate them in all kinds of computer systems: connecting them to a computer, to an Android phone, or even to a web server. On this latter point, we have so far discussed web integration examples destined to seasoned programmers, working directly in PHP or in Java. Today, we discuss a solution which is simpler to implement for web developers using the WordPress platform.
WordPress is an environment which greatly facilitates the creation of classic internet sites, containing structured pages, posts, photo galleries, and so on. You don't need to know programming to use it, everything is done via menus and a graphical interface. There are many plug-ins available to add specific functions to WordPress for particular applications.
Today, we propose a WordPress plug-in exemple called Yocto-Sensor, enabling you to display the measures coming from a Yoctopuce sensor on a web site.
How does it work ?
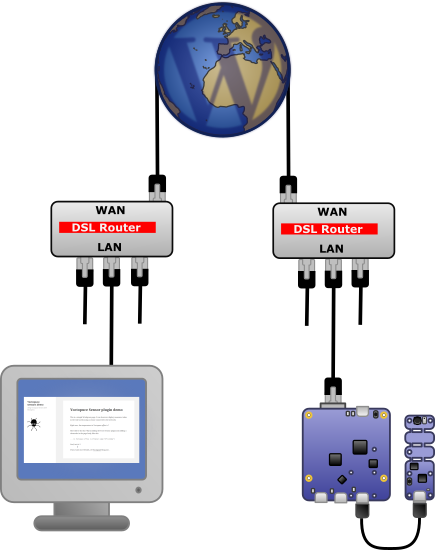
The use scenario assumes an interaction between at least three entities: the Yoctopuce sensor taking the measure, the WordPress server hosted on a server somewhere on the Earth, and the user web browser, which we can't assume to be close to the sensor. Moreover, in a normal situation, we must assume that the sensor as well as the web browser are behind a NAT filter, such as a DSL router or a fire-wall.

Interactions to read a sensor via a web site
For the user to be able to retrieve the measures, there is therefore only one solution: both must talk to the web server, which everyone can see, and which must store the measures in the meantime. Our plug-in therefore automatically creates a new table in the WordPress database to store the measures.
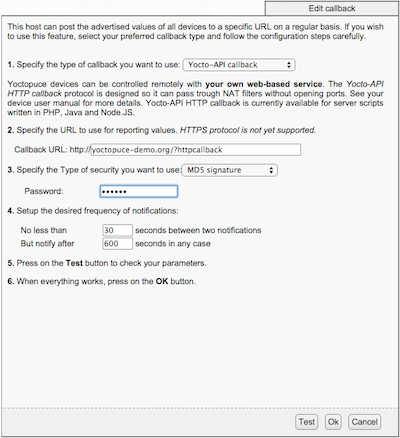
The data from the sensors are automatically sent through the network to the WordPress server, through the HTTP callback method, of which we talked about previously. Concretely, to achieve this, you must connect the sensor either on a YoctoHub-Ethernet or a YoctoHub-Wireless-g, or by USB on a computer running the VirtualHub. Whatever the method, the configuration is the same: we configure an HTTP callback pointing to the WordPress web site, with a specific ?httpcallback URL suffix, which is intercepted by our plug-in to collect the measures:

Configuring the HTTP callbacks to a WordPress server
On top of the callback URL, this configuration window contains two important parameters:
- The interval between calls to the callback, which defines the measure frequency
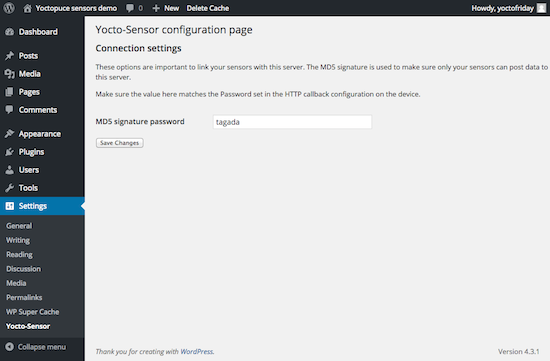
- The password used to secure your callbacks (with an MD5 signature), preventing someone else to post extraneous measures on your site. You must configure the same password when configuring the Yocto-Sensor plug-in:

Configuring the password for HTTP callbacks in WordPress
To display the latest measure in WordPress, you can then use the [YSensor name="..."] shortcode in any page, indicating the name of your sensor (either its logical name if you assigned one or its hardware identifier).
Implementation
WordPress plug-ins are simple PHP files located in the wp-content/plugins directory. They must respect some conventions. The entry point is the PHP file at the root of the plug-in. It describes the plug-in and simply includes the code found in the inc directory. In particular, we can find there a load.php file, which grafts our plug-in into WordPress, by associating to predefined entry points:
- a installation function, called when the user enables the plug-in on the site, and which creates the database
- a few functions to define the plug-in options panel
- a function recording the new shortcode
- a function telling WordPress which are the keywords of interest in the URLs
- a function intercepting URLs containing our "httpcallback" keyword and which sends them to our measure recording code
If you want to see our plug-in working, have a look at our test site on yoctopuce-demo.org...
If you want to test it on your own site or if you want a better look to the source code, you can download our Yocto-Sensor plug-in or take if from the plug-in library on WordPress.org.


