 This week, we are going to talk about the Yocto-Color-V2. This module can drive up to 150 RGB leds. In a previous post, we saw how to create animations which are run directly by the Yocto-Color-V2. There are however limitations and for complex animations we sometimes have to compute each frame of the animation and to update the leds from the application. This is what we are going to do this week.
Note: We already have a post explaining the basics of the Yocto-Color-V2. If you aren't familiar with this module, we recommend that you start by reading this post.
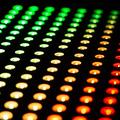
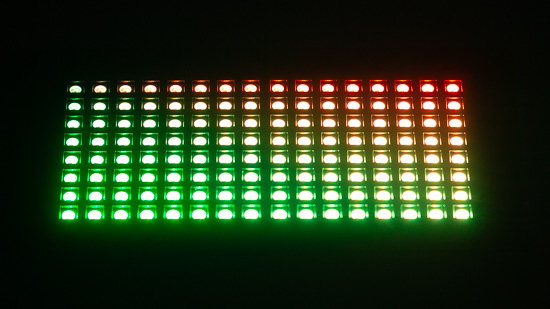
A 16x8 pixel display
As stated above, in some situations, the only solution is to compute each frame of the animation and to update all the leds. To illustrate this situation, we are going to see how to implement a mini-display with two 8x8 Neopixel led panels chained together.
![]()
The two 8x8 Neopixel led panels make up a 16x8 pixel display
Although the leds visually form a rectangle, they remain cabled serially. That means that the number of each led corresponds to its position on the led string. Led 0 is connected directly to the Yocto-Color-V2, led 1 is connected to led 0, and so on. The Yocto-Color-V2 has no idea of the topology of the leds it is driving.
The first step is therefore to determine how the leds are linked to one another. In our case, the led string starts bottom right and goes up to then go to the second column. As a picture is worth a thousand words, here is the topology of our led string:
![]()
The led order
A small C# example
To drive this display, we implemented a small application in C#.
As it is much easier to work with a two dimensional array rather than a list of leds, we created a ColorLedScreen object. This object has two functions: it is used first to convert the X,Y coordinates into led addresses, and then to update the led colors.
The object constructor takes as argument a YColorLedCluster object corresponding to the Yocto-Color-V2 driving the two led panels.
The getLEDNumberFromXY method performs the conversion of the X,Y position. It is this function that we would have to modify if the led panels were assembled differently.
Finally, the drawBitmapRGB(int x, int y, int[,] bitmap) method goes through the pixels of the bitmap given as argument and updates the corresponding leds.
{
private YColorLedCluster colorleds;
private int nbleds;
private int width;
private List<int> ledStripe;
private int height;
public ColorLedScreen(YColorLedCluster colorLeds, int width, int height)
{
this.colorleds = colorLeds;
this.nbleds = width * height;
this.width = width;
this.height = height;
this.ledStripe = colorLeds.get_rgbColorArray(1, this.nbleds);
}
private int getLEDNumberFromXY(int user_x, int user_y)
{
int tmp_x = user_x;
int tmp_y = user_y;
tmp_y = this.height - 1 - tmp_y;
int ofs = tmp_x * this.height + tmp_y;
return ofs;
}
public virtual int drawBitmapRGB(int x, int y, int[,] bitmap)
{
int ofs = 0;
for (int i = 0; i < bitmap.GetLength(0); i++) {
for (int j = 0; j < bitmap.GetLength(1); j++) {
int led_ofs = getLEDNumberFromXY(x + i, y + j);
this.ledStripe[led_ofs] = bitmap[i, j];
}
}
this.colorleds.set_rgbColorArray(0, this.ledStripe);
return YAPI.SUCCESS;
}
}
Note that the object doesn't update the leds individually with the set_rgbColor function, but works on a cache (the ledStripe property) and updates all the leds at the end. This solution is more efficient because the library transmits all the data in block in one go.
To check that our code works, we wrote a small program displaying a gradient on the panel.
{
string errmsg = "";
string url = "usb";
if (YAPI.RegisterHub(url, ref errmsg) != YAPI.SUCCESS) {
Console.WriteLine("Unable to register hub with url "
+ url + " :" + errmsg);
return;
}
YColorLedCluster colorLedCluster = YColorLedCluster.FirstColorLedCluster();
if (colorLedCluster == null) {
Console.WriteLine("No Yocto-Color-V2 is connected on hub " + url);
return;
}
int w = 16;
int h = 8;
ColorLedScreen colorLedScreen = new ColorLedScreen(colorLedCluster, w, h);
/*
* Draw a gradient on the two 8x8 panel
*/
int[,] gradient = new int[w, h];
for (int j = 0; j < h; j++) {
for (int i = 0; i < w; i++) {
int r = i * 255 / w;
int g = j * 255 / h;
gradient[i, j] = (r << 16) + (g << 8) ;
}
}
colorLedScreen.drawBitmapRGB(0, 0, gradient);
YAPI.FreeAPI();
}
The code is rather standard, we initialize the API with the YAPI.RegisterHub method, and we retrieve a YColorLedCluster object corresponding to the Yocto-Color-V2, then we instantiate our ColorLedScreen object.
Now that we know that our code is working, we can start to have fun with animations.
We start by animating our gradient somewhat:
Here is another example, a rendering of the Mandelbrot set:
and finally the display of a scrolling text:
The complete code of the application and of the animations is available on GitHub: https://github.com/yoctopuce-examples/ColorLedScreen
Refresh rate
Now that we have an application that updates all the leds, we can measure the time needed to refresh the display with the following code:
{
int w = 16;
int h = 8;
int[,] bitmap_r = new int[w, h];
int[,] bitmap_g = new int[w, h];
int[,] bitmap_b = new int[w, h];
for (int j = 0; j < h; j++) {
for (int i = 0; i < w; i++) {
bitmap_r[i, j] = 0xf0000;
bitmap_g[i, j] = 0xf00;
bitmap_b[i, j] = 0xf;
}
}
Stopwatch sw = new Stopwatch();
sw.Start();
for (int i = 0; i < 100; i++) {
this.drawBitmapRGB(0, 0, bitmap_r);
this.drawBitmapRGB(0, 0, bitmap_g);
this.drawBitmapRGB(0, 0, bitmap_b);
}
sw.Stop();
Console.WriteLine("frame refresh took {0}ms",
sw.ElapsedMilliseconds / 300.0);
}
In the end, with a USB connection, we need a bit less than 14 milliseconds to refresh the whole display, which is equivalent to about 70Hz. It's more than enough to create a flowing animation. In most cases, we will even need to add a small delay between each frame to make sure our eyes have enough time to perceive the change.
However, we must keep in mind that the animation is driven by the application and not by the Yocto-Color-V2. This implies that the refresh rate depends on the time needed to compute the frame but also on the communication between the application and the Yocto-Color-V2.
If the Yocto-Color-V2 is connected on a USB port, there is no problem. But if you use a YoctoHub on a very slow or congested network, your animation may lag.
Conclusion
As we just saw it, it's quite easy to implement complex animations by refreshing all the leds connected to the Yocto-Color-V2 in block.
In this example, we organized the leds so that they form a 16x8 rectangle, but you can apply the same technique for other topologies.

