![]() We usually consider IP connection as a means to access Internet, but in fact it's quite possible to build networks which do not have outside connectivity. It's called non routable networks. They are useful, but they also introduce some difficulties. This week, we explain how to use Yoctopuce modules in a non routable network.
We usually consider IP connection as a means to access Internet, but in fact it's quite possible to build networks which do not have outside connectivity. It's called non routable networks. They are useful, but they also introduce some difficulties. This week, we explain how to use Yoctopuce modules in a non routable network.
There can be several reasons to want to build a non routable network, for example:
- You need to make a demonstration of network equipment at a location where there is simply no network.
- You don't trust the network that is available to you.
- You want to free yourself from the maximum length of USB cables by using YoctoHub-Ethernet.
The hardware
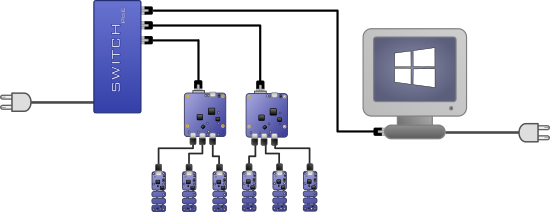
Setting up the network hardware is quite trivial. On top of the controlling computer and of the YoctoHub-Ethernet, you need an Internet switch and UTP cables. You can find this type of hardware for a small fee in any store with a decent computer department. We recommend a switch with PoE ports, thus you won't have to explicitly power each YoctoHub-Ethernet: the power comes from the network cable. Connect everything to the Ethernet switch and you are done. If you want to use one or serveral YoctoHub-Wireless-g, you must add a Wifi access point that you connect to the switch. Some Wifi access points can be powered by PoE as well.

Non routable network, using a PoE switch makes your life easier
Then you have to affect an IP address to each node. Usually this is done by the DSL router, but since this is a non-routed network case, you'll have to deal with this yourself...
Assigning IP addresses
In an IP network, each node must have a distinct IP address. When two machines have the same IP address on the same network, consequences are completely unpredictable, or even quite harmful. There are several ways to assign these addresses.
Static IP addresses
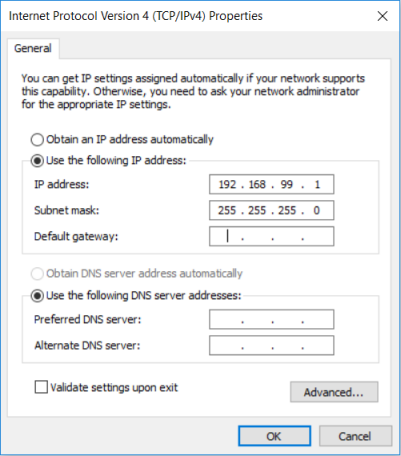
In this case you define yourself the IP address of each node. It's the most fastidious method: you must configure each node manually and if you later change your mind, you must have physical access to the nodes to reconfigure their address. Width Windows 10, finding the interface to configure the IP address of a machine is akin to a treasure hunt, you must go through:
Start menu / Control panel / network and sharing center / change adapter settings / local area connection / properties /internet protocol version 4 /properties

Configuring the static IP address 192.168.99.1 under Windows
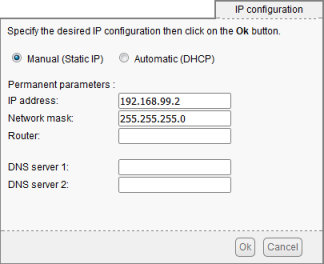
It's rather simpler on a YoctoHub-Ethernet, you can access the setting directly from the module configuration page.

Configuring the static IP addess 192.168.99.2 on a YoctoHub. For a non routable network, leave the router field empty
Dynamic DHCP addresses
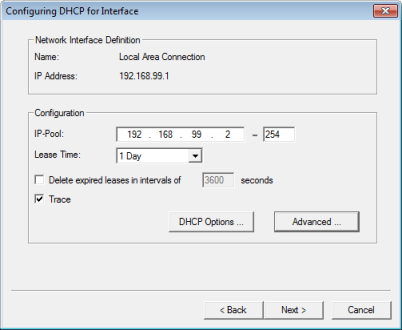
In this case, rather than manually defining an IP address in each node, you can configure each node so that its IP address is automatically assigned by a server called a DHCP server. Under Windows, you can for example install this free DHCP server on your control machine. You only need to configure each node to use your DHCP server, and everything else follows. Note that the YoctoHubs are sold pre-configured to use a DHCP server.

Configuring the DHCP server
The issue with this method is that you don't quite know which address is assigned to which node, and you more importantly can't be a 100% sure that the server will assign the same address to the same node when it next starts. But there is a way.
Static DHCP addresses
Most DHCP servers allow you to predefine which address is assigned to which client depending on its MAC address, it's called a lease. And the MAC address of each network device is supposed to be unique in the world. When you know the MAC address of your node, you only need to make the corresponding lease in the server configuration. In the case of the DHCP server given as example, to assign the IP address 192.168.99.2 to the node with the 00:04:A3:BD:4F:EB MAC address, you simply add the following section in the config.ini file of the DHCP server.
[00:04:A3:BD:4F:EB] IPADDR=192.168.99.2
We recommend this method because it allows IP addresses to be assigned in a predictable way, while centralizing system configuration. Note, when you have changed an address lease, you must restart the corresponding node for the change to be taken into account.
A few final recommendations on the attribution of IP addresses by DHCP that we urge you to follow:
- If you want to avoid chicken and egg issues, we recommend that you assign a purely static address to the machine hosting the DHCP server.
- Preferably select a unconventional address range, such as 192.168.99.x rather than 192.168.0.x or 192.168.1.x
- Don't test the DHCP server on your production network where there is most likely another DHCP server. Remember that if two machines obtain the same IP address at the same time, you will be instantly beamed to hell.
Time server
Many network machines use Internet to know the exact time: they connect at regular interval to a time server to synchronize their internal clock. It's also the case for the YoctoHub-Ethernet. They need to know the time to, among other things, set the time of the Yoctopuce modules which are connected to them. It's important if you need to use the data loggers of the Yoctopuce sensors and want to have correct time stamps. So, one of the first things a YoctoHub-Ethernet does at startup is to contact an Network Time Protocol (NTP) server. There are NTP servers aplenty on the Internet, but without outside connectivity, they aren't useful at all.
Windows provides an NTP server by default. However, for reasons that we don't know about, it delivers by default packets with the Stratum field set to zero, which is interpreted as a "kiss-o'-death" message by the clients. Any NTP client which receives this "kiss-o'-death" message from a server is requested to stop contacting the said server (RFC 4330, section 8). As "kiss-o'-death" management is implemented in the YoctoHubs, they don't work too well with the Microsoft server. The simplest way to remedy this issue is probably to install another NTP server, such as this one, it's free, and its installation is very simple: simply click next... next... next.
When your NTP server is set up, you need to configure your YoctoHub-Ethernet so that they use your server. Note that you don't necessarily need to connect to the YoctoHub interface to do so, your can use the command line API. Let's imagine that the IP address of the YoctoHub is 192.168.99.2 and that the IP address of the NTP server is 192.168.99.1, you can simply type the following command:
C:\>YNetwork -s -r 192.168.99.2 set_ntpServer 192.168.99.1
if you need to switch back to the default NTP server, simply use
C:\>YNetwork -s -r 192.168.99.2 set_ntpServer ""
Network watchdog
One last piece of advice as a conclusion: All the Yoctopuce network modules have a setting which enables them to automatically restart in case of prolonged network connectivity loss. This connectivity is tested by checking the HTTP callback, if defined, and the NTP server otherwise. If you decided to not use an NTP server on your non routable network, make sure that this setting is truly disabled.


