![]() From time to time, some customers complain that the Yocto-3D-V2 lacks reactivity. But each time, it's due to a misunderstanding of our API. Indeed, to use the Yocto-3D-V2 efficiently, you must imperatively use callbacks. To illustrate this issue in an entertaining way, we have decided to show you how to correctly use a Yocto-3D-V2 in a Unity 5 game engine.
From time to time, some customers complain that the Yocto-3D-V2 lacks reactivity. But each time, it's due to a misunderstanding of our API. Indeed, to use the Yocto-3D-V2 efficiently, you must imperatively use callbacks. To illustrate this issue in an entertaining way, we have decided to show you how to correctly use a Yocto-3D-V2 in a Unity 5 game engine.
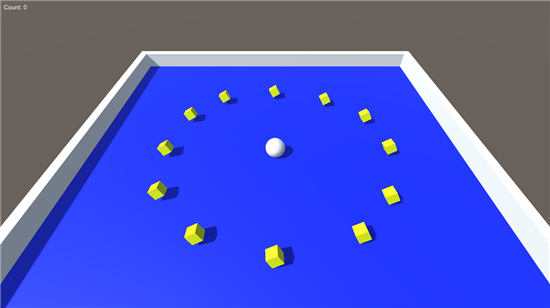
The aim of this post is to modify the Unity "Roll-a-ball" tutorial to control the player with a Yocto-3D-V2 instead of the keyboard. The tutorial is available on the Unity web site. The player drives a ball and must catch 12 objects. This example is really really basic, but enables us to demonstrate how to use the Yocto-3D-V2 inside the Unity 5 engine.

The Roll-a-Ball tutorial provided by Unity
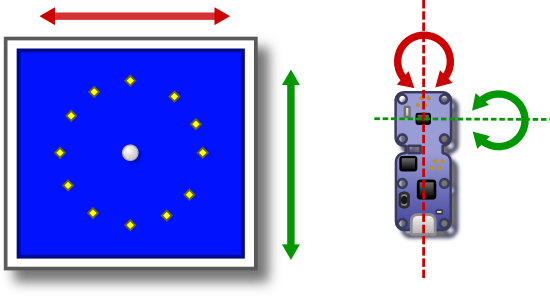
Before you start, you must follow the tutorial to have an example that works with the keyboard. Then, you modify the code of the game to use the inclinometer (tilt sensor) of the Yocto-3D-V2 to control the ball. You are going to use the functions tilt1 and tilt2 of the module to control how the ball moves on the X and Z axes. Thus, when you tilt the Yocto-3D-V2 to the left, the ball moves left, and if you lean the module forward, the ball moves forward, and so on.

The aim is to control the ball with a Yocto-3D-V2
Adding the Yoctopuce library
Before you can use the Yoctopuce modules in Unity, you must download and add the C# library to the Unity project. To do so, you must copy the C# source files in the Assets directory of the Unity project. Then, you must copy the content of the unity directory of the library into the Assets/Plugins directory of the Unity project. Finally, you should have the following tree structure:
/Assets /_Scene /Materials /Plugings /x86 /yapi.dll /libyapi.so /x86 /yapi.dll /libyapi.so /yapi.bundle /Prefabs /Scripts /Sources /yocto_accelerometers.cs /yocto_api.cs ...
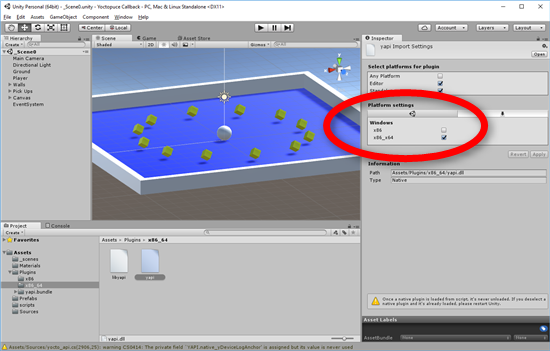
Note, Unity doesn't always correctly detect the architecture of the yapi.dll dll. The 32bit version is located in the /Assets/Plugings/x86 directory. The 64 bit version is located in the /Assets/Plugings/x86_64 directory. Make sure to check in the inspector that the architecture is correct.

Check that Unity uses the correct dll
Finding the Yocto-3D
Now that the Yoctopuce library is integrated into the project, you must modify the script of the Player GameObject so that it uses a Yocto-3D and not the keyboard. The first step is to check that there is a Yocto-3D when you load the level. The simplest way is to add the code in the Start() function of the Player object. This code is very simple, you list all the Yoctopuce modules connected by USB and take the first Yocto-3D or Yocto-3D-V2. If there is no such module or if you can't access the USB port, display an error message and exit the function.
Then, you must initialize the tilt_x and tilt_z attributes so that they use the tilt1 and tilt2 functions of the Yocto-3D-V2 that you decided to use.
private YTilt tilt_x;
private YTilt tilt_y;
void Start ()
{
rb = GetComponent<Rigidbody> ();
count = 0;
setCountText ();
winText.text = "";
errorText.text = "";
Debug.Log ("Use Yoctopuce Lib " + YAPI.GetAPIVersion ());
string errmsg = "";
int res = YAPI.RegisterHub ("usb", ref errmsg);
if (res != YAPI.SUCCESS) {
Debug.Log ("error with RegisterHub:" + errmsg);
errorText.text = errmsg;
return;
}
YModule module = YModule.FirstModule ();
while (module != null) {
string product = module.get_productName ();
if (product == "Yocto-3D" || product == "Yocto-3D-V2") {
Debug.Log ("Use " + product + " " + module.get_serialNumber ());
break;
}
module = module.nextModule ();
}
if (module == null) {
errorText.text = "No Yocto-3D or Yocto-3D-V2 found";
return;
}
string serial = module.get_serialNumber ();
tilt_x = YTilt.FindTilt (serial + ".tilt1");
tilt_y = YTilt.FindTilt (serial + ".tilt2");
}
...
You now have to modify the FixedUpdate() method for it to move the ball depending on the orientation of the Yocto-3D-V2.
What not to do
The wrong approach is to retrieve the module orientation with the get_currentValue() method of the tilt_x and tilt_y objects:
{
// do not do that!!!
double roll = tilt_x.get_currentValue ();
double pitch = -tilt_y.get_currentValue ();
Vector3 movement = new Vector3 ((float)roll, 0.0f, (float)pitch);
rb.AddForce (movement * speed);
}
This solution is not wrong, but it is very inefficient. As we have explained it in a previous post, the get_currentValue() works by polling, that is each call to the method reads by USB the value of the tilt sensor and this operation can take up to 100 milliseconds!
For a traditional application, losing 100 milliseconds when clicking is not catastrophic, but for a video game, losing 100ms for each frame is disastrous. The framerate becomes so low the the game is unplayable.
Fortunately, there is a solution.
What to do
The correct approach is to work by callback and not by polling. For each function of the Yoctopuce modules, you can register a callback function which is called when the value of this function changes.
This working mode is greatly more efficient for two reasons: first, the module uses a much more efficient communication protocol. Secondly, communication is managed as a background task by the library.
To work with callbacks, you must start by writing the callback functions for your tilt_x and tilt_z objects. Callback functions of objects of the YTilt type receive two parameters: the YTilt object itself and a character string containing the new value. Note that a callback function receives the value as a character string, the user must then convert this character string into the appropriate type.
Your two callback functions must simply parse the character string and store the value into an attribute. Note, make sure not to call the get_XXX() function into the callback functions, because this call would read the value directly on the Yocto-3D-V2 and you would find yourself with the same latency issue as in polling.
private double _z
void TiltCallbackX (YTilt sensor, string value)
{
_x = double.Parse (value);
}
void TiltCallbackZ (YTilt sensor, string value)
{
_z = -double.Parse (value);
}
Then you must register these two callback functions with the registerValueCallback() function. These calls can be added at the end of the Start() method of the Player object.
{
...
string serial = module.get_serialNumber ();
tilt_x = YTilt.FindTilt (serial + ".tilt1");
tilt_y = YTilt.FindTilt (serial + ".tilt2");
tilt_x.registerValueCallback (TiltCallbackX);
tilt_y.registerValueCallback (TiltCallbackZ);
}
Finally, you must modify the FixedUpdate function to call the YAPI.HandleEvents() method and use the _x and _z attributes to compute the strength to apply to the ball. Again, don't use any get_XXX() function to avoid slowing down the execution.
{
string errmsg = "";
int res = YAPI.HandleEvents (ref errmsg);
if (res != YAPI.SUCCESS) {
errorText.text = errmsg;
return;
}
Vector3 movement = new Vector3 ((float)_x, 0.0f, (float)_z);
rb.AddForce (movement * speed);
}
Instead of taking 100ms, the new FixedUpdate function takes only a few milliseconds. The gain is just enormous. It is even more important as the FixedUpdate method is called in each frame, which has a considerable impact on the game framerate.
| Using callbacks, the framerate is much higher | ||
As usual, you can find the complete code of this example on GitHub.
Conclusion
Here we are, you now know how to efficiently use the Yoctopuce modules. In Unity, the difference is blatant and using callbacks is the only viable solution. But this technique can also be used in any other application. You can also manage other events by callbacks as we explained it in this previous post. Finally, each Yoctopuce library contains a Prog-Event-Based example illustrating the different ways to use the callbacks.


