 We showed you previously how to use a Yoctopuce screen to display information coming from Internet, such as an RSS feed or Google Calendar events. Today, we are going to show you how you can use a Yocto-Display to build an active control panel for an XBMC media center.
To build the control panel, we need a Yocto-Display and six buttons for top, bottom, left, right, OK, and back actions.
The Yocto-Display and the Yocto-MaxiDisplay are not simple screens: they embed the equivalent of a Yocto-Knob. On top of the display function (enabling you to interact with the screen) and of the files function (enabling you to upload images or fonts), they also have 6 anButton functions enabling you to measure the state of resistive components (switches, push buttons, potentiometers, and so on). These 6 functions can be used with the mini-buttons on the board. You can also solder your own buttons on the designed pads.

The Yocto-Display with 6 external buttons
To build this control panel, we wrote a short Python script that retrieves the title of the movie being read, that displays it on the Yocto-Display, and that sends to the XBMC the navigation commands when a button is pushed.
The XBMC API
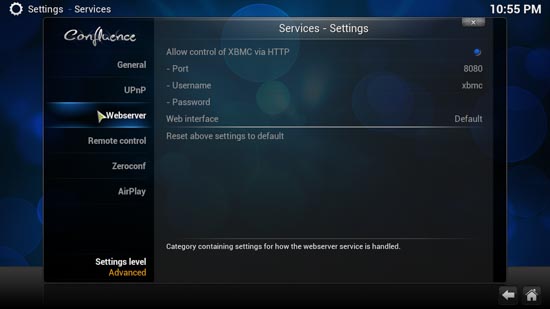
To interact with XBMC, we used the JSON-RPC API which is automatically installed. With this API, you can simulate any button of a remote control, but also retrieve information on the movie (or mp3) which is aired. This API follows the JSON-RPC protocol and is documented on the project web page (http://kodi.wiki/view/JSON-RPC_API). By default, this API is disabled. To use it, you must enable the "Allow control of XBMC via HTTP" option in the "Webserver" menu (available in the parameter "Service" section).

To use the JSON-RPC API, you must enable the 'Allow control of XBMC via HTTP' option
Several Python libraries implement only this protocol, but we decided to use the requests library which allows us to write any request based on the HTTP protocol.
A JSON-RPC request is nothing more than an HTTP POST request with a JSON structure containing the name of the function to be called ("method" field) and the parameters of this function ("params" field).
To communicate with XBMC, we implement a SimpleXBMC class containing a json_rpc_request method that takes as arguments the name of the XBMC function and its parameters, and that returns the result of the request. This class contains the methods up(), down(), right(), left(), ok(), back(), and get_player_info() which call the json_rpc_request method with the correct parameters.
def __init__(self, host, port, user, password):
self._url = 'http://%s:%d/jsonrpc' % (host, port)
def json_rpc_request(self, method, params):
headers = {'content-type': 'application/json'}
payload = {
"method": method,
"params": params,
"jsonrpc": "2.0",
"id": 0,
}
response = requests.post(
self._url, data=json.dumps(payload), headers=headers).json()
if 'error' in response:
print(response['error'])
return response
def up(self):
self.json_rpc_request('Input.Up', {})
....
xbmc_interface = SimpleXMBC('localhost', 80, 'xbmc', 'password')
xbmc_interface.up()
The Python script
The remainder of the script is rather similar to the Prog-EventBased example provided with the Yoctopuce Python library. We register the callback functions which are called each time a module is connected and each time the value of a function changes. If you have never used the RegisterDeviceArrivalCallback() or registerValueCallback(), we strongly advise you to read the the post describing how to use callbacks with the Yoctopuce API.
To send the commands ("up", "down", and so on) to XBMC each time a button is pushed, we must call the corresponding method of our xbmc_interface object from the an_button_callback() function.
The main function is made of an endless loop calling YAPI.UpdateDeviceList() and YAPI.Sleep(). In this endless loop, we retrieve the title with a call to xbmc_interface.get_info_to_display(), and we refresh the screen with this new information. So the main function performs the following tasks in a loop:
- displays on the screen the title of the movie
- checks whether we must call connection/disconnection callbacks
- checks during 1 second whether we must call value change callbacks
The screen is refreshed only once per second but, for this type of application, it is quite enough.
This script works therefore both in "polling" and in "callback" modes. Managing buttons is done in "callback" while screen refresh is done in "polling".
if (anbutton.get_isPressed() == YAnButton.ISPRESSED_TRUE):
last = anbutton.get_userData()
if last == YAnButton.ISPRESSED_FALSE:
funcid = anbutton.get_functionId()
if funcid == 'anButton1':
xbmc_interface.up()
elif funcid == 'anButton2':
xbmc_interface.down()
elif funcid == 'anButton3':
xbmc_interface.left()
elif funcid == 'anButton4':
xbmc_interface.right()
elif funcid == 'anButton5':
xbmc_interface.ok()
elif funcid == 'anButton6':
xbmc_interface.back()
anbutton.set_userData(anbutton.get_isPressed())
....
def main():
errmsg = YRefParam()
YAPI.RegisterDeviceArrivalCallback(device_arrival)
YAPI.RegisterDeviceRemovalCallback(device_removal)
if YAPI.RegisterHub("usb", errmsg) < 0:
print("Unable register usb :" + str(errmsg))
return -1
while True:
progress, title = xbmc_interface.get_info_to_display()
for display in display_list:
w = display.get_displayWidth()
h = display.get_displayHeight()
layer0 = display.get_displayLayer(0)
layer0.selectGrayPen(0)
layer0.drawBar(0, 0, w - 1, h - 1)
layer0.selectGrayPen(255)
layer0.drawText(w / 2, h / 2, YDisplayLayer.ALIGN.CENTER, title)
if progress > 0:
layer0.drawBar(0, h - 1, int(progress * w / 100), h - 1)
display.swapLayerContent(0, 1)
YAPI.UpdateDeviceList()
YAPI.Sleep(1000)
The complete source code is available on GitHub at the http://github.com/yoctopuce-examples/xbmc_remote address.
Conclusion
| And here is the proof that it works :-) | ||
In less than 200 lines, we have implemented an XBMC control panel. And as the Yoctopuce library doesn't require drivers, it works from the outset on any OS (Windows, Linux, and OS X). Dead easy :-)


