 Some time ago, we found a post where someone had built a device showing his schedule on his office door using Google Calendar. We liked the idea and, this week, we are going to show you how to display your appointments of the day on your fridge door using a Yocto-MaxiDisplay and a YoctoHub-Wireless-SR.
To display the day's events on a Yocto-MaxiDisplay, you must start by retrieving these events from Google Calendar. To do so, you need to authenticate yourself with Google, following the OAuth2 protocol. This protocol is far from trivial, particularly if you are not used to developing web applications. In order for this post to remain at an appropriate size, we are going to concentrate only on the inner workings and on the setup of our example on a web server. But if you wish to know more details on OAuth2, we have written another post explaining how it works.
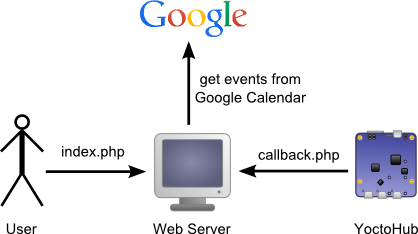
We are going to use three PHP scripts:
- An index.php configuration script which the user can view. This scripts negotiates access tokens with Google (using OAuth2) and saves them in a database.
- A callback.php script called by the YoctoHub-Wifi-SR. This script uses tokens (previously saved by the configuration script). It then questions the Google servers to retrieve the events to be displayed on the Yocto-MaxiDisplay.
- A common.php script containing functions used by the two preceding scripts. Database access functions are located in this file.

The user and the YoctoHub do not connect themselves on the same script
Google Developers Console
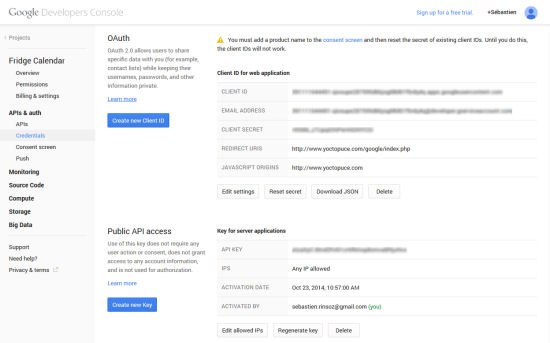
Before anything else, we must go to the "Developers Console" and create a new project. In the "APIs" section, we must activate the Calendar API so that our web application can access the user's calendar.
We must then generate several keys in order for our application to access Google services. We must create a developer key ("Public API access key"). We must make sure to select "Server key" when creating this key as it is the PHP script hosted on the web server (and not the module or the browser) that is going to contact the Google services.
Then we must create the OAuth keys ("Client ID"). When creating these keys, we must select "Web application" and provide the web server domain name as well as the URL of the script to be used if the authentication is successful. In our case, all the requests come from http://www.yoctopuce.com and if authentication is successful, we must run http://www.yoctopuce.com/google/index.php.

All the necessary keys are available in the API section.
Installing the libraries
For this project, we naturally need the Yoctopuce library available on our website or on GitHub. But we also need the Google API Client library available on GitHub (https://github.com/google/google-api-php-client.git). In PHP, we only need to copy the source files on our web server in a location that the three scripts can use.
Installing the project
It is important that we copy the three files on this project in the directory that we provided in the Google console. In our example, we must copy these three files in the /google directory because we said that our script was available with the http://www.yoctopuce.com/google/index.php URL.
We must edit the common.php file and modify the constants at the beginning of the file. We must update the DB_NAME, DB_USER, and DB_PASS constants with the parameters of our database. We must update the GOOGLE_CLIENT_ID, GOOGLE_CLIENT_SECRET, and GOOGLE_REDIRECT_URI constants with the keys generated in the Google Developer console. Finally, YOCTO_DISPLAY_SERIAL must correspond to the serial number of our Yocto-MaxiDisplay.
define('DB_USER', 'XXXXXXXXX');
define('DB_PASS', 'XXXXXXXXX');
define('GOOGLE_CLIENT_ID', 'XXXXXXXXXXXXXXXXXXXXXXXXXXXXXXXXX');
define('GOOGLE_CLIENT_SECRET', 'XXXXXXXXXXXXXXXXXXXXXXXXXXXXX');
define('GOOGLE_REDIRECT_URI', 'XXXXXXXXXXXXXXXXXXXXXXXXXXXXXX');
define('YOCTO_DISPLAY_SERIAL',"YD128X64-XXXXX");
We must also configure the YoctoHub-Wireless-SR so that it connects itself to our http://www.yoctopuce.com/google/callback.php callback. If you have never used HTTP callbacks with our products, have a look at this post which explains the process in details.
Updating the Yocto-MaxiDisplay
We are not going to detail each line of code because this post is long enough as it is. We are going to concentrate only on the part displaying the events on the Yocto-MaxiDisplay.
$display = YDisplay::FirstDisplay();
// iterate on all displays connected to the Hub
while ($display) {
// get the display serial number
$module = $display->module();
$serial = $module->get_serialNumber();
$events = getEventsFromSerial($serial);
if ($events) {
OutputMaxiDisplay($display, $events);
} else {
error2YDisplay($display, "Not registered");
}
// look if we get another display connected
$display = $display->nextDisplay();
}
The OutputMaxiDisplay function takes as parameters a YDisplay object and an array of events to be displayed. We divide the screen into only five lines of text so that the events can be read from far enough. Each text line is drawn with the drawText method using an ALIGN_TOP_LEFT anchoring. Which means that the text is displayed below and to the right of the X and Y coordinates. The first line contains the date of the first event (starting with "Today:" if it's today). Then we display as many events as possible.
A Yocto-MaxiDisplay follows the principle of superposed and independent layers. You can write and draw independently in each of the five layers. A trick to avoid flickering when refreshing the screen: we draw the new version on layer 0 (which is hidden by layers 1, 2, 3, and 4). When we are done drawing the layer, we request the screen to swap the content of layer 1 with that of layer 0 with the swapLayerContent method. In this way, the screen never displays an incomplete layer.
{
$layer0 = $display->get_displayLayer(0);
$layer0->clear();
$h = $display->get_displayHeight();
$w = $display->get_displayWidth();
$layer0->selectGrayPen(0);
$layer0->drawBar(0,0,$w-1,$h-1);
$layer0->selectGrayPen(255);
$nblines = 5;
$line_height = $h / $nblines;
$ev_pos = 0;
$today = date('D j M:', $events[0]['when']);
$last_day="";
for($i =0; $i < $nblines; $i++) {
$y =$line_height * $i;
$day = date('D j M:', $events[$ev_pos]['when']);
if ($last_day!=$day) {
if ($i==$nblines-1){
// do not display day header if it's the last line
break;
}
$last_day = $day;
if ($day==$today)
$day="TODAY: ".$day;
$layer0->drawBar(0,$y+8,$w-1,$y+8);
$layer0->drawText(2, $y,
YDisplayLayer::ALIGN_TOP_LEFT,
$day);
} else{
$layer0->drawText(10, $y,
YDisplayLayer::ALIGN_TOP_LEFT,
$events[$ev_pos]['what']);
$ev_pos++;
}
}
$display->swapLayerContent(0,1);
}
As usual, the code is available on GitHub and you can send us an email if there are parts that you don't understand.
Conclusion

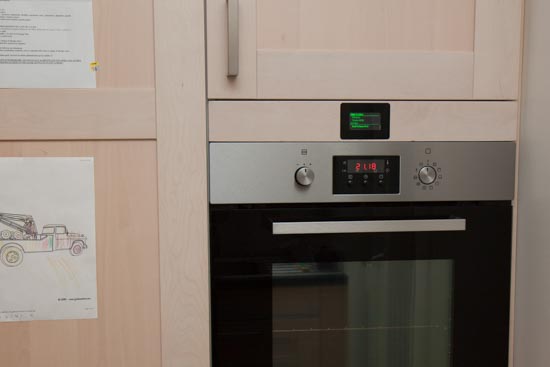
And here is a connected calendar
The only difficulty in this project is the OAuth 2.0 authentication. This authentication mechanism is very cunning, and it forces us to use a PHP script for the user and another one for the hub (plus another one to avoid writing twice the same functions). Apart from this, thanks to the Yocto-MaxiDisplay layer system, it is very easy to display the events on the screen.


